Matchbox 1/700 HMS Kelly
| KIT #: | PK 64 |
| PRICE: | AU$5.00 at a swap meet |
| DECALS: | yes |
| REVIEWER: | George Oh |
| NOTES: |
| HISTORY |
In 1942, Noel Coward produced and stared (along with other big stars Sir John Mills and Sir Richard Attenborough) in the patriotic film, “In Which We Serve”. It was a story of a WWII Royal Navy destroyer, HMS Torrin (played by HMAS Nepal), from the laying-down of her keel, to her eventual sinking in the Mediterranean Sea. Her veteran Commanding Officer, Captain E.V. Kinross, trains his men not only to be loyal to him, their ship, and their Country, but also to themselves (as a crew). They face challenges, lose some of their shipmates in action, and some of their loved ones at home. Despite this, the men of the Torrin serve valiantly and heroically. Most of the film is told via flashbacks of her survivors as the Torrin sinks. In actual fact, Coward’s screenplay was inspired by the WWII exploits of Captain Lord Louis Mountbatten, when he commanded the destroyer, HMS Kelly.
HMS Kelly was built by R&W Hawthorn, Leslie & Co
Ltd, in Hebburn in South Tyneside (in the north-east of England) from Aug
’37 to Aug ’39. She was the flotilla leader of the 8 x K-Class destroyers of
the Royal Navy – light destroyers that relied on torpedoes as their main
weapon, with guns as secondary armament. Her first wartime job was to bring
back to Britain, the Duke and Duchess of Windsor (formerly King Edward VIII
& Mrs Wallis Simpson). Later, Kelly was damaged by a storm and spent some
time in port, undergoing repairs. Back on operat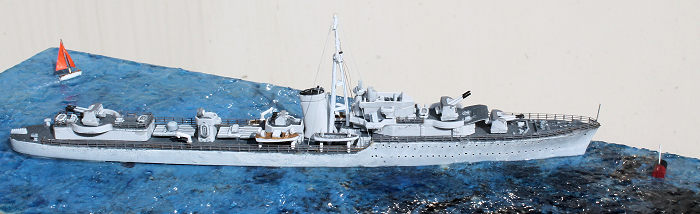 ions,
she struck a mine and spent another three months in port. But within two
days, she was back again after colliding with another destroyer. She was
repaired and sent to Norway where she was torpedoed by an S-Boat (aka, an
E-boat), and was towed home while fending-off more attackers. Repaired
again, HMS Kelly was sent into the Mediterranean Sea to escort Allied
convoys, attack Axis shipping, and bombard enemy positions. Her luck ran out
when she was sent to Crete to assist in the evacuation of British &
Commonwealth soldiers. Attacked by Stuka dive-bombers on 23 May, 1941, she
was hit and sank, losing about half of her compliment (of 218, all ranks).
ions,
she struck a mine and spent another three months in port. But within two
days, she was back again after colliding with another destroyer. She was
repaired and sent to Norway where she was torpedoed by an S-Boat (aka, an
E-boat), and was towed home while fending-off more attackers. Repaired
again, HMS Kelly was sent into the Mediterranean Sea to escort Allied
convoys, attack Axis shipping, and bombard enemy positions. Her luck ran out
when she was sent to Crete to assist in the evacuation of British &
Commonwealth soldiers. Attacked by Stuka dive-bombers on 23 May, 1941, she
was hit and sank, losing about half of her compliment (of 218, all ranks).
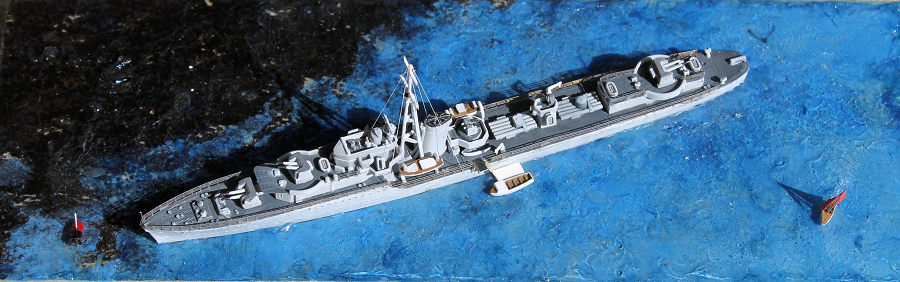
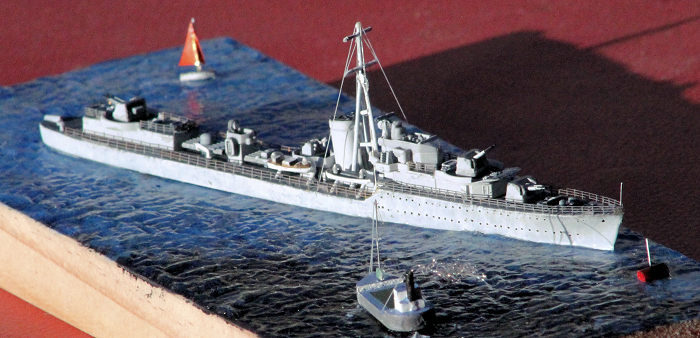
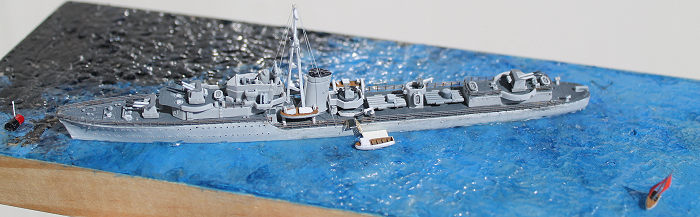
HMS Kelly was 356’ long and 36’wide (beam). She was armed with 10 x 21” torpedoes in 2 banks of five, 3 pairs of 4.7” cannons, and some smaller-calibre weapons. She displaced 2,400 tons, had a draft of 12’ and could charge along at 36 knots. The HMS Kelly Association hosts commemorations and reunions. Notable supporters of the Association are King Charles III and Sir John Mills. In Hebburn, the story of HMS Kelly and her crew is not forgotten, and is still a source of civic pride in the town. There is a public house called “The Kelly” and the local train station features artwork of the ship herself.
| THE KIT |
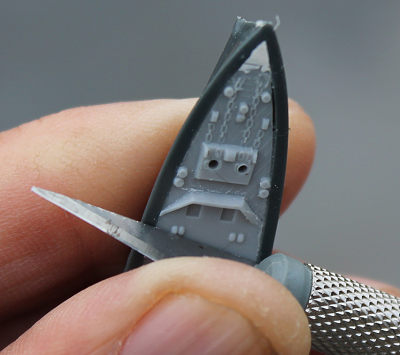
This kit hales from 1980. In 2013, it was released by Revell. It comes in two sprues – one each in dark grey and light grey. The weird thing is that the dark grey hull is to be painted light grey, and the light grey deck is to be painted dark grey. Smart thinking, Matchbox!! There are 102 parts with most common to Kelly & Kipling, and a few unique to each. Many are small. Most are tiny. Matchbox saves some parts because this is a waterline model. There is a little bit of flash, but slight mould-slip seams are everywhere. Fit is quite good. We modellers accept that moulding limits dictate that some parts WILL be over-scaled. White Ensign’s PE set 727, designed for this kit, will fix that (but I ‘aint got one – Rats!!!) This kit and PE set has been superseded by the Flyhawk kit.
 The
instructions are printed on a long foolscap sheet that provided 9 assembly steps
(12, if you include the 3 that identify differences for HMS Kipling). The
painting guide shows HMS Kelly in a pre-war light grey, but no deck colour, and
a wartime all-over sea grey. There is no information on HMS Kipling’s colours,
or a painting guide for some details – like the ship’s boats.
The
instructions are printed on a long foolscap sheet that provided 9 assembly steps
(12, if you include the 3 that identify differences for HMS Kipling). The
painting guide shows HMS Kelly in a pre-war light grey, but no deck colour, and
a wartime all-over sea grey. There is no information on HMS Kipling’s colours,
or a painting guide for some details – like the ship’s boats.
I bought this kit because, when I saw it for $10 at a Swap n’ Sell and asked about it, the seller offered it to me for $5 - which rounded-out the cost of my other purchases from him.
I started building it because I was examining the instructions and the plastic while watching “In Which We Serve” while My Lady was at work. I planned to build it as HMS Kelly.
There were three things I wanted to do with this model. I wanted to add PE railings (‘cos I reckon that a ship model looks wrong without them), place it at-anchor on a water base (‘cos I’m an amateur when it comes to modelling water), and I wanted to put a small sailing boat on the water with it (because I bought a set of PE sailing boats on a whim).
| CONSTRUCTION |
My initial plan was to thin the exposed, over-scaled edges, but that was too hard, so I stopped after doing only the sides of the hull at the step in the main deck. Unlike a plane, I sprayed all of the parts (less the deck) with a glossy dirty white that’ll do for the pre-war light grey. This allowed me to apply a dark wash where needed.
I sort-of followed the instructions in that I first assembled the major sub-assemblies – the hull, gun turrets, funnel, main superstructure and aft’ gun deck. With a spot of wax, I hoped to keep the turret guns movable. And I didn’t use the belly plate under the hull, because I wanted to mount the forward/A-turret and the banks of torpedo tubes at a later date, so that they would rotate. None of this worked because their small size meant that the liquid glue seeped everywhere. Rats!!!
 I used
the back of a knife blade to get the deck level with the sides of the hull. The
only (minor) problem was that the tip of the deck was missing - but a spot of
putty fixed that. With the deck in place (so that I could do the edges of the
hull parts at the same time), I brush-painted it with a medium grey that the
model’s small scale makes look very dark. While I was at it, the other
horizontal surfaces of other deck structures received the same dark grey. Then,
I pre-empted my placing this model onto a base by finding a suitable piece of
scrap board, then drilling two holes in it. Small-diameter bolts were pushed
onto the holes, and Kelly was balanced atop them. The bolts were affixed to the
underside of Kelly’s deck with a generous dollop of epoxy glue, then the hull
around them was filled with Milliput (for a bit of certainty.) Washers and nuts
underneath the board will pull the hull firmly down onto the surface. The board
was stippled with (cheap, old) dark blue poster paint, and then some black. I
used it as a handle to manipulate the ship and to steady it while I proceeded
with the construction.
I used
the back of a knife blade to get the deck level with the sides of the hull. The
only (minor) problem was that the tip of the deck was missing - but a spot of
putty fixed that. With the deck in place (so that I could do the edges of the
hull parts at the same time), I brush-painted it with a medium grey that the
model’s small scale makes look very dark. While I was at it, the other
horizontal surfaces of other deck structures received the same dark grey. Then,
I pre-empted my placing this model onto a base by finding a suitable piece of
scrap board, then drilling two holes in it. Small-diameter bolts were pushed
onto the holes, and Kelly was balanced atop them. The bolts were affixed to the
underside of Kelly’s deck with a generous dollop of epoxy glue, then the hull
around them was filled with Milliput (for a bit of certainty.) Washers and nuts
underneath the board will pull the hull firmly down onto the surface. The board
was stippled with (cheap, old) dark blue poster paint, and then some black. I
used it as a handle to manipulate the ship and to steady it while I proceeded
with the construction.
The turrets and torpedo banks were fitted into place, and their shafts were secured by their retaining rings. Even though I used the glue sparingly, most of them are locked in-place, in a fore/aft orientation (LESSON – next time, use a thick (not a thin runny) glue). The deck structures were also fitted in-place with only the (thick) tripod elements of the main mast requiring care to ensure that it was vertical, and the cross-trees horizontal and not twisted from the athwart-ship orientation. Fine tweezers were essential to position the multitude of tiny parts.
 This is when
I did the water, with something new to me – Wassereffekte/water effects from
Noch (in Germany?). It was thicker in viscosity than those things that cows drop
around their paddocks, looks like one but in opaque white, and it smears around
as easily as a fresh one. I covered the board with a thin layer that I trowelled-on
with a metal spoon (that I could wash later). Then I dabbed the surface with a
ball of loosely-crumpled kitchen foil (dipped in warm water first), to achieve a
flat yet uneven surface. The Kelly was added by pushing the bolts back into
their holes, then refitting the washers and nuts (and the ‘water’ didn’t flow
off the board). Tightening the nuts wasn’t an easy job (‘cos they were in
sockets in the underside of the board), but doing so pulled the hull into the
‘water’. I left it to dry overnight, and next morning, wow, was I impressed. The
‘water’ retained my imparted surface texture, didn’t run-off the edge of the
board, and it dried clear. Hopefully, it looks like shallow water that suddenly
drops-off into deeper water.
This is when
I did the water, with something new to me – Wassereffekte/water effects from
Noch (in Germany?). It was thicker in viscosity than those things that cows drop
around their paddocks, looks like one but in opaque white, and it smears around
as easily as a fresh one. I covered the board with a thin layer that I trowelled-on
with a metal spoon (that I could wash later). Then I dabbed the surface with a
ball of loosely-crumpled kitchen foil (dipped in warm water first), to achieve a
flat yet uneven surface. The Kelly was added by pushing the bolts back into
their holes, then refitting the washers and nuts (and the ‘water’ didn’t flow
off the board). Tightening the nuts wasn’t an easy job (‘cos they were in
sockets in the underside of the board), but doing so pulled the hull into the
‘water’. I left it to dry overnight, and next morning, wow, was I impressed. The
‘water’ retained my imparted surface texture, didn’t run-off the edge of the
board, and it dried clear. Hopefully, it looks like shallow water that suddenly
drops-off into deeper water.
I watched “In Which We Serve” again, and noticed that some of the kit details are different from the model. The positions of the quad-machineguns are one. They should be on the smaller bridge wings, not the larger ones. There was no paint guide for the ship’s boats (ships can carry a boat, but a boat can’t carry a ship), so I went with what would be visible, distinguishable, and plausible. And too colourful? Well my model IS of Kelly in her pre-war paint scheme. To maintain a clear run, I left-off some of the finer-detail parts because I wanted to attach the tiny railings. A plastic paint bottle was used to keep the PE in-line with the edge of the deck, and because they are very fine, a light touch was required to ensured that they dried in-contact with the deck as they were stitch-glued down. One thing I thought about adding to each boat, was a pair of crossed straps to stop them swinging while suspended from their davits. But the railings were already in-place, and so I couldn’t get to the base of the davits. (LESSON – Think BEFORE gluing).
With all of the known railings in-place, I hit the model with a coat of clear flat to hide all shiny glue spots. With the box-art as a guide, I put some of the rigging about the mast. Flag halyards were replicated from my fine Wife’s fine hair, and the stays for the mast were made from EZ-Line.
| OTHER STUFF |
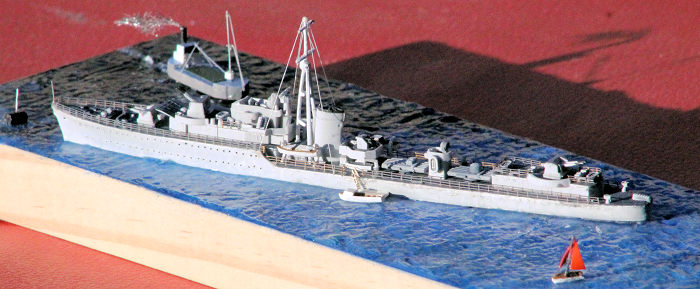
To justify the size of the base, I elected to spread a
few little bits around the Kelly. Now, I knew that I had the White Ensign Models
PE fret of RN Ship’s boats, so I wanted a sailing boat to occupy a corner of the
base. But there are problems with the beautiful White Ensign Models RN Ship’s
boats PE set. The set provides only the decks of the ship’s boats. The modeller
has to find, or scratch-build, the hull. This is a minor hindrance on the
smaller boats. I reckon that it would be harder to find a hull that is the exact
size and shape of a larger PE deck. The sails are flat (naturally), with details
on one side only (ditto), AND they incorporate the mast. To put them in a
sailing mode requires that they be worked to appear bowed-out/inflated. I did
this by lying them flat on a piece of felt, then rolling a pencil along the
trailing edges. But this action deforms the mast. To reinforce the mast, I
drilled through my carved hull and down into the base. A thin rigid wire
 was inserted
into the hole, and the mast was superglued to it. Not only does this prevent the
mast from being bent by a fat finger, but it also anchors the sailing boat
firmly to the water (and the base).
was inserted
into the hole, and the mast was superglued to it. Not only does this prevent the
mast from being bent by a fat finger, but it also anchors the sailing boat
firmly to the water (and the base).
During my search for my stock of 700-scale PE railing from Elementy in Eastern
Europe, I located the other goodies that I incorporated into this build. I found
a fret of stairs (and railings and open doors) from Chuanyu (in China?). I can
normalise the base by adding stairs that lead down to a pontoon (of scrap
plastic) and a boat (from the spares box and dressed-up). I put a buoy (from a
bit of sprue) near the bow of the Kelly. It, too, is pinned to the base.
I scratch-built a small supply boat, based on a model in the Smithsonian Institute. It is pinned to the base by a pin down through the funnel. Did you notice that its smoke (a bit of steel wool) trails-off in the same direction as the sailing boat is sailing? Wind, you know! I rigged it, too, because I was basing it on a known model, but I didn’t put railings around the bow or stern, because it isn’t the star of the base.
Post-photos additions.
The box-art shows two short masts near the stern, but they’re not supplied as parts. I replicated them with lengths of wire. The box-art shows 4 x (antenna?) lines running from the mast to the stern, but does not indicate where they terminate. They are supposed to terminate on a frame on the forward edge of the searchlight platform. I replicated the frame with a piece of 400-scale PE railing that is too weak to hold the lines. With no obvious option, I ran them to the forward edge of the X-turret deck-house. I sprinkled a number of Eduard IJN figures around the ships, just to bring them to life. I added time 3D-printed anchors to the bow, and tethered the bow to the buoy as, I believe, would be normal procedure.
| CONCLUSIONS |
The only thing I didn't do was to paint the anchor chain on the foc'scle because the etched-in detail was too fine. This build was hindered by the small size of parts (and their mould seams). Because of this, I would recommend it to a modeller with some ship-building experience. It was enhanced by how well the parts fit together. Its waterline format virtually demands that it be mounted on a water-base, which compels the modeller to experiment with that difficult modelling ability. I took the easy way out and made my ship at-anchor in calm water (rather than in a high sea. One of these days, I’ll try it. Perhaps.) because I’m not a water-making guru like Frank Spahr. But I did try to make a scene that looks realistic in its simplicity and serenity.
13 November 2023 Copyright ModelingMadness.com.
All rights reserved. No reproduction in part or in whole without express
permission. If you would like your product reviewed fairly and
fairly quickly, please
contact
the editor or see other details in the
Note to
Contributors.