Airfix 1/600 HMS Suffolk
| KIT #: | 03203 |
| PRICE: | $ |
| DECALS: | |
| REVIEWER: | Frank Spahr |
| NOTES: |
| HISTORY |
 The Royal Navy´s County Class of heavy cruisers
were constructed in the 1920s according to the limitations of the Washington
Naval Treaty. Displacement was limited to 10,000 tons, and the armament to a
calibre of eight inches. Of this class, thirteen vessels were built in three
subgroups, slightly differing in hull shape and protection. The Royal Australian
Navy received two vessels; three Counties were lost during World War 2. HMS
suffolk belonged to the first group of ships, the Kent class. She was laid won
in Portsmouth in 1924 and commissioned in 1928. Prior to WW2, she mainly served
on the China Station. Her comprehensive reconstruction in 1936 added a large
hangar, and her stern was lowered by one deck level to still comply to the
treaty tonnage restrictions. During the war, she was deployed around the world,
from Norway to Australia. Heavy damage off Norway by German bombers in 1940
necessitated long repairs. She participated in the hunt for the German
battleship Bismarck, shadowing her before and after the battle of the Denmark
Strait, where HMS Hood was lost and HMS Prince of Wales damaged.
The Royal Navy´s County Class of heavy cruisers
were constructed in the 1920s according to the limitations of the Washington
Naval Treaty. Displacement was limited to 10,000 tons, and the armament to a
calibre of eight inches. Of this class, thirteen vessels were built in three
subgroups, slightly differing in hull shape and protection. The Royal Australian
Navy received two vessels; three Counties were lost during World War 2. HMS
suffolk belonged to the first group of ships, the Kent class. She was laid won
in Portsmouth in 1924 and commissioned in 1928. Prior to WW2, she mainly served
on the China Station. Her comprehensive reconstruction in 1936 added a large
hangar, and her stern was lowered by one deck level to still comply to the
treaty tonnage restrictions. During the war, she was deployed around the world,
from Norway to Australia. Heavy damage off Norway by German bombers in 1940
necessitated long repairs. She participated in the hunt for the German
battleship Bismarck, shadowing her before and after the battle of the Denmark
Strait, where HMS Hood was lost and HMS Prince of Wales damaged.
| THE KIT |
In my youth, I built
almost all the Airfix 1:600 ship kits – but not this one. I´m interested in the
County Class of heavy cruisers, and when all those nice new 1:350 kits were
presented, I felt tempted. In the end I skipped a new kit and rather built a
classic. Given the price of the aftermarket parts I added, that wasn´t
necessarily that much cheaper, but it saved display space, and I was forced to
find my individual approach and my personal solution to the kit´s issues.
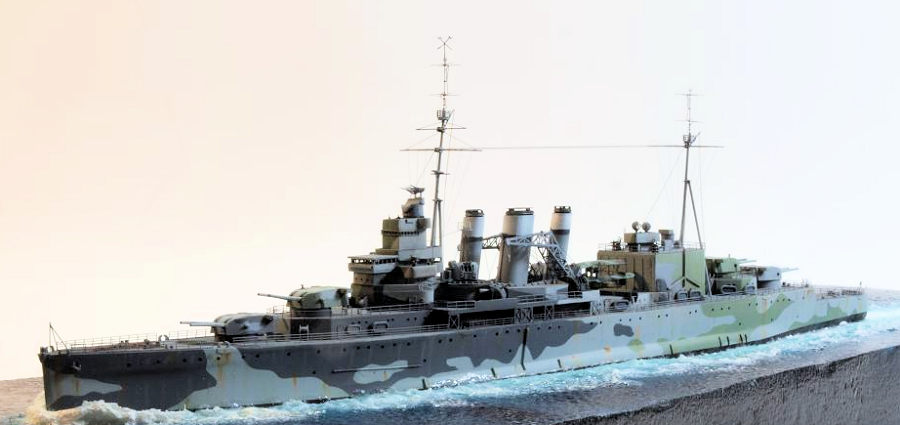
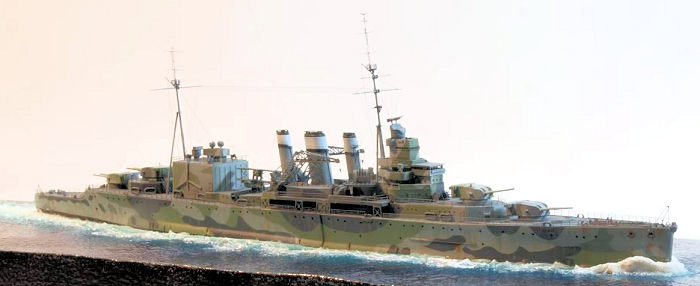
 The kit shows Suffolk
after her 1936 reconstruction, with the box-like and rather ungainly hangar and
the stern lowered by one deck. The kit is quite nicely detailed despite its 1964
vintage, but some parts are clunky and could do with a replacement. I did not
measure the kit.
The kit shows Suffolk
after her 1936 reconstruction, with the box-like and rather ungainly hangar and
the stern lowered by one deck. The kit is quite nicely detailed despite its 1964
vintage, but some parts are clunky and could do with a replacement. I did not
measure the kit.
I decided to build Suffolk in her 1942 fit, before she received a radar installation atop the hangar and additional AA guns. At that time, she sported an attractive yet tricky camouflage scheme.
I still had the WEM destroyer PE set in my stash, which also contains the parts for Suffolk, so this is what I used. These days, Atlantic Models has a new set for Suffolk with more and nicer parts, including the necessary railings (ATEM 60015). As the ship´s boats are rather crude, I replaced them with 3D printed items by Micromaster, who also provided very neat and highly detailed turrets for the primary and secondary armament. Apart from that, I would utilize the contents of my spare PE folder and whatever wire and styrene I had in stock.
| CONSTRUCTION |
I drilled open some of the scuttles, following period images. After gluing the hull halves I added a reception for the screws that would hold the model to my vise during construction. Some outboard details were added using styrene profiles. Quite early on in the project, I prepared the base in my usual method. Making the cutout was a bit tricky due to the bulging hull, but by cutting at an angle it worked out well enough.
Wherever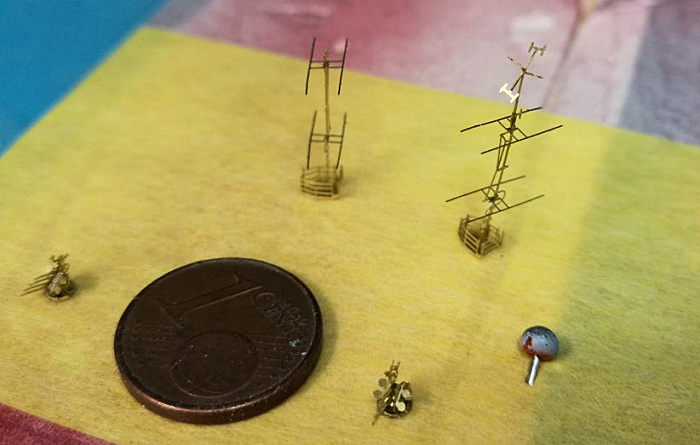 needed, I closed overly
large openings in the decks with stretched sprue. Following the WEM
instructions, I filled the catapult area with styrene. My main area of
reconstruction was the bridge area. I replaced the massive bridge with a
see-through version and enlarged the structure above the bridge. I replaced the
searlight platform atop the hangar and added some structures to the hangar
walls. Numerous scuttles were drilled open all around the superstructure, and a
lot of PE watertight doors were added.
needed, I closed overly
large openings in the decks with stretched sprue. Following the WEM
instructions, I filled the catapult area with styrene. My main area of
reconstruction was the bridge area. I replaced the massive bridge with a
see-through version and enlarged the structure above the bridge. I replaced the
searlight platform atop the hangar and added some structures to the hangar
walls. Numerous scuttles were drilled open all around the superstructure, and a
lot of PE watertight doors were added.
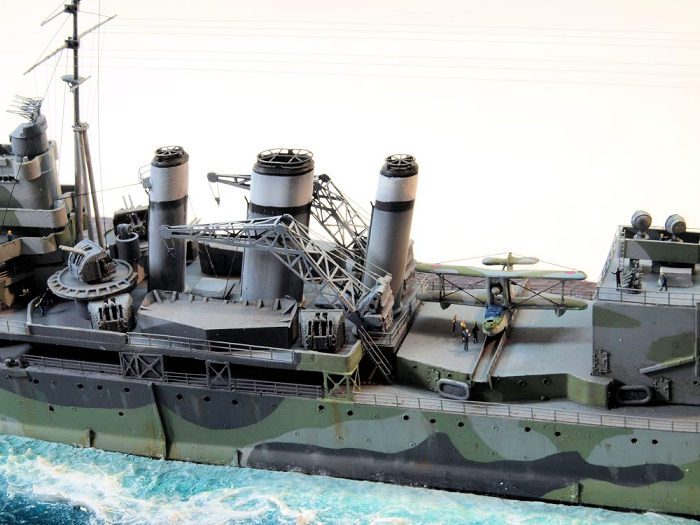
The iffiest PE parts were the masttop radar aerials and their platforms, which needed a lot of concentration. I have special glue application tools (basically wires of various diameters mounted to paintbrush handles), and they helped a lot. I couldn´t work without an optivisor, least of all in assembling the tiny Vickers .5 inch quad AA guns. The funnels received platforms and PE grilles, mounted on very small pieces of styrene as spacers.
I always try to get the masts look right scale-wise, and sturdy enough to withstand the tension of the rigging. This time I tried something new in mounting the yards to the masts, using stock PE perforated strips. That worked very well, same as using PE handwheels to fix the rear legs of the tripod masts. The longer yards are machined brass items from Master.
At the Walrus amphibian, I tried to make all the parts as thin as possible, and added the WEM PE parts. Using a razor saw, I tried to simulate some structure around the cockpit. The gun positions wer drilled out.
I was surprised how fast I had mounted the deck to the hull and had all my subassemblies ready for priming – plus having a completed base ready. That may have been due to those weird days in April 2020, when my dental practice had come to a virtual standstill and I had a lot of time on my hands.
| COLORS & MARKINGS |
Bitter experiences in the past have led me to degrease my models quite carefully and only to use Stynylrez primer on them. Hull and turret were primed in black, the subassemblies in grey.
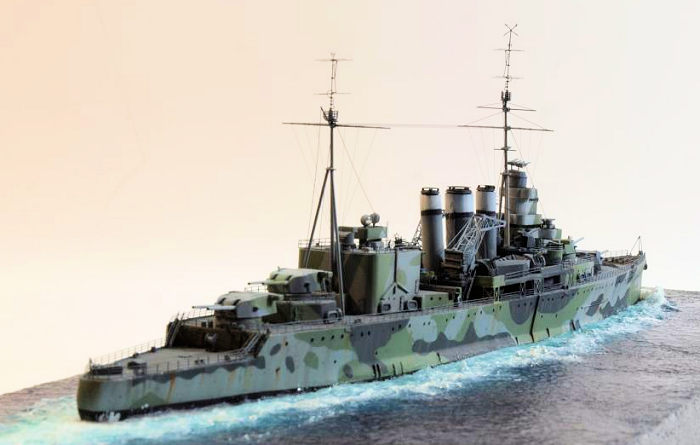
 A sizable period rich in masking
followed. First I masked the lower hull at the upper end of the boot topping. No
hull red would be visible in the end anyway. Then I sprayed the upper hull in a
dark grey that looked consistent with the darkest camo shade, AP 507 A. That
proper sahde looked too stark to me. Sadly I had relied on a table of
equivalents and had selected much too light shade for MS 3. It was hardly
distinguishable from the lightest shade, AP 507C. Sadly I only really accepted
that when I had masked and sprayed the entire camouflage. So it was back to the
drawing board, redo from start and make all individual masks afresh. Using
British Interior Green for MS3 looked much better to me and I was quite
satisfied with the end result.
A sizable period rich in masking
followed. First I masked the lower hull at the upper end of the boot topping. No
hull red would be visible in the end anyway. Then I sprayed the upper hull in a
dark grey that looked consistent with the darkest camo shade, AP 507 A. That
proper sahde looked too stark to me. Sadly I had relied on a table of
equivalents and had selected much too light shade for MS 3. It was hardly
distinguishable from the lightest shade, AP 507C. Sadly I only really accepted
that when I had masked and sprayed the entire camouflage. So it was back to the
drawing board, redo from start and make all individual masks afresh. Using
British Interior Green for MS3 looked much better to me and I was quite
satisfied with the end result.
I wasn´t done with masking yet, not by a long chalk. I now had to mask a lot of the superstructure to be able to spray the decks. It took time, but was worth it in the end. Now I had to successively mask and spray all the subassemblies to make them fit the camo scheme. That done, I added a dark wash for more definition and some weathering. The hull sides were weathered using artist´s oils, always trying to get the extent credible.
| FINAL CONSTRUCTION |
As usual, I worked from the centre to the periphery, to minimize the risk of damage. I added and rigged the masts, to mention one step, before adding any details to the bow and stern areas. For rigging, I used Albion Alloys .1 mm nickel silver wire, and UNI Caenis. When I had added all the railings and figures, the last items were the iffy masttop aerials, followed by my usual friendly flat coat of oblivion.
Now I only had to mount the model to the base. But. I had frequently and nervously eyed the completed base, and always with some sort of sinking feeling. Now, when the model was done and looked quite nice, I had to admit to myself that neither the colour nor the acrylic structures of the base looked like I would have wanted them to look.
 So I took several deep breaths,
and made a new base for the completed model, something I normally avoid. Luckily
only one boat boom fell victim to the process of fitting, but I wouldn´t want to
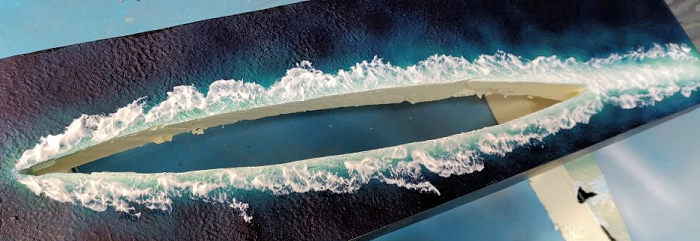
repeat it. This time, I applied the wave pattern prior to making the hull
cutout. That is definitely better than the other way around, as it leaves much
neater borders to the cutout. Having made sure the hull fit the base, I stippled
white wall paint onto the base and after drying sprayed the base green and blue,
without making any acrylic structures.
So I took several deep breaths,
and made a new base for the completed model, something I normally avoid. Luckily
only one boat boom fell victim to the process of fitting, but I wouldn´t want to
repeat it. This time, I applied the wave pattern prior to making the hull
cutout. That is definitely better than the other way around, as it leaves much
neater borders to the cutout. Having made sure the hull fit the base, I stippled
white wall paint onto the base and after drying sprayed the base green and blue,
without making any acrylic structures.
I now had a week curing time
before I could spray the solvent-based clear gloss coat. During that time, I
tested how to apply my wave and wake structures. I had recently received a new
clear gloss acrylic gel, very heavy in body. I made tests with that, using a
brush, and was quite happy with the results. It did shrink a lot, and would only
cure really transparent in rather thin layers. But I could easily apply several
layers, and the thicker areas would be painted white anyway. I also found out
that I could apply my white oil paint quite
 nicely using a piece of sponge, not
leaving any brush marks.
nicely using a piece of sponge, not
leaving any brush marks.
Having gloss coated the base, I applied my gel around the vessel, adding some cotton wool for the bow wave. After curing, I applied white artist´s oil paint where needed.
Finally, I was able to mount the model on the base and fill any gaps with acrylic gel, using an extra long „rigging brush“. Now I was done. Or was I?
No, I wasn´t.
I presented my model at the Airfix Tribute Forum, where hopeless Airfix addicts meet. A friendly fellow modelers liked my work, but told me I had used six instead of four twin four inch turrets, mis-interpreting my references. So I built two four barreled Pom-Poms from the WEM sheet, painted them and replaced the wrong turrets.
Now I was done. I had liked (almost) every step of the way. And I now have a unique model of a ship with a place in history.
| REFERENCES |
Brown, Les: County Class Cruisers (Shipcraft series.) Barnsley 2011
Raven, Alan / Roberts, John: British Cruisers of World War Two. Annapolis 1980.
https://www.world-war.co.uk/Kent/suffolk.php3
Frank Spahr
15 December 2020 Copyright ModelingMadness.com If you would like your product reviewed fairly and fairly quickly, please contact the editor or see other details in the
Note to
Contributors. Back to the Main Page
Back to the Review
Index Page
Back to the Previews Index Page