
Atlantic Models 1/350 HMS Cleopatra
| KIT #: | ATK-35006 |
| PRICE: | $104.95 plus postage |
| DECALS: | Multiple options |
| REVIEWER: | Frank Spahr |
| NOTES: | Resin multimedia kit |
| HISTORY |
The British Leander Class of Guided Missile Frigates comprised 26 vessels built in three batches over the space of 14 years (1959-73). It was the most numerous and long-lived Royal Navy postwar frigate class. The final British vessels were phased out in the 1990s. Several foreign navies licence-built Leanders or derivatives of the design.
 The original design was
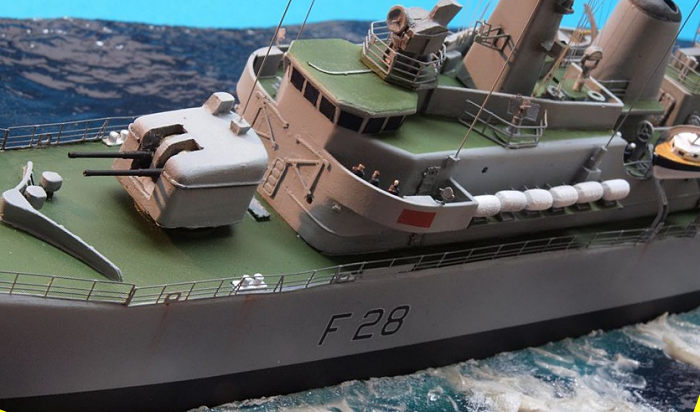
powered by steam turbines and was armed with a twin 4.5 in gun turret ahead of
the superstructure, two 20 mm Oerlikons for close range defence, a quadruple
Seacat missile launcher for aerial defence, plus a three-barreled „Limbo“ depth
charge mortar astern of the small helo deck. A Westland Wasp helo was shipped
for longer-range ASW missions. The stern housed a towed array sonar suite.
The original design was
powered by steam turbines and was armed with a twin 4.5 in gun turret ahead of
the superstructure, two 20 mm Oerlikons for close range defence, a quadruple
Seacat missile launcher for aerial defence, plus a three-barreled „Limbo“ depth
charge mortar astern of the small helo deck. A Westland Wasp helo was shipped
for longer-range ASW missions. The stern housed a towed array sonar suite.
During the service with the Royal Navy, numerous modifications were applied to individual ships or sub-groups. The limits of the given displacement led to the loss of some capabilities. Most of the vessels swapped their gun turret against either Exocet missile launchers or Ikara ASW missile launchers, plus additional Seacats.
Some vessels received the newer Seawolf surface-to-air missile system. The Limbo mortar was removed in favour of an enlarged flight deck able to operate the Lynx helicopter. Some vessels later on had a newer towed array system added. As the hangar space was needed for the system´s data processing, these ships lost their helicopter capacity in the process. Some later conversions instead used the former Seacat magazines and were able to retain the helo.
The Leanders were active throughout the world and in all the conflicts the RN participated during the period.
See the Wikipedia entry for Cleopatra´s service history.
| THE KIT |
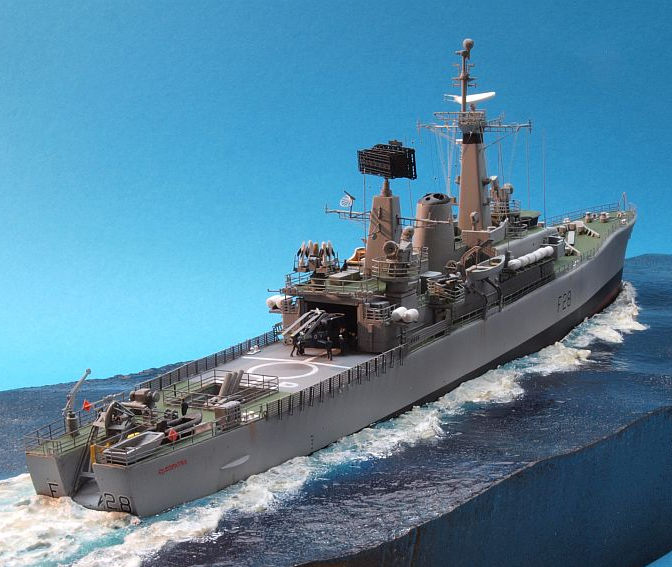
 Having already built HMS
Argonaut from the 1:600 Airfix kit, in her post-refit guise, I was happy to see
a classic gun Leander on offer from Atlantic Models, and ordered it. The kit
shows Cleopatra in her original guise, with the Limbo launcher, stern VDS and
Wasp helo. It´s a typical Atlantic Models kit with neat resin and superb PE
parts, not that nice looking yet usable white metal parts, plus comprehensive
decals. The build instructions are helpful and make sense. All in all a very
decent and virtually complete kit.
Having already built HMS
Argonaut from the 1:600 Airfix kit, in her post-refit guise, I was happy to see
a classic gun Leander on offer from Atlantic Models, and ordered it. The kit
shows Cleopatra in her original guise, with the Limbo launcher, stern VDS and
Wasp helo. It´s a typical Atlantic Models kit with neat resin and superb PE
parts, not that nice looking yet usable white metal parts, plus comprehensive
decals. The build instructions are helpful and make sense. All in all a very
decent and virtually complete kit.
I did order machined brass barrels with the kit, though, as I like them much better than the resin items, and I used 3D printed liferaft containers, even though they don´t actually save that much on work and don´t look radically better than the white metal items. I just had them lying around from an earlier project.
The kit comprises tan resin parts, one comprehensive PE fret or helo netting), white metal parts, some wire plus decals for all ships in class and comprehensive instructions. The hull is split at the waterline.
| CONSTRUCTION |
Having completed the Artitec Dutch version of the Leander after its midlife modernization, it felt natural to build the original. I pretty much knew what to expect from the kit, and wasn´t surprised. I started with assembling the hull parts, needing quite some filling of the waterline seam even after I had fit the parts together as best as I could. Zap a gap Medium CA, the glue of my choice for resin, helped as a filler, too. I checked the seam with applications of Stynylrez primer and corrected it until I felt it was OK. Traditionally, I start my subassemblies with the most intimidating PE, in this case the type 965 radar array for the main mast. It went surprisingly smooth, but obviously needed patience and dedication.
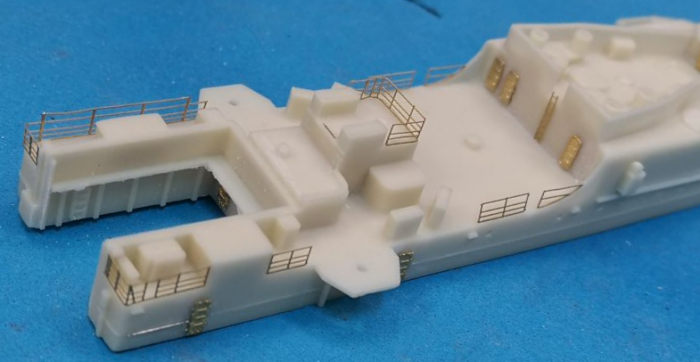 I then worked my way
through the superstructure blocks, trying to fit them to the deck as neatly as
possible, and detailing them with PE watertight doors. Those are crisper and
sharper than the casting. This kit has no molded on bridge windows nor decals to
represent them. I also couldn´t find PE railings with appropriate dimensions to
make window frames from. So I tried a different approach this time. I cut the
windows from what I believed is called furnace tape in English. It´s
self-adhesive aluminum tape from the hardware store. These parts were placed
where the windows are, and would later be painted blue. I also added most
superstructure railings prior to painting this time. The masts were demanding to
build, as well as the stern gantry for the VDS which took some figuring out how
to make it fit.
I then worked my way
through the superstructure blocks, trying to fit them to the deck as neatly as
possible, and detailing them with PE watertight doors. Those are crisper and
sharper than the casting. This kit has no molded on bridge windows nor decals to
represent them. I also couldn´t find PE railings with appropriate dimensions to
make window frames from. So I tried a different approach this time. I cut the
windows from what I believed is called furnace tape in English. It´s
self-adhesive aluminum tape from the hardware store. These parts were placed
where the windows are, and would later be painted blue. I also added most
superstructure railings prior to painting this time. The masts were demanding to
build, as well as the stern gantry for the VDS which took some figuring out how
to make it fit.
I prepared the base as usual, aiming at a livelier sea state with higher waves, but without any serious drama. That went fairly well, and the hull turned out to fit reasonably well after filling gaps with acrylic caulking. I prepared the livelier waves around the vessel with Winsor & Newton´s Heavy Carvable Modeling Paste. I applied it with a spatula and a sponge for finer structures.
On the whole, this was plain sailing and things went smoothly. After a few weeks, I had prepared all the subassemblies and started priming.
 The hull needed some
masking and re-masking for the several shades needed. I was especially happy to
build a vessel with a green deck, a welcome touch of colour amidst all those
warship greys. More colour is provided by the motor boat in blue and white with
wooden deck, the yellow towed sonar body, and the bright orange reflectors on
the danbuoys.
The hull needed some
masking and re-masking for the several shades needed. I was especially happy to
build a vessel with a green deck, a welcome touch of colour amidst all those
warship greys. More colour is provided by the motor boat in blue and white with
wooden deck, the yellow towed sonar body, and the bright orange reflectors on
the danbuoys.
The decals proved to be very brittle and hard to work with, and the white didn´t cover at all well. It may be the age of the decals, I didn´t have this issue with other kits of this manufacturer.
As usual, I had trouble fitting the main superstructure part neatly on the deck, despite all previous attempts at fitting it. It needed some filling with CA glue. The other parts fit well, especially the hangar roof which I only attached as late as possible. I then added the subassemblies from the centre outwards. I rigged the model once the main central subassemblies were on, to minimize collateral damage. I then also added the numerous HF antennae made from .2 mm nickel silver wire from Albion Alloys.
Having dispensed with the superstructure, I added the main deck railings alongside it. They were glued with medium CA, any gaps were closed with either CA or white glue. The railings had previously been sprayed medium grey primer, and the stanchions were hand painted in hull colour after adding the railings to the model.
 I added some „bracing“ to
the helo deck netting, working from reference images. I feel a bit more
structure improves their look. The Limbo launcher and its surrounding railings
as well as the VDS and its paraphernalia were then added.
I added some „bracing“ to
the helo deck netting, working from reference images. I feel a bit more
structure improves their look. The Limbo launcher and its surrounding railings
as well as the VDS and its paraphernalia were then added.
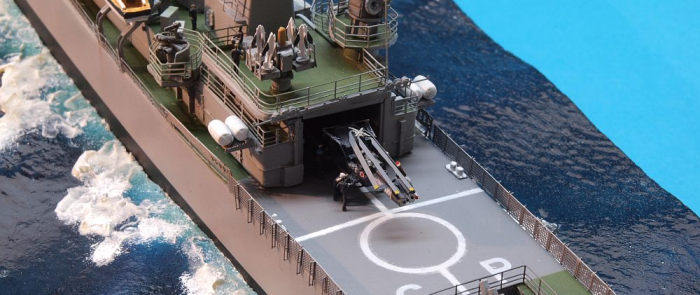
Then I added the railings ahead of the superstructure, the gun turret and anchor chains. Now it was time to tackle the helicopter. As the casting can´t reproduce the see-through and delicate look of the real thing, I decided to place the helo halfway inside the hangar so the focus is on the rear half of the machine. Building the PE undercarriage was iffy, but using metalizers on the exposed engine was fun. The decals, not so. But in the end it was done. Some figures had been added previously to the superstructure. Now, upon placing the helo on the deck, some more people were added, moving the machine.
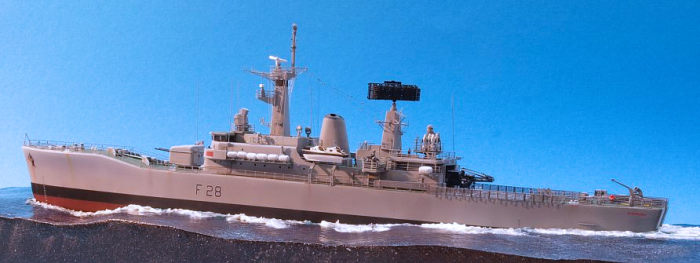
The vessel was only mildly weathered around the hull, and the final step was a flat coat leveling the general aspect and look of the model. I then placed it inside its cutout on the base and called things quits.
| CONCLUSIONS |
This was a neat and hassle-free build of a really complete kit, that ended up in an attractive model of the most numerous british postwar warship class. There are and will be kits of the other versions of the Leander by this manufacturer. I can wholeheartedly recommend this kit.
| REFERENCES |
Brown, D.K. : Rebuilding the Royal Navy. Barnsley 2012
https://en.wikipedia.org/wiki/Leander-class_frigate
https://www.helis.com/database/unit/479-HMS-Cleopatra
17 December 2021
Copyright ModelingMadness.com. All rights reserved. No reproduction in part or in whole without express permission.
If you would like your product reviewed fairly and fairly quickly, please contact the editor or see other details in the Note to Contributors.