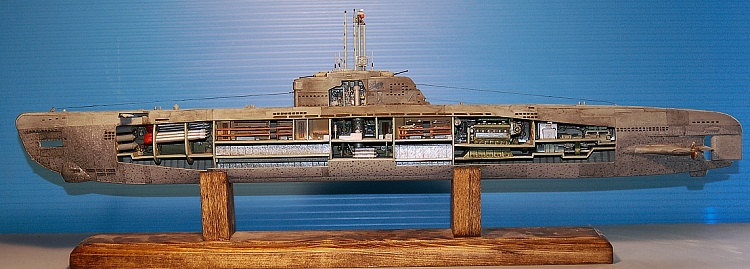
Revell AG 1/144 Type XXI Uboat
| KIT #: | 05078 |
| PRICE: | $21.99 |
| DECALS: | one option |
| REVIEWER: | Greg Ewald |
| NOTES: | Not for beginners, but rewarding. You are going to need decal solvents, and a good magnifying glass. |
| HISTORY |
The Germans built lots of whacky things during the second world war…some projects were supposed to ensure victory, like the Ratte ( a tank with naval guns., two 280mm’s !), the Project C carrier aircraft with parasite fighters, the submarine launched nuke capable V-2. Of all of these, the latter is the scariest…towed by the new Type 21 submarine in a special barge, it could be launched 100 kilometers from the target, and the deadly, silent submarine would make it’s way back to port to read of the devastation. Frightening, huh?
The Type XXI broke so much new ground in the field of submarines, that it is amazing (and lucky for the allies) that the German staff paid so little attention to it, preferring to cater to a madman’s desire for “bigger is better” weaponology. TC wrote a great bit of history on his build of the fully-hulled 21 here: http://modelingmadness.com/reviews/misc/ships/tmc21.htm
| THE KIT |
I picked this kit up on a lark,
and it sat on a shelf for quite a while, upon opening, I was amazed at the
quality of the kit construction…this one really delivers a good dollar
 value! The flash is nil,
but there are some sink marks, mostly covered up during assembly, and the light
gray plastic is easy to work with, a true delight to sand.
value! The flash is nil,
but there are some sink marks, mostly covered up during assembly, and the light
gray plastic is easy to work with, a true delight to sand.
There are over a hundred pieces that go into this gem, the fit is so/so, and careful test fitting is going to be required…so make sure you have some new #11 blades and a lot of sandpaper.
The decal sheet is tremendous, but quite thick, and it takes a lot of setting solution to get them to lay down, in some areas, it is simpler to paint the dials and doors. I had to overcoat every decal with future and then a flat finish, they just didn’t want to stay in place.
Being so for-warned, let’s get onto the build:
| CONSTRUCTION |
There are 54 steps of construction for this baby, definitely not a weekend kit ! Read over the instructions carefully, and come up with a plan to attack this one, I opted to ignore the assembly plans, and build everything up into sub-assemblies (how appropriate) to be put together at the very end.
 I started with step 12, and built up the sail first, painting the small pieces
as I went. Setting that aside to cure, I began on the forward torpedo room,
learning that the fit in some areas is somewhat strange, and does require a lot
of test fitting. The decals that have to be applied during construction also
silvered badly, and most were removed and the dials and switches hand-painted
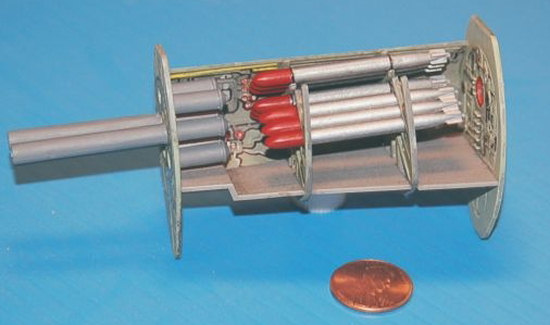
after that. Some of the torpedo banks ( they come molded in sets of three ) were
left off to keep from hiding details I had spent hours painting.
I started with step 12, and built up the sail first, painting the small pieces
as I went. Setting that aside to cure, I began on the forward torpedo room,
learning that the fit in some areas is somewhat strange, and does require a lot
of test fitting. The decals that have to be applied during construction also
silvered badly, and most were removed and the dials and switches hand-painted
after that. Some of the torpedo banks ( they come molded in sets of three ) were
left off to keep from hiding details I had spent hours painting.
During the construction process,
they want you to attach ladders that go fr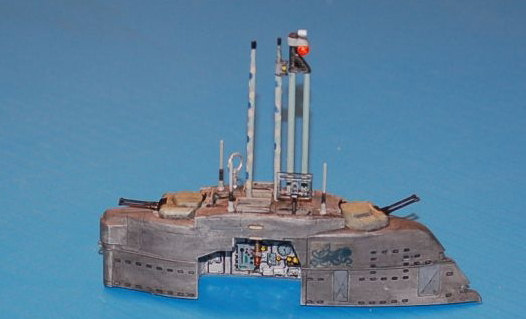 om
one level to another now and again, I prefer to wait until everything is
together, take a deep drink and a deep breath, and put them in using hemostats.
om
one level to another now and again, I prefer to wait until everything is
together, take a deep drink and a deep breath, and put them in using hemostats.
The only real issue in
construction of this sub was during step 43, the installation of the ove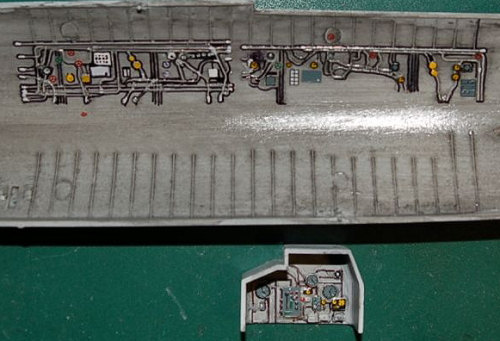 rhead
pipes that lead from the engine room to the sail. Check this fit very, very,
very carefully…you are going to have to notch out the bulkhead and if you get it
just a little off…well, you know the story.
rhead
pipes that lead from the engine room to the sail. Check this fit very, very,
very carefully…you are going to have to notch out the bulkhead and if you get it
just a little off…well, you know the story.
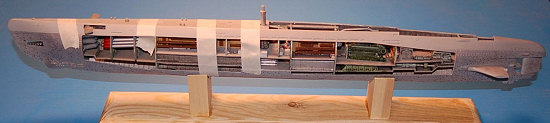
Once you have all of your insides
assembled, you can go ahead and place it into the starboard half of the hull…DO
NOT GLUE IT ! Yes, it is going to shimmy around, but wait until you get the
![]() other
half of the hull in place and set overnight before you even attempt to place the
interior permanently.
other
half of the hull in place and set overnight before you even attempt to place the
interior permanently.
Put on the deck and the sail, then gently maneuver the interior construction to the proper location (everything lines up) and then glue it with C/A and the wonderful capillary action that comes from this super glue. (get it…huh?)
 After adhering the
exterior bits from the early steps, such as the fins and screws, it is time for
some filling and a light sanding. The outside joints are actually quite nice,
and take a minimum of compound to bring up to par. The instructions call for
the builder to use stretched sprue to make a series of poles and ropes around
the deck of the submarine, but after talking to a few coffin-riders, I decided
not to put them on this model, as an underway sub probably wouldn’t run too
stealthy with all of those cables thrumming.
After adhering the
exterior bits from the early steps, such as the fins and screws, it is time for
some filling and a light sanding. The outside joints are actually quite nice,
and take a minimum of compound to bring up to par. The instructions call for
the builder to use stretched sprue to make a series of poles and ropes around
the deck of the submarine, but after talking to a few coffin-riders, I decided
not to put them on this model, as an underway sub probably wouldn’t run too
stealthy with all of those cables thrumming.
The main antennae wires were glued in place using monofilament, once dry, I added on the tackle points by just putting a bead of white glue on the line, then painting them dark grey.
| COLORS & MARKINGS |
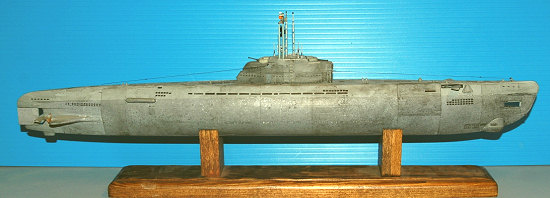
The two tone scheme for Type 21
u-boats isn’t that exciting, and I did want to make mine look a bit “aged”, so I
went with using a salt chip finish over the lower hulls
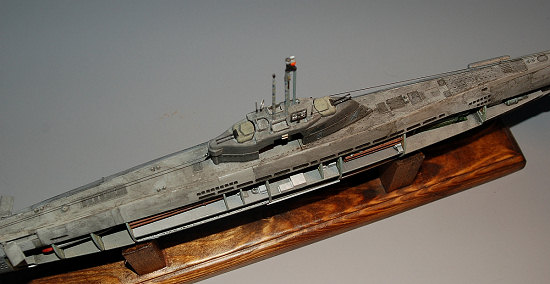 dark gray. The hull was
primed with light gray all over, then the upper portion was masked off. I
sprayed the hull with water, using a common hand pump spray, the type you can
pick up at a hardware store for about a dollar, then salted the hull with a
shaker, for the smaller pits I wanted, I used iodized table salt. Once dry, the
lower section was sprayed with aluminium, set aside, and the process repeated
again, without removing any of the salt still hanging on. Salted again, the
ship was beginning to resemble a barnacle encrusted wreck! A light misting of
lilac was applied, to simulate oxidized rust, then yet another salt layer…then,
finally, the overspray with dark gray. The model needed two days of dry time
before I could get the hull wet and gently remove the salt caked on the sides
with an old toothbrush and a 3M pad. Once the tape was removed I was very happy
with the results.
dark gray. The hull was
primed with light gray all over, then the upper portion was masked off. I
sprayed the hull with water, using a common hand pump spray, the type you can
pick up at a hardware store for about a dollar, then salted the hull with a
shaker, for the smaller pits I wanted, I used iodized table salt. Once dry, the
lower section was sprayed with aluminium, set aside, and the process repeated
again, without removing any of the salt still hanging on. Salted again, the
ship was beginning to resemble a barnacle encrusted wreck! A light misting of
lilac was applied, to simulate oxidized rust, then yet another salt layer…then,
finally, the overspray with dark gray. The model needed two days of dry time
before I could get the hull wet and gently remove the salt caked on the sides
with an old toothbrush and a 3M pad. Once the tape was removed I was very happy
with the results.
To make the separate panels of the hull stand out, a series of gray washes were applied to different areas of the boat and the sail.
| FINAL CONSTRUCTION |
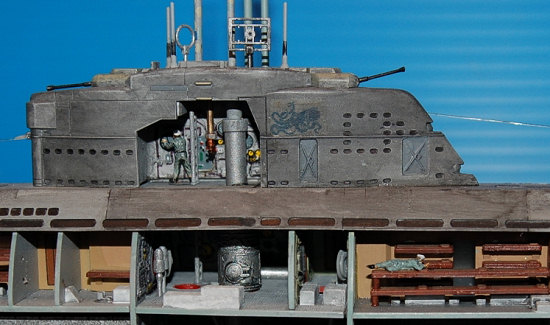 A small octopus decal
was placed on the sail, it seemed fitting to me, then the whole shebang was
coated with flat from a rattlecan.
A small octopus decal
was placed on the sail, it seemed fitting to me, then the whole shebang was
coated with flat from a rattlecan.
The flood holes and vents were done in black using a fine tip permanent marker after the final coat of flat was applied, if you do it beforehand, it will run right down the sides of your kit. Trust me, lesson learned the hard way.
Some 1/144 soldier figures were modified and placed in the sail and bunk-bed sections, to give it a sense of scale. God bless magnifying glasses.
| CONCLUSIONS |
For the money compared to sheer entertainment, this kit is a complete winner, though the fit is squirrelly, and the painting a daunting task. Total hours were over 50, much in painting the little dials and such.
| REFERENCES |
I couldn’t have done this without Frank Spahr’s photos and text on the IPMS site: http://www.ipmsstockholm.org/magazine/2003/11/detail_uboot_xxi_01.htm
For technical information, and general U Boat reference, look no further than: http://www.uboat.net/
If you are into weird WW2 ideas, pick up this book…highly recommended! http://www.amazon.com/My-Tank-Fight-Zack-Parsons/dp/0806527587
June 2007
Greg Ewald
Copyright ModelingMadness.com. All rights reserved.
If you would like your product reviewed fairly and fairly quickly, please contact the editor or see other details in the Note to Contributors.