
| KIT #: | 05208 |
| PRICE: | $20.00 MSRP |
| DECALS: | Two options |
| REVIEWER: | Greg Ewald |
| NOTES: | Good hull for multiple projects, make sure you have white putty. |
| HISTORY |
 The 97.5 meter
long hull of the modern research vessel has spawned a number of ships ( see
links below) that have state of the art systems for studying the depths of
our oceans and seas in a way that Cousteau’s Calypso never could (alas!).
No longer are scientists working from leaky WW2 cargo ships or converted
trawlers, but instead have access to some of the most radical engineering
in the world. Many of these ships have the ability to “hover” in a
particular spot (moving not more than 1 foot) for hours at a time, using
forced water jets linked to geosynchronous satellites, allowing the massive
winches and cranes to lower sensing equipment or ROV’s (remotely operated
vehicle) to a designated area day or night. Ships like the Meteor can
travel for almost 10,000 miles, carrying a 33 man crew and up to 30 working
scientists, plus all of the techno-do-dads for the incredible work they are
doing.
The 97.5 meter
long hull of the modern research vessel has spawned a number of ships ( see
links below) that have state of the art systems for studying the depths of
our oceans and seas in a way that Cousteau’s Calypso never could (alas!).
No longer are scientists working from leaky WW2 cargo ships or converted
trawlers, but instead have access to some of the most radical engineering
in the world. Many of these ships have the ability to “hover” in a
particular spot (moving not more than 1 foot) for hours at a time, using
forced water jets linked to geosynchronous satellites, allowing the massive
winches and cranes to lower sensing equipment or ROV’s (remotely operated
vehicle) to a designated area day or night. Ships like the Meteor can
travel for almost 10,000 miles, carrying a 33 man crew and up to 30 working
scientists, plus all of the techno-do-dads for the incredible work they are
doing.
The data yielded by such fieldwork is staggering, we have learned more about our planet in the last ten years than in the previous century, and the information continues to flow in daily. These simple hulls can be set and launched within a year, and outfitted in various configurations depending on the need of the country or society funding the oceanographic studies, making this a true “workhorse” vessel.
| THE KIT |
 The 181 pieces
contained in this kit go together to make a staggering ship, unfortunately
in a rather painful fashion. The plastic is very, very brittle and has
enough flash to make another ship (almost) ! Read the instructions over,
over, and over again…and hopefully you will not be as confused as I was
during the build. Whatever you do, don’t throw out the box, as you will
need the photographs on the side, and especially the cover painting for
reference.
The 181 pieces
contained in this kit go together to make a staggering ship, unfortunately
in a rather painful fashion. The plastic is very, very brittle and has
enough flash to make another ship (almost) ! Read the instructions over,
over, and over again…and hopefully you will not be as confused as I was
during the build. Whatever you do, don’t throw out the box, as you will
need the photographs on the side, and especially the cover painting for
reference.
The parts fit
fairly well together , but you are going to need a full tube of white putty
and a pair of hemostats or tweezers for fitting in the small (many of them)
bits and pieces. The railings are thick for the scale, and you might want
to try to find some photoetch replacements, as the kit’s can not be bent
into circles, or around the myriad complex corners o f
the different ship levels.
f
the different ship levels.
Painting is done during construction, mostly with a brush or marker. Also, the ship that is pictured here is a proposed design, and should be considered a “what if” at the moment. I used a piece of stretched sprue to paint the windows and portholes, a simple dunk into the paint jar, and then just press to the area to be painted, ‘viola !
| CONSTRUCTION |
First off,
you are going to want to build a hull jig, to hold the model during
construction, the included kit jig is garbage. I have built a series of
different sized hull jigs from scrap pine, cutting a sharp t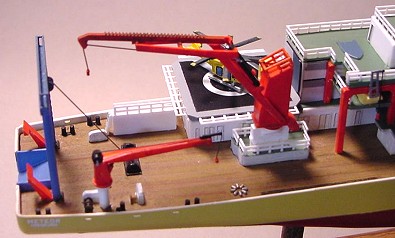 riangle in the
two uprights and then adhering some felt to the inside angles…this holds
the ship hull firmly at any angle, without marring the finish. After
cleaning off the flash (3 hours on mine), assembly starts with attaching
the port and starboard hulls to each other, set aside to dry very well.
While this is drying, you can begin work on the wooden portion of the deck,
if you haven’t read L. Roberto’s Constitution build, you might want to now…
riangle in the
two uprights and then adhering some felt to the inside angles…this holds
the ship hull firmly at any angle, without marring the finish. After
cleaning off the flash (3 hours on mine), assembly starts with attaching
the port and starboard hulls to each other, set aside to dry very well.
While this is drying, you can begin work on the wooden portion of the deck,
if you haven’t read L. Roberto’s Constitution build, you might want to now…![]()
http://modelingmadness.com/reviews/misc/robertoconst.htm
(he has a simple way of making wood decks look very convincing. The complex vertical structures should be prepainted, portholes, doors, etc. before gluing them in place, the whole thing goes together somewhat like a layered cake, and you want to make sure to put in as many of the small railings during the assembly as possible ( I did not, much to my regret).
 In step 3, the
foredeck has to have a slight bend in it, do that in small increments, and
keep on test fitting until you get the angle just right, then glue it down.
Note: I painted all of the matte green decks prior to assembly using
Testor’s Model Master “R.A.F. interior green”, it looks the most accurate
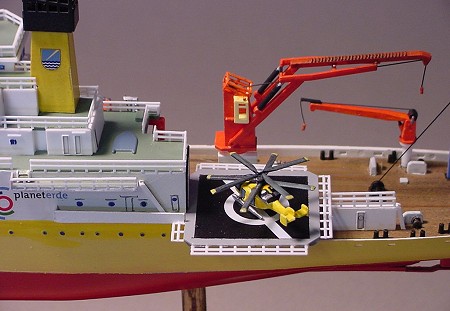
at scale. I knew this was going to be a “theoretical” ship, with a helo pad
and chopter, so I moved the main crane assembly to the aft middeck, to make
room for the scratchbuilt hangar and pad. In steps 4-12, the additional
decks keep on being layered , be sure to test fit every deck to the
vertical pieces as you go, and I recommend using a slow setting glue for
this bit, as I had to sand down various pieces here and there to get them
to work together. Once again, putty , sand, and paint before you put on the
next deck. Stairway pieces in two sizes are included on the sprues with the
railings, these have to be cut to the proper length, fitted and painted as
you add on each story.
In step 3, the
foredeck has to have a slight bend in it, do that in small increments, and
keep on test fitting until you get the angle just right, then glue it down.
Note: I painted all of the matte green decks prior to assembly using
Testor’s Model Master “R.A.F. interior green”, it looks the most accurate
at scale. I knew this was going to be a “theoretical” ship, with a helo pad
and chopter, so I moved the main crane assembly to the aft middeck, to make
room for the scratchbuilt hangar and pad. In steps 4-12, the additional
decks keep on being layered , be sure to test fit every deck to the
vertical pieces as you go, and I recommend using a slow setting glue for
this bit, as I had to sand down various pieces here and there to get them
to work together. Once again, putty , sand, and paint before you put on the
next deck. Stairway pieces in two sizes are included on the sprues with the
railings, these have to be cut to the proper length, fitted and painted as
you add on each story.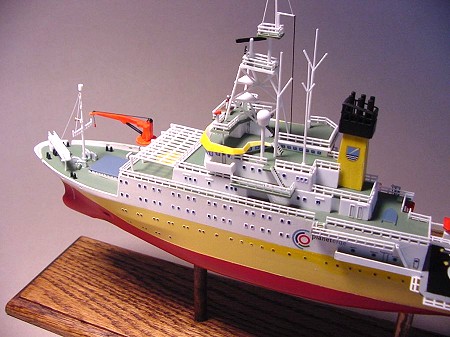
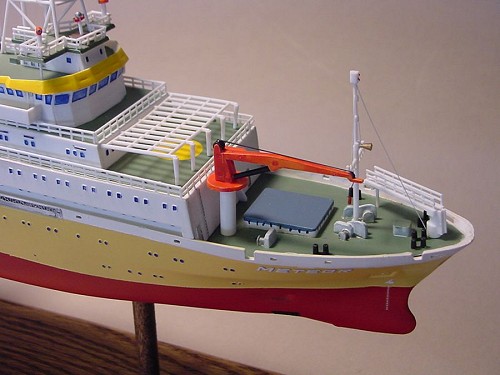
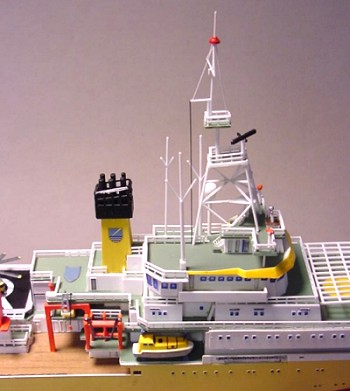
The exhaust funnel is going to take a little bit of work, but it is only in preparation to the fun you have assembly the main mast in step 13 ! I have never seen so many arrows going in different directions before in any instruction sheet, and it is somewhat hard to puzzle out exactly how this thing goes together. After a lot of test fitting, and some rather harsh language, I finally resorted to using contact cement (the rubbery stuff) to adhere the three main pieces together while arranging it on the decks it is attached to. The mast is located off center, so don’t be worried when the whole thing looks somewhat crooked, once it is in place, it comes out fine. Once you get the location puzzled out, affix it with ca glue, and take a deep breath. I ditched the kit triangle stands, and made new ones out of sheet styrene.
The antennae’s can either be put on prior to the railings, or after, be careful with these, as the plastic is so brittle that they can snap off easily. The cranes were put on before railings were added, painted in MM Coast Guard Orange for an accurate scale match.
I waited until the ship was basically done to put on the railings, which turned out to be an error on my part, as trying to fit every little piece in was a tactical nightmare. The railings are thick, but cut easily to fit into designated areas after measuring with a pair of calipers/dividers…it is just very tedious (enough to make you want to rig a biplane in 1/144th to relax).
| COLORS & MARKINGS |
 As noted
above, it really is best to paint as you go with this one, with all of the
different levels of little details adhered on. I changed the hull colour
to yellow after a discussion with some scientists on Tonmo in regards to
tropical temperatures, viewing that the dark blue would unnecessarily heat
the interior decks. The area below the waterline was painted with Krylon
primer red, then sprayed with a thinned down Insignia Red to add a bit more
“oomph”. Fittings and stanchions were painted according to the
instructions and a constant referral to websites and the box art. Using
light washes of medium gray, doors were accented, and then outlined with a
2B pencil for definition.
As noted
above, it really is best to paint as you go with this one, with all of the
different levels of little details adhered on. I changed the hull colour
to yellow after a discussion with some scientists on Tonmo in regards to
tropical temperatures, viewing that the dark blue would unnecessarily heat
the interior decks. The area below the waterline was painted with Krylon
primer red, then sprayed with a thinned down Insignia Red to add a bit more
“oomph”. Fittings and stanchions were painted according to the
instructions and a constant referral to websites and the box art. Using
light washes of medium gray, doors were accented, and then outlined with a
2B pencil for definition.
The decals go on without a hitch, you do get two different versions of the ship’s markings, but they are rather bland. Ah well.
| FINAL CONSTRUCTION |
The helipad
was made from grey sheet styrene, with undersupports of bass wood sanded
smooth, you could also use scale I-beams. I sheeted in the barn/hangar
with the same styrene, and added on some walkways for access. For the
Helicopter, 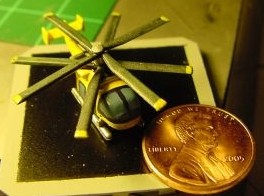 kitbashing and scratchbuilding created a Kamov-ish
counterrotating blade scout helicopter, starting with a 1/350 Seahawk left
over from another kit, and a fair amount of filler and sanding. Definitely
my smallest scratchbuild so far !
kitbashing and scratchbuilding created a Kamov-ish
counterrotating blade scout helicopter, starting with a 1/350 Seahawk left
over from another kit, and a fair amount of filler and sanding. Definitely
my smallest scratchbuild so far !
The mast was scratchbuilt from sprue, and a “devo hat” light was added for aircraft avoidance (remember, this ship has a helicopter). Rigging was done on a minimal level, as 1/300 scale lines would be almost invisible. Mast rigging was made from leftover white sprue, and the crane rigging from black, with small bits added to replicate the tackle.
| CONCLUSIONS |
For the $$, you get a lot of entertainment for quite a while. The redundancy of attaching railings can get old after awhile, but the “oohs and ahhs” of all visitors will help alleviate this. With it’s bright colours and impressive detail, it really sticks out in a sea of drab grey ships, and is a welcome break from most modern ship models.
| REFERENCES |
http://www.ifm.uni-kiel.de/ze/zs/ship.htm
http://www.researchvessels.org/
Review kit courtesy of: Myself and a sale at HobbyTown in Gilbert.
Greg Ewald
September 2005
If you would like your product reviewed fairly and fairly quickly, please contact the editor or see other details in the Note to Contributors.