Heller 1/200 Remorqueur Jean Bart/Utrecht
| KIT #: | |
| PRICE: | |
| DECALS: | |
| REVIEWER: | Frank Spahr |
| NOTES: |
| HISTORY |
 The
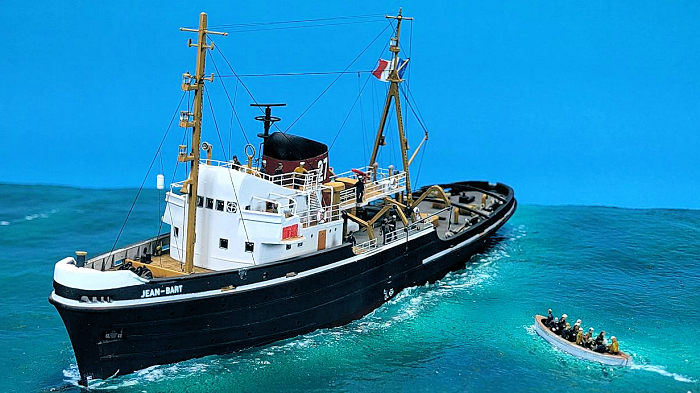
French salvage tug „Jean-Bart“ was built in 1956 by the shipyard Ateliers et
chantiers de France at Dunkirk for the Société de Remorquage et de Sauvetage du
Nord. Based at Boulogne-sur-Mer, it was tasked with assisting and protecting the
shipping in the English Channel (for the French: La Manche) and the Pas de
Calais. Between 1956 and 1965, the ship provided assistance to 45 vessels,
saving 673 lives. In January 1965, the vessel was decommissioned and sold to the
Dutch company Bureau Wijsmueller at Ijmuiden. In July of the same year, the ship
was recommissioned there under the name Utrecht. After its service there
concluded in 1977, the ship was sold to Greece and named Kriti. In 2001, the
vessel was renamed Ahli II and scrapped in India.
The
French salvage tug „Jean-Bart“ was built in 1956 by the shipyard Ateliers et
chantiers de France at Dunkirk for the Société de Remorquage et de Sauvetage du
Nord. Based at Boulogne-sur-Mer, it was tasked with assisting and protecting the
shipping in the English Channel (for the French: La Manche) and the Pas de
Calais. Between 1956 and 1965, the ship provided assistance to 45 vessels,
saving 673 lives. In January 1965, the vessel was decommissioned and sold to the
Dutch company Bureau Wijsmueller at Ijmuiden. In July of the same year, the ship
was recommissioned there under the name Utrecht. After its service there
concluded in 1977, the ship was sold to Greece and named Kriti. In 2001, the
vessel was renamed Ahli II and scrapped in India.
In 1967, Utrecht was amongst the ships assisting the supertanker Torrey Canyon, which had stranded on the Seven Stones reef off the Cornish coast due to navigation error. Sadly, all salvage efforts were in vain, and the tanker broke up, causing the first in a series of devastating oil spills. The British tried to ignite the cargo by aerial attacks via bombs, rockets and napalm canisters, but the crude oil could not be set on fire. Since then, numerous improvements to tanker safety have reduced the number of spills. But in a time with many aging vessels of unclear ownership plying the waves, oftentimes up to no good, another catastrophe is not inconceivable.
| THE KIT |
 According
to Scalemates, the molds for this kit date back to 1976. They seem to have kept
well, as the parts are quite crisp and neat, with fine rectangular bridge
windows, raised wooden deck details, and a lot of small parts detailed to a more
than just decent degree. The hull has no plating or straking structure molded
on, but it fits very well. The parts are molded in white. There are quite some
ejector pin marks, some of them at visible locations. The model will benefit
from their removal. A set of decals is included, and a length of anchor chain.
The instructions are fairly neat and clear, with colour callouts referring to
Humbrol shades throughout. As this is a dual combo, one can build one kit in
French and the other in Dutch markings. The model is about 26 cm / 10.5 inches
long. I would recommend this kit!
According
to Scalemates, the molds for this kit date back to 1976. They seem to have kept
well, as the parts are quite crisp and neat, with fine rectangular bridge
windows, raised wooden deck details, and a lot of small parts detailed to a more
than just decent degree. The hull has no plating or straking structure molded
on, but it fits very well. The parts are molded in white. There are quite some
ejector pin marks, some of them at visible locations. The model will benefit
from their removal. A set of decals is included, and a length of anchor chain.
The instructions are fairly neat and clear, with colour callouts referring to
Humbrol shades throughout. As this is a dual combo, one can build one kit in
French and the other in Dutch markings. The model is about 26 cm / 10.5 inches
long. I would recommend this kit!
| CONSTRUCTION |
 Having
built a string of aircraft kits, I felt I would enjoy building a ship again, but
not something too fiddly or involved. Something that would offer me some leeway.
So I chose this kit, of which I had bought the twin combo just a year or two
ago. I soon found that the parts fit well and, as stated above, the molds were
still in fine fettle. I started by assembling the hull halves and cleaning them
up, including drilling open the portholes. Likewise, I worked on the
superstructure and assembled most of the bigger parts, up to a point where I
could prime them. Ejector pin marks were filled with punched out disks of thin
styrene sheet and sanded over.
Having
built a string of aircraft kits, I felt I would enjoy building a ship again, but
not something too fiddly or involved. Something that would offer me some leeway.
So I chose this kit, of which I had bought the twin combo just a year or two
ago. I soon found that the parts fit well and, as stated above, the molds were
still in fine fettle. I started by assembling the hull halves and cleaning them
up, including drilling open the portholes. Likewise, I worked on the
superstructure and assembled most of the bigger parts, up to a point where I
could prime them. Ejector pin marks were filled with punched out disks of thin
styrene sheet and sanded over.
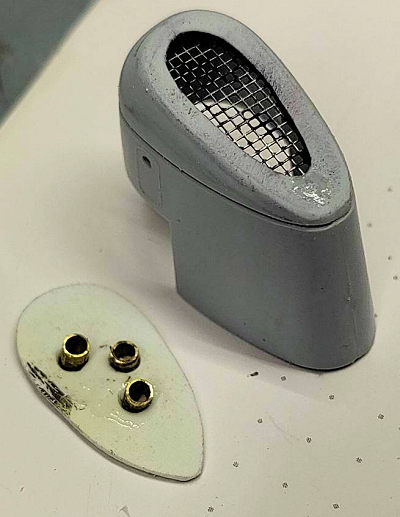
I looked for reference photos and found some really nice ones on the web, especially on a forum for Heller enthusiasts. After seeing them, some limited detailing was performed. The top of the kit´s funnel was closed, leaving no egress for exhaust gases. So I opened it and added a piece of PE grating, as I had seen it on a fellow modeler´s build. As he had used the plans obtainable by the Association of the friends of the Museum of the French Navy (Associations des Amis du Musée de la Marine), I reckoned that should be about right. I added an entirely spurious extra part with three exhaust pipes into the empty inside of the funnel.
I then cleaned up and somewhat refined the many small parts, drilled out cowl vents, searchlights, sirens and the like. The water cannon was detailed as per my reference images.
Parallel to that, I let presentation ideas bubble through my head. Like in a simmering stew, they popped up to the surface, languidly rotated, and then sunk, being replaced by others. But in the process, my ideas got more concrete step by step. Until I had decided what to do.
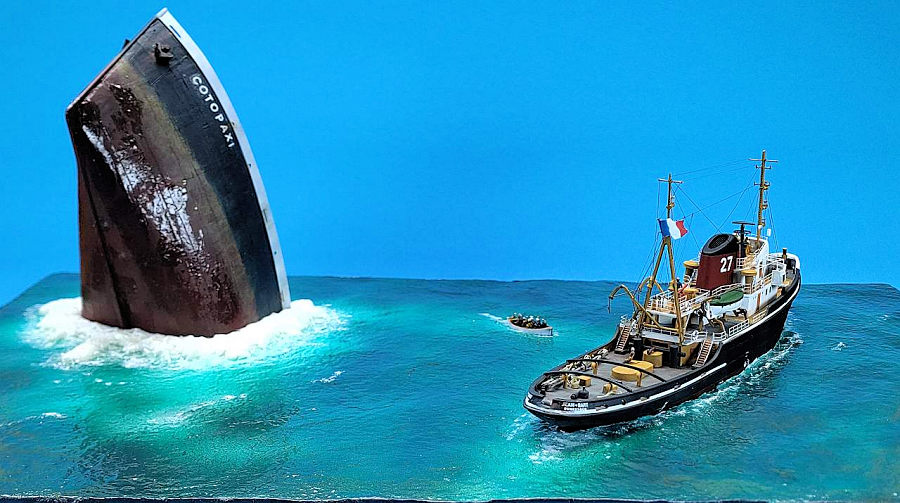
I chose a plastic transport box I already owned, and realized it would not house a base large enough for what I wanted to do. Which was, showing the tug together with a sinking vessel. So I made two baseplates which would fit together for presentation, and stacked above each other for transport inside the box. How to camouflage the centerline seam would be an interesting question.
| THE SINKING SHIP |
For the stricken vessel, I toyed with the idea of buying a paper/cardboard kit and use part of it, painted and detailed. But in the end I was too mean for that, as the paper kit would easily have cost twice as much as the twin plastic kits. So I searched around, until I found plans for a Liberty ship which I could scale up to the 1:200 scale needed. I decided to only use the bow section.
My inspration was the outstanding miniature work by A.A. Gillespie and his team for „The Wreck of the Mary Deare“, a 1959 movie by Michael Anderson. It starred Charlton Heston, Gary Cooper, Richard Harris – and the 1:16 scale miniature of the titular vessel, more than 30 feet long, and filmed in a vast tank with razor-sharp looking reefs.
 Kind“ by
Steven Spielberg in 1979, as the Cotopaxi, inexplicably stranded in the midst of
a desert.
Kind“ by
Steven Spielberg in 1979, as the Cotopaxi, inexplicably stranded in the midst of
a desert.
Somehow I freely associated the shipwreck scene from the beginning of „Indiana Jones and the Last Crusade“, where the vessel Coronado goes to the bottom almost vertically after Indy has saved the cross of Coronado – and his beloved Fedora. Intrigued, I looked at the hull structure of the miniatures, and also at the rivet-studded hull of the „Jean-Bart“ evident in one of my reference images. Moreover, I recalled an image in a German propaganda book from WW2 of a sinking vessel which looks uncannily similar to the scene in Indiana Jones.
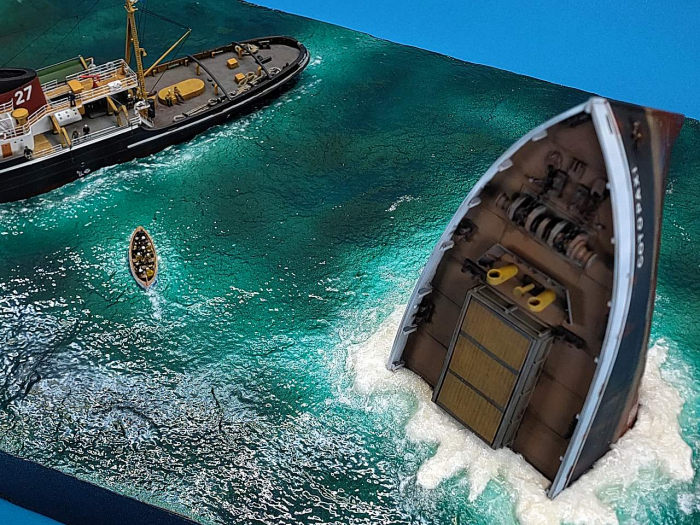
So I would try to create a section of a composite vessel, devoid of any historical accuracy, its bow almost vertically in the aft half of my base.
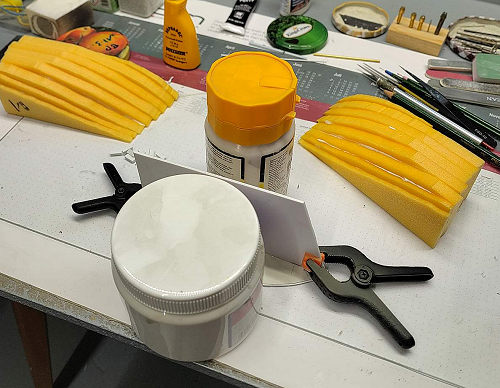
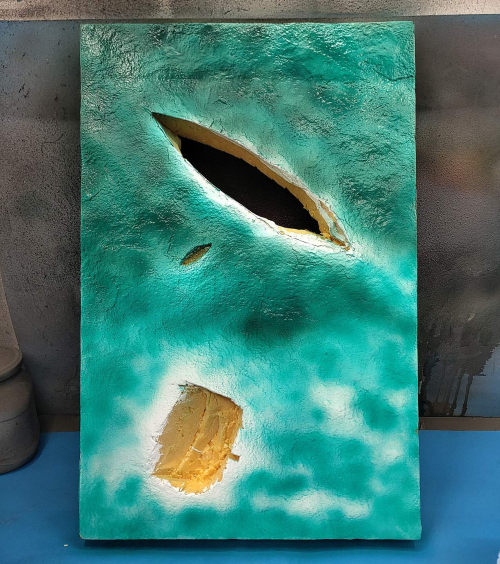
I started with the freely available plans for the Liberty Ship, which I downloaded, cropped and printed to the desired size and extent. I cut the deck plan and the side elevation of the hull out and glued them to styrene sheeting. These were glued together with some styrene blocks added for stability. For the hull form, I traced the various horizontal sections and cut pieces of foam board of the required height to the shapes needed. These I sandwiched and then sanded them as smooth as I could. They were then glued to the styrene „backbone“ using PVA. I used Winsor & Newton´s Heavy Carvable Modeling Paste as a putty, smoothened with wet fingers.
 The
various deck fittings were made from styrene stock, aided with generic PE
handwheels for the windlass. That actually was a fun project all around. Having
copious walkaround photos from the extant Liberty Ship Jeremiah O´Brien helped a
lot. After removing the paper template from the deck, I added stanchions and a
bulwark from styrene stock, and I drilled holes for the anchor chain. The one
cargo hatch in my bow section was made from a core of foam board clad with
styrene stock, and a cover made of structured styrene.
The
various deck fittings were made from styrene stock, aided with generic PE
handwheels for the windlass. That actually was a fun project all around. Having
copious walkaround photos from the extant Liberty Ship Jeremiah O´Brien helped a
lot. After removing the paper template from the deck, I added stanchions and a
bulwark from styrene stock, and I drilled holes for the anchor chain. The one
cargo hatch in my bow section was made from a core of foam board clad with
styrene stock, and a cover made of structured styrene.
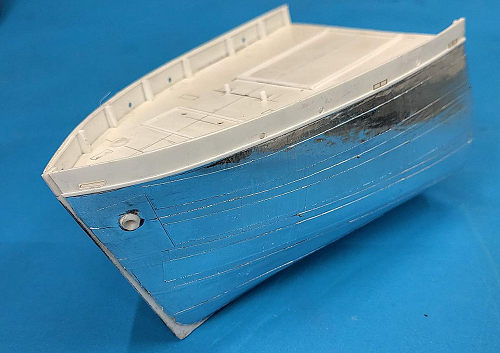
Having blended in the hull with the bulwark using more putty and PVA glue, I then started sheathing the hull with sections of thin self-adhesive aluminum foil. I tried to simulate riveting with a riveting wheel, but that did not look right to me, so I redid the whole process.
Having primed the scratchbuilt parts and the bow section, I structured my base using a gas torch, as always with the required caution. I then made cutouts for the hulls of both vessels in the base.
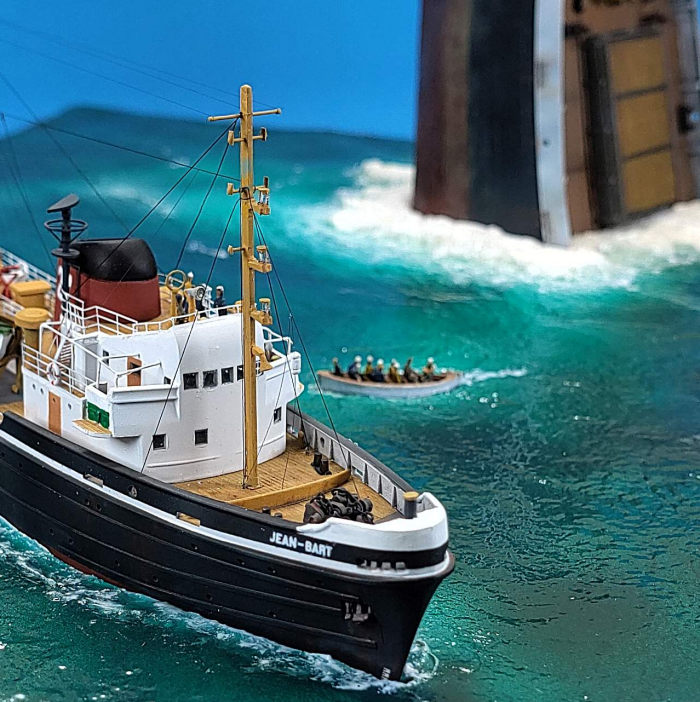
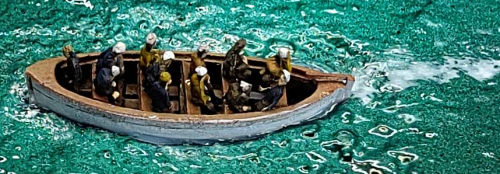 At about
that time I realized I needed something between the vessels, and what better
than one of the tug´s boats loaded with the sinking freighter´s survivors. So I
converted one of the two boats. They are provided with canvas covers firmly in
place, so I needed to remove the top, clear up the molded-on coverings and
straps from the hull, make some bit of an interior with an engine and thwarts –
the works. Which, again, was more fun than expected. I now added a third cutout
into the base for the boat. While I was at it, I also worked on one of the
davits, with the aim of showing it deployed and waiting to pick up the boat
again. I also replaced the rather clunky portside radar array with a homemade
one, made from various brass tubings and yet another handwheel.
At about
that time I realized I needed something between the vessels, and what better
than one of the tug´s boats loaded with the sinking freighter´s survivors. So I
converted one of the two boats. They are provided with canvas covers firmly in
place, so I needed to remove the top, clear up the molded-on coverings and
straps from the hull, make some bit of an interior with an engine and thwarts –
the works. Which, again, was more fun than expected. I now added a third cutout
into the base for the boat. While I was at it, I also worked on one of the
davits, with the aim of showing it deployed and waiting to pick up the boat
again. I also replaced the rather clunky portside radar array with a homemade
one, made from various brass tubings and yet another handwheel.
Before continuing, I did some cleanup work on the base´s surface, especially at the seam, and then puttied the base over, again using the heavy carvable paste. Some days later, I found an affordable storage box which was just a tad too small for my composite base, and bought it. My rationale was to avoid having a seam on the base. So I made a new, smaller base, which fitted just into the new box, and proceeded as with the original one. I also made a thin piece of foam fitting the perimeter of the sinking vessel on the seascape, trying to make the foaming water as a separate and easier manageable piece.
| COLORS & MARKINGS |
 I started
with paint on the sinking vessel. After my primer had cured thoroughly, I first
sprayed the deck brown, taking care not to let the paint cover - instant
weathering. Then the hull was sprayed in various shades of black, brown and red
to arrive at a credible shade for the lower hull, before masking this and
spraying the upper hull blackish grey. Having masked that, and the deck, I
sprayed the bulwark white inside and out, taking care to let black and grey
shine through, and arriving at a patchy and weathered look.
I started
with paint on the sinking vessel. After my primer had cured thoroughly, I first
sprayed the deck brown, taking care not to let the paint cover - instant
weathering. Then the hull was sprayed in various shades of black, brown and red
to arrive at a credible shade for the lower hull, before masking this and
spraying the upper hull blackish grey. Having masked that, and the deck, I
sprayed the bulwark white inside and out, taking care to let black and grey
shine through, and arriving at a patchy and weathered look.
Upon removing the masks, I experienced some liftoff at the rear part, but was able to repair it. I then gave the hull a good coat of Future in preparation for the name decals.
I had bought dry transfers in a 4mm (16 pt) font, but was afraid my flimsy hull would not like being attacked with a pencil whilst rubbing the transfers on. So I instead transferred them to clear decal sheet, and coated them with Microscale Liquid Decal Film to give them at least a modicum of stability. If that failed, I was prepared to print the name in black on clear decal film, and apply it to the white bulwark area.
The morning after I faced the music and tried applying the decals. The first issue being, would the fragile dry transfers remain on the very thin decal film? The second, had the very thin decal film withstood the rather vigorous rubbing with a pencil needed to transfer the letters? Moreover, had the Liquid Decal Film worked?
Luckily, yes to all three. It actually worked like a charm. I cut the names in half, as I had a misalignment in the middle, and was able to improve on that. I added a bit of Micro Set to help them conform to the surface irregularities, and let it all cure. I also sanded the base and applied a second layer of white wall paint.
| CONSTRUCTION CONTINUES |
 Having cut
my left thumb whilst trying to trim the thin foam surround for the sinking
vessel, I paused for a day, and then continued. Trimming and thinning completed
without further blood loss, I rolled a ball of crumpled aluminum foil over the
piece, adding some surface texture to it.
Having cut
my left thumb whilst trying to trim the thin foam surround for the sinking
vessel, I paused for a day, and then continued. Trimming and thinning completed
without further blood loss, I rolled a ball of crumpled aluminum foil over the
piece, adding some surface texture to it.
I then sprayed the piece pure white, and let it cure. Having made some test pieces in the same manner, I next tried adding heavy clear gloss gel with some added micro-globes you use together with CA glue.
Things slowed down from then on. I sprayed the base green and left some white shining through. I weathered the bow section and added my scratchbuilt deck fittings, but the crucial issue of the churned water surrounding the sinking ship stalled. I made two more and slightly narrower pieces to work on, and tried some materials I had in my stash but hadn´t used before. I had hoped to create a surface that was bubbly and shiny and reminded of the effects seen in movies. In the end I had to concede defeat, and applied cotton wool over the piece, which I sprayed with Future to blend the loose fibres in as best I could. Attempts at spraying white paint over the wool didn´t improve the impression, so were discarded.
I then tackled the two masts, which had some nasty sink marks and, being styrene, were not sturdy enough. So I was happy to find a length of 1x2 mm rectangular brass, which I sawed, bent and soldered. The holes for the yards and the bracing on the main mast were drilled with .6 mm micro drills in my cordless handpiece, using drilling oil for lubrication and as a coolant.
Having prepared my subassemblies as far as I could, a period of procrastination followed, whilst I was indecisive what to do with the churned water. Moreover, it got quite cold in my basement den. But at some point I decided to continue, as I could not see how to improve on the surround.
So I slid it over the bow section, applied clear gloss acrylic gel and glued the piece to the base, securing it with pins. I removed the bow section immediately to prevent it getting accidentally glued to the base as well.
Over the next few days, I primed the parts for the tug, and applied several layers of clear gloss acrylic gel to the surround and its environs, trying to blend it into the base and achieve a bit of depth. Once cured, I drybrushed white oil paint to the gel, using a piece of foam as applicator. I also randomly added some gel to the cotton wool, and some white paint plus Future for good measure. Until I felt reasonably satisfied for the time being.
Work on the tug continued by masking and spraying the hull, the decks and the superstructure. I experienced paint liftoff on parts of the hull, despite seemingly adequate prepping. But there might have been some vaseline residue on the hull, who knew? I was miffed at seeing severe paint liftoff at the funnel, which hadn´t had any contact with vaseline. I was left with removing the paint, and lightly sanding the areas, plus rubbing the parts off with white spirit.
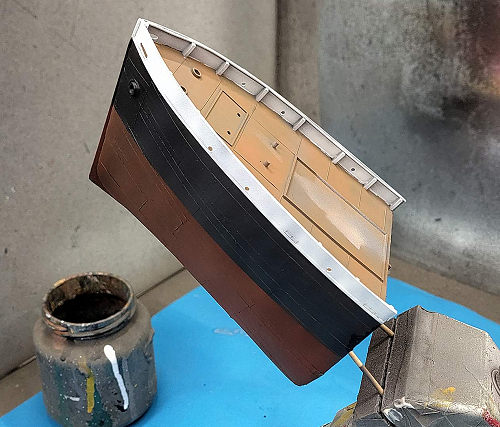
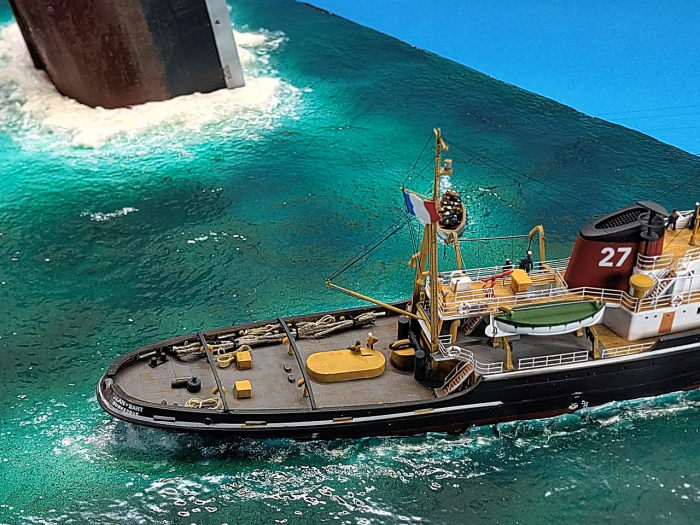
 The next
attempt at painting worked fine. It was a bit tricky to mask the white stripes
on the hull, but in the end it worked. I sprayed the inside of the bulwarks
white for the fore and ochre/spar for the main deck. I had seen that the vessel
had been repainted at some point of her career, and decided not to be too rigid
in adhering to the painting instructions.
The next
attempt at painting worked fine. It was a bit tricky to mask the white stripes
on the hull, but in the end it worked. I sprayed the inside of the bulwarks
white for the fore and ochre/spar for the main deck. I had seen that the vessel
had been repainted at some point of her career, and decided not to be too rigid
in adhering to the painting instructions.
The wooden decks were sprayed a light buff and afterwards drybrushed with brown oil paint, which seemed like an adequate look to me.
Having completed spraying and having made touchups where necessary, I started assembly with the aft part of the deck, followed by the bulkhead and the fore deck, and then the prepared superstructure and the funnel. It all fit very well, and is a testimony to the sound work of Heller staff so many years ago. I only had to tweak a bit at the aft end of the upper deck, as its supports would not align properly as built.
All that cured, I sprayed the model with Future, and after curing applied the decals. They were in turn coated with Future to blend them in, and the whole model flatcoated prior to further work. I then tried to prepare the various bits and pieces for assembly, and there are quite some of them. I also addressed the issue of inclined ladders and railings. I found a very old and discontinued PE sheet once issued by a leading German manufacturer of card model sheets. HMV. That was in 1:250 scale, but luckily some of the inclined ladders were long enough for use, and the railings worked not too bad, too. I used Saemann railings for some areas, though, as they fit better. I had to cheat a bit with the two inclined ladders leading to the aft deck, as they were too short. Styrene blocks helped a bit. All those parts were painted now.
I then started adding the numerous searchlights, binnacles, engine telegraphs to the model, adding homemade voicepipes from .5 mm solder wire for good measure. I had ordered a fresh supply of lacklustre generic 1:200 scale figures, and selected about a dozen of them for my crew. They were mounted on a piece of styrene to ease painting.
Now I did my main weathering, both of the hull and the decks and superstructures, using at this stage artist´s oils exclusively. I added a red, a brown and a black wash to the decks, always allowing curing time between applications. I also added the anchor chains at this stage, after having treated them with blackening solution.
 Now I
could start adding the PE railings. I did not do that earlier as I wanted free
access to the decks and their nooks and crannies for my weathering, and wanted
to avoid collateral damage. Having attached all the PE railings and the inclined
ladders, I used PVA glue to blend them in where there were gaps or steps,
followed by paint touchups. I also added a screw to the starboard lifeboat,
using a small PE handwheel, and a rudder. I had found a framework for an awning
over the bridge wings on reference images, and replicated that using wire.
Now I
could start adding the PE railings. I did not do that earlier as I wanted free
access to the decks and their nooks and crannies for my weathering, and wanted
to avoid collateral damage. Having attached all the PE railings and the inclined
ladders, I used PVA glue to blend them in where there were gaps or steps,
followed by paint touchups. I also added a screw to the starboard lifeboat,
using a small PE handwheel, and a rudder. I had found a framework for an awning
over the bridge wings on reference images, and replicated that using wire.
Having (not without issues and cracks in my normally sunny mood) completed all that, I glued the prepainted lacklustre figures to the model, and then attached the starboard boat to its davit. Now I was able to add the two masts, and start rigging.
I used black UNI thread for the derrick and stays, glued with CA glue. Which needed quite some time to cure, so I only ever did a few lines at a time, and then did something that didn´t get so much on my nerves. Bit of a rigging-life-balance.
That done, it was time for the really last bits and pieces, as in what details were to be placed on the aft deck, inclduing some homemade rope coils and the like. Some final paint touchups were followed by a friendly flat coat of forgiveness and oblivion.
I then placed the three models (wreck, lifeboat and tug) onto the base, only the lifeboat needed blending in with acrylic gel. The remaining gaps around the tug are mostly hidden under the stern hull overhang.
| CONCLUSIONS |
In fact, it was Jim Baumann who coaxed me into this build, by saying it would be nice to see a new maritime project after so many aircraft over the last year. In retrospect, I´m glad he did, because this was a project right up or down my street. I was able to include the new challenge of scratchbuilding a larger item, combining it with my favourite pastime of toying with classic kits. What´s not to love about it?
| REFERENCES |
https://www.shipsnostalgia.com/media/utrecht-torrey-canyon.465387/
https://player.bfi.org.uk/free/film/watch-bombing-of-the-torrey-canyon-1967-online
https://www.christians-modellwerft.de/ausgeflaggt-verkauft/jean-bart/
https://heller-forever.forumactif.com/t4656-remorqueur-jean-bart-1-200eme-ref-602
https://www.modelshipsinthecinema.com/2013/01/the-wreck-of-mary-deare-1959.html
23 February 2026
Copyright ModelingMadness.com. All rights reserved. No reproduction in part or in whole without express permission.
If you would like your product reviewed fairly and fairly quickly, please contact the editor or see other details in the Note to Contributors.