| KIT #: | 0398 |
| PRICE: | $ 69.95 |
| DECALS: | none |
| REVIEWER: | Dietmar Carstensen |
| NOTES: |
| HISTORY |
The Constitution was in service of the US Navy for about 80 years, from 1798
until 1879.
So she took part of a long period of American history.
She sailed first on July 22nd, 1798. Than she began serving as a flagship of a
little squadron in the Caribbean sea.
 From 1803 until 1807 she fought against north African
states in
the Mediterranean. From 1809 until 1812 she was the
flagship of the North Atlantic squadron.
From 1803 until 1807 she fought against north African
states in
the Mediterranean. From 1809 until 1812 she was the
flagship of the North Atlantic squadron.
The Constitution had here most excited period during the war against the Royal
Navy
On February 20th, 1815, the Constitution fought against two English frigates at
the
Her wartime period now came to an end. But the Constitution again served in the
Mediterranean, and from 1839 she sailed in the Pacific Ocean.
From 1844 until 1846 the Constitution sailed around the world.
During the Civil War (1861-1865) she sailed as a training frigate for
non-commissioned officers and until 1878 she was a training ship for midshipmen.
1878 the Constitution sailed the goods for the World Exhibition to Le Havre. She
stayed
at
That was her last long voyage. Her carrier ended 1879 at Portsmouth.
| THE KIT |
 Revell's
Constitution in 1/96 is a very good kit.
Revell's
Constitution in 1/96 is a very good kit.
It is
possible to build a beautiful and very detailed model straight out of the box.
The rigging
plans provided with my kit, already bought in 1992, are very detailed and
understandable.
The modeller
will learn much about the standing and running rigging of a sailing ship.
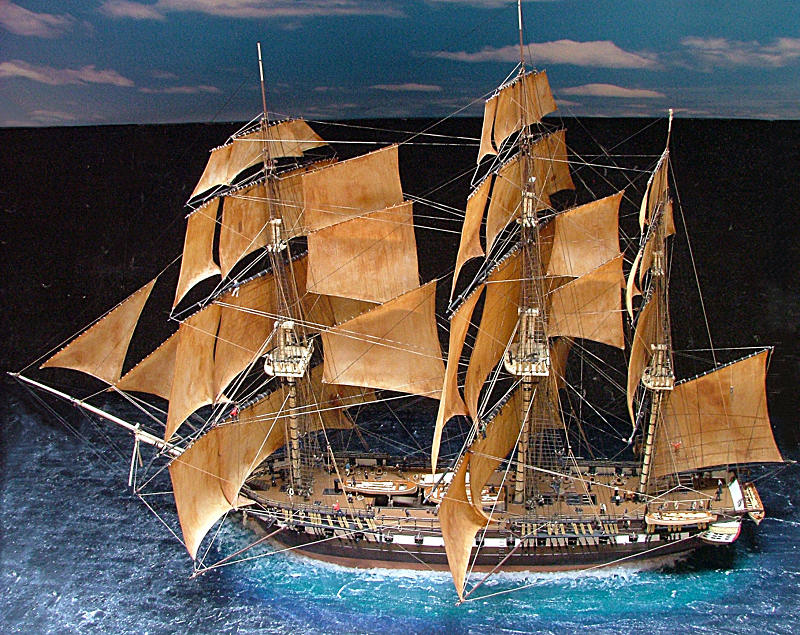
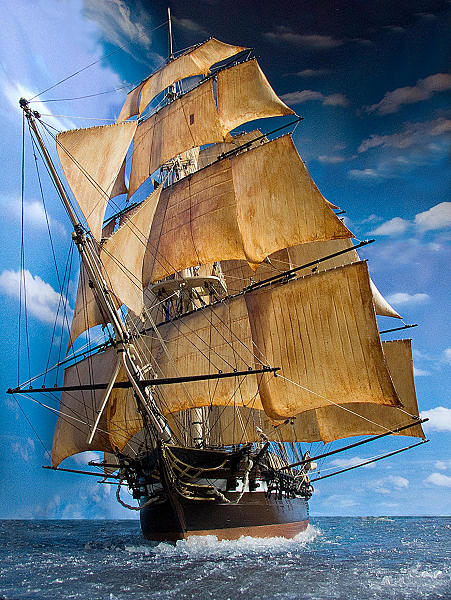
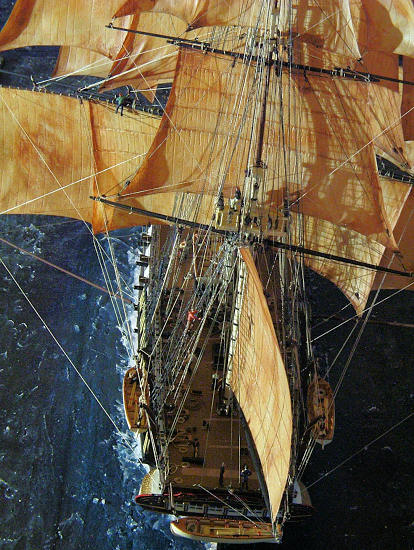
The kit
contains plastic sails, which have a fine and realistic structure. Depending on
the
| CONSTRUCTION |
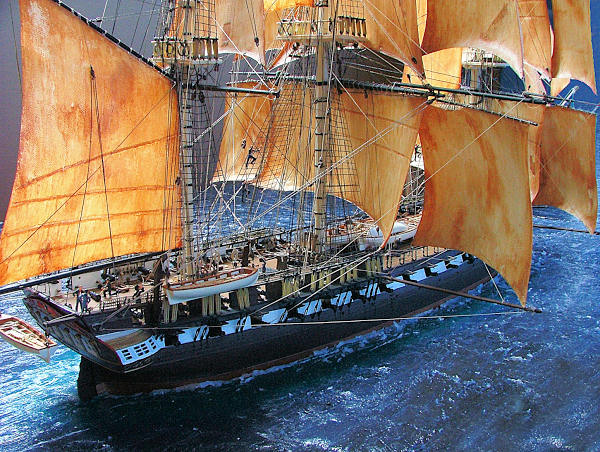
Weathering of
the sails have been done here by using extremely thinned acrylic paint from
Tamiya.
Yellow, brown and white with a high amount acrylic thinner have been mixed to a
dirty brown-coloured substance and have been applied to the sails by using a
thick paintbrush.
Depending on
the effect you prefer to create sails, which like old and weathered, you can
apply more paint on the edges and corners of the sails. Before this mixture
begins to dry,
rub it on the
surface of the sail by using a piece of soft paper until you get the desired
effect.
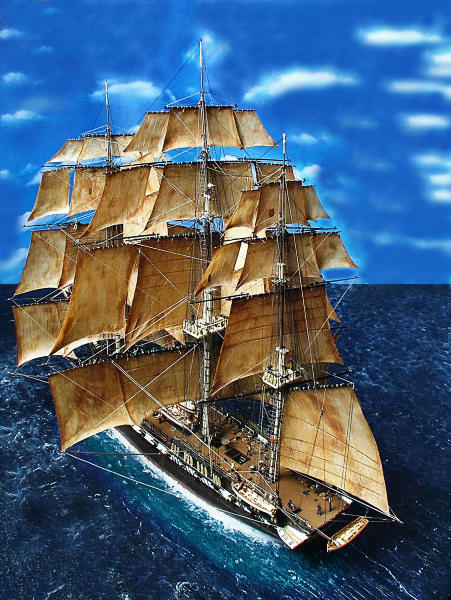
I decided to
show the ship under full sail and therefore rigged also the studding sails.
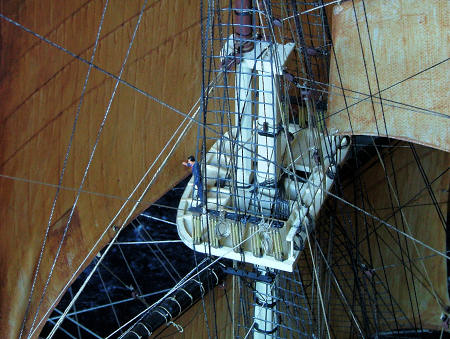
The
ratlines are pre-shaped from thin, flexible plastic and have to be cut into the
appropriate
 The ratlines
have to be tied up at the masttops and on deck at the hull deadeyes,
The ratlines
have to be tied up at the masttops and on deck at the hull deadeyes,
The
plastic-made deadeyes look like of rope if painted carefully with the
corresponding rope colour.
The
ship has been built with all the parts the kit provided. However it was
important for me to
The nets on
the rails I made from synthetic mesh instead of using thread as advised in the
instruction sheet.
The
cannonballs were sanding from little plastic pearls (normally used for
necklaces). The anchor buoys and buckets for fuses were made from Evergreen
styrene-strips.
I advise to
build the topgallant masts from wood (scratch). From plastic they are very weak
due to their small diameter. This is a problem during rigging.
I did not
make the effort to build the topgallant masts from wood afterwards. By rigging
these masts tight from fore and aft I was able to avoid bending them.
On my next
model I definitely will make them from wood, because these give them more
stability.
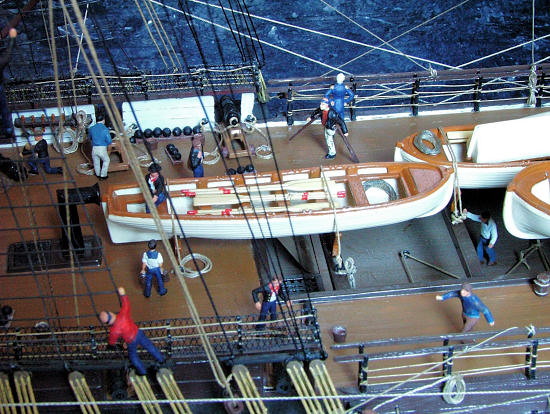
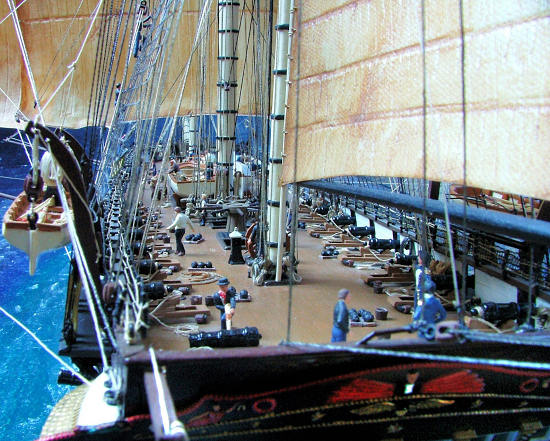 There
were 20 crewmembers attached to the kit. They are from high quality. If you
decide to build the ship as a waterline model in action, you will need the
crewmembers.
There
were 20 crewmembers attached to the kit. They are from high quality. If you
decide to build the ship as a waterline model in action, you will need the
crewmembers.
A ship on the
sea without showing any crewmembers
on deck, would looks a little like a ghost
The extra
figures are three sets of each 6 working men from the brand Preiser.
They have
been altered and repainted according to their purposes on deck. One figure was
Delivered
with the kit are four different sizes of rigging thread in black and brown.
I bought a
lot of extra rigging threat, but did also not try to save as much as possible
and
the ends were
first cut off shortly behind the knots, before the coiled-up ends were attached
afterwards in a manner which makes it not visible that the ends had been cut off
before.
 (It is very
difficult, if not impossible, to coil up the remaining ends of the thread whilst
the rigging is tighten on deck.) Before attaching the ends to the pins
afterwards they have to be coiled up, which can be done very realistic by using
the following technique: First roll a piece of thread around a round object
(pencil or brush). Than brush it with Micro Crystal Clear and let it dry.
(It is very
difficult, if not impossible, to coil up the remaining ends of the thread whilst
the rigging is tighten on deck.) Before attaching the ends to the pins
afterwards they have to be coiled up, which can be done very realistic by using
the following technique: First roll a piece of thread around a round object
(pencil or brush). Than brush it with Micro Crystal Clear and let it dry.
When dry you
easily can shape the thread into the desired form and glue it on deck.
You can build
the model with closed or open gunport covers. If you want them open, you should
open all the gunport covers and have all cannons ready, because open only a part
of the covers would be unrealistic.
All cannons
under deck are rigged following the instruction sheet, using the same method
The cannons
on deck have got additional rigging (not mentioned in the instruction sheet).
The
additional cannon rigging on deck is very visible. The effect is worth the extra
work.
 However I did
not scratchbuild the blocks as part of the cannon rigging. In this scale
However I did
not scratchbuild the blocks as part of the cannon rigging. In this scale
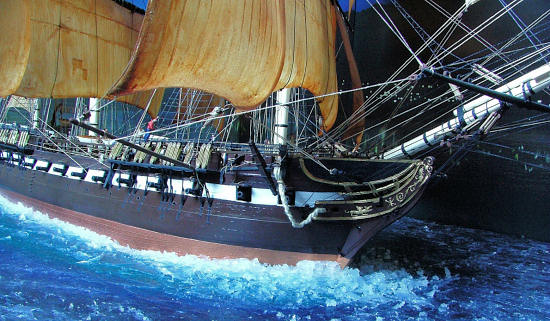
The captains
cabin pieces, also delivered with the kit, are also hardly visible when the hull
is
The windows
at the stern are fine moulded. On the inner side of the hull a transparent
This creates
the effect of real windows and looks very realistic.
The
engravings at the stern gallery, on the galleon and the hull are very fine
moulded by Revell. Careful painting will also lead to a very realistic effect.
Six different
sizes of blocks are in the box. I cannot imagine making them better from
scratch.
Like each
other part of the model I also painted all the blocks to create a wood-like
effect.
 The wooden
decks are well imitated on the plastic and you can create the
The wooden
decks are well imitated on the plastic and you can create the
Unfortunately
this had not the desired effect, and now, after knowing all the different
I have to be satisfied with the result, which happily still let the deck looks like from wood!
I used some
general modelling methods, which also used by aircraft modellers. Books about
One important
thing for me, self evident for most of the modellers today, was the use of
The main yard broke, after the rigging was already far done. Without superglue together with the accelerator I most probably would have given up all the modelling here.
| SEA CONSTRUCTION |
To imitate
the sea I used as a base a styropor plate. This plate first were painted with
water colours in blue and turkey. Near the hull of the ship – due to the water
extremely mixed with
 On the ready
coloured plate silicone was added by using a palette-knife. With a teaspoon
the waves were moulded into the fresh silicone corresponding with the
direction of the wind.
On the ready
coloured plate silicone was added by using a palette-knife. With a teaspoon
the waves were moulded into the fresh silicone corresponding with the
direction of the wind.
The foam at
the bow and alongside the hull can be moulded into the silicone by using a
tooth-pick.
When the
silicone is dry you can paint the crests with white colour.
The hull has
been lowered into the styropor up to the waterline, and has not been cut.
Cutting the
hull at the waterline I considered too risky, since I only decided to show
Photos made
with Fuji S5000, at daylight as well as at artificial light. As a background I
used
| CONCLUSIONS |
For me it was
important to let the ship looks like a real sailing ship at full speed at sea.
The kit did
not disappoint me in any respect. This kit can be build by a careful and
concentrated modeller into a top model of this famous ship.
The scale 1/96 allows extensive detailing.
October 2008
If you would like your product reviewed fairly and quickly, please contact the editor or see other details in the Note to Contributors.