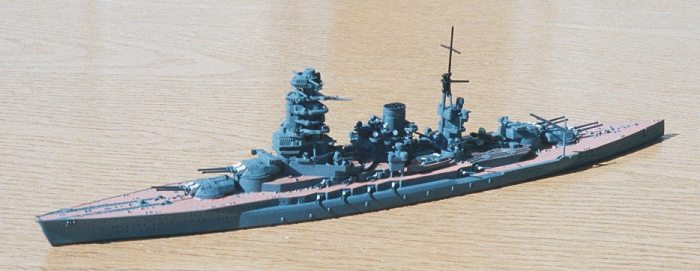
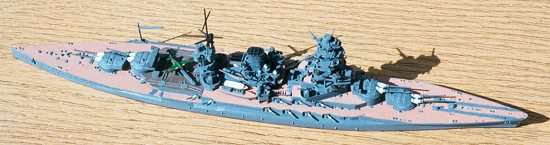
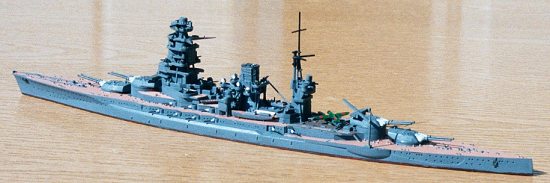
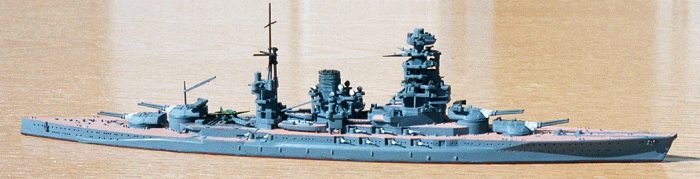
Aoshima 1/700 IJN Battleship Mutsu
|
KIT # |
239381 |
|
PRICE: |
$28.00 |
|
DECALS: |
None |
|
REVIEWER: |
|
|
NOTES: |
New tool kit |
|
HISTORY |
 They were even faster then the British 15 inch gun
Queen Elizabeth class fast Battleships. The hull design was modeled on that of
the Ise class, but with many improvements added in the area of, speed,
armament and Armour .
They were even faster then the British 15 inch gun
Queen Elizabeth class fast Battleships. The hull design was modeled on that of
the Ise class, but with many improvements added in the area of, speed,
armament and Armour .
From 1934 to 1936 the Mutsu was reconstructed along the same lines as the Fuso and Ise classes. The massive Pagoda type bridge structure or tower was constructed, the stern was extended , increasing length to 737 feet. Anti torpedo bulges increased its beam to 113 feet 6 inches.
|
THE KIT |
 The kit comes as a one piece hull, with a separate flat waterline base.
5 sprues of parts, plus 2 sprues of upgrade parts which include the ships
boats, float planes, AA guns, catapult and other hardware for detailing your
model.The instructions are in Japanese so you are on your own, and must find
references for the paint colors and detail. There are good step by step
drawings though, taking you thru the construction of the kit. The parts are
all numbered for placement.
The kit comes as a one piece hull, with a separate flat waterline base.
5 sprues of parts, plus 2 sprues of upgrade parts which include the ships
boats, float planes, AA guns, catapult and other hardware for detailing your
model.The instructions are in Japanese so you are on your own, and must find
references for the paint colors and detail. There are good step by step
drawings though, taking you thru the construction of the kit. The parts are
all numbered for placement.
|
CONSTRUCTION |
Starting off with the hull, before doing any painting. I decided assemble the superstructure first, which is done by gluing and stacking the parts in the correct sequent according to the instructions. There are 4 poles that each part must slide down to fit each level in the proper place. The parts fit well and were easily lined up with the corresponding pegs and holes.
|
PAINT & DECALS |
Next I wanted to paint the deck before I added the smaller hardware and turrets. I used Model Masters flat tan # 2021 for this. For 1/700 scale I like to brush paint the model, having good results. I first painted all the molded on deck hardware the hull color, this makes it easier then waiting till after the deck is painted. Then I started brushing the paint on beginning at the bow and working my way back carefully painting around all the deck hardware and structures.
Next I painted the flight deck. Painting the turntables and deck fixtures the hull color first. Then I painted the deck itself with Tamiya acrylic red brown XF-64 , the color of the linoleum they used on the steel decks. I came back after the paint dried, and dry brushed the rails and deck fixtures with the hull color to touch them up and highlight there appearance. I decided before anymore painting to attach the 5.5 inch guns to the hull so they would bond plastic to plastic. Also attaching the search lights, fire control units and antennas.
|
CONSTRUCTION CONTINUES |
For the AA guns, I painted them with Model masters titanium Metalizer, the 5.5 inch guns also. This gives them a realistic metallic finish. After these are all painted and detailed , they were attached to there places according to the instructions. Following this I attached the aircraft lift crane to its position on the side of the deck. The mast was painted after the three piece structure is assembled. It is painted in two colors, the lower half is painted the hull color and the upper half is painted flat black. This was done because the smoke from the stack would stain the upper mast and by painting it black , the stains did not show!

Now I attached the mast, lining it up so it was strait from all angles. At this time I also added the ships boats crane, just in front of the rear superstructure. I also painted the anchor chains and anchors titanium , and attached them to the mortises in the bow and stern. I painted the search light lenses flat white for this is how they appear in photos.
The last part of construction is adding the waterline bottom. The edge of this I painted with testers flat red # 1150. After painting, The steel ballast weight can be attached to the inside of the waterline bottom inside its mortise . I use putty to hold this in place. Then the waterline bottom was glued in place to the hull and weights set on top of the deck to hold it down and left set over night.
|
CONCLUSIONS |
I have to say, This was the best fitting and most highly detailed 1/700 plastic kit I have ever built! I can not add anything else to that. It was a pure pleasure to build and I look forward to building its sister ship the Nagoto. I would recommend this kit to anyone beginner or artist that enjoy IJN 1/700 scale Warships!
|
REFERENCES |
Janes Battleships of the 20th century by Bernard Ireland
Copyright ModelingMadness.com
If you would like your product reviewed fairly and quickly, please contact the editor or see other details in the Note to Contributors.