Pavla 1/72 X-Craft Submarine
| KIT #: | 72068 |
| PRICE: | $82.95 MSRP |
| DECALS: | None |
| REVIEWER: | Carmel J. Attard |
| NOTES: | Weapons set U72-91 ($10.95 MSRP) used. |

| HISTORY |
The X Class was a class of
midget submarines during the course of the Second World War. These were
built for the Royal Navy by Vickers Armstrong during 1943-44. These vessels
were about 51 feet long and 5.5 feet wide displacing 27 tons when surfaced
and 30 tons when submerged. They were propelled by a 4-cylinder
These vessels were
designed to be towed to their area of operation by a full-size “mother”
submarine; usually one of the T class or S class, the later also carried the
operational crew of the X- craft. When the operational area was reached the
crew would transfer to X- craft. After conducting operations an X- craft
would rendezvous with the towing submarine at a pre-agreed point. It would
then be towed back to a home base. The range of operation was dependent by
the endurance and determination of their
 crews.
This was thought to be up to 14 days in the craft or 1500 miles distance
with a trained crew complement. The crew comprised of a commander, pilot and
engineer but soon a specialist diver was added for which an air lock was
provided. The actual range was 500 miles surfaced and 82 miles at 2 knots
submerged.
X class submarines carried two large explosive charges in detachable compartments that were attached on either side of the hull. Each charge consisted of two tons of Amatol. The charges were dropped on the sea-bed underneath the intended target. These were detonated by means of a time-fuse which was intended to give the submarine sufficient time to make its escape.
The first operational
deployment of X Class submarines was in September 1943 in what was known as
Operation Source. Six X- Craft were used in an attempt to neutralise the
threat posed by the German battleship Tirpitz which was based in a fjord in
northern
In April 1944 another
attack was carried out by X24 on a floating dock in
In the build-up to D-Day
the Royal Navy launched Operation Postage Able submarine X 20 was to make
surveys of the landing beaches in
 In all
22 X- craft were built. The first two were prototypes numbered X3 and X4.
The first operational batch was numbered from X5 to X10. They were
constructed by Vickers Armstrong. These were all used in the attack on the
Tirpitz in
The
next batch of X- Craft was numbered from X20 to X25. X 24 was the only
vessel used in offensive action when it attacked the floating dock in
| THE KIT |
The X-craft kit by Pavla Models comes packed in a sturdy cardboard box measuring 9”x5 3/8”x1 ˝”. The box has a side view colour painting of the craft. Upon opening the box one will find blocks of short-run material with small detail parts all made in resin and in separate different sized bags.. There are four major parts consisting of two body halves and two deck parts, one bigger than the other. The deck parts in particular, had nicely cast deck features such as small port holes, two manhole openings that can show interior detail if fixed with the separate port covers in open position. There are in all 48 resin detail parts apart from the main resin parts mentioned earlier.
For a look at what comes in the box, please visit the preview.
| CONSTRUCTION |
There are seven stages of construction. The first four comprise of assembly and detailing the main parts that form the x-craft body and deck items. The latter three stages deal with the assembly of the tail fins, two rudder pieces, and a horizontal stabiliser complete with control links for these. There are aft support brackets and a three blade right hand propeller.
Joining the two main body
halves together indicated that these leaves a little overlap at the front
and end but rectifying these two spots with a little putty and careful
reshaping followed by light sanding was of no concern as these were located
away from the
 fine
surface detail. Fixing the flat deck part I found best to align it in
parallel with the flat bottom when viewing the kit from front elevation. One
has to bear in mind that the kit has no locating holes as most resin kits
are. Once this position is established the parts are held firmly, the deck
part is first glued at the front portion taking advantage of the capillary
action of the super glue when tilting slightly the body parts. Having
secured the front end the rest of the deck is glued in one or more steps so
that any slight disparity that may show up will be corrected as one move
along.
It is the turn of fixing
the long thin resin items such as the long actuators that fits to the
stabilisers, rudder control links, the forward and rear strip guards. I
found it more convenient to replace the latter two items with steel strings
which are cut to same length and made of same thickness to the kit parts.
The numerous tiny detail parts were then carefully separated from the runner
blocks using an Xacto
blade. These were fixed in place with a tiny drop of super glue transferred
on the tip of a sharpened match stick. Extra care is made when fitting the
rear fins of which there are three since these can be easily exchanged with
one another. Only the lower fin differs from the other two. This conforms to
the fourth fin integrally cast with the
 upper
deck part. Having fixed the rudder and stabilisers in place the propeller is
inserted. This may require some cleaning before it is fitted. The actuators
and support brackets and side guard are fitted in the end. The X-craft had a
retractable middle mast. This item was not issued and I decided to add this
as extra detail which I made from a steel pin fixed at its position in a pre
drilled hole.
If one decides to fit the detachable explosive side charges to the fuselage these are best fixed at an earlier stages after assembling the main body parts. I highly recommend installing these as it looks more of a complete kit when these are added. These come as a separate resin kit referred to U72-91 weapon set for X-craft consisting of two charge resin parts. Again these like the rest of the kit are of excelling fitting quality with NO presence of air bubbles or rough surfaces. The minimum of sanding was needed for a perfect flush fit. Pavla also marked the side charges from the inside with the engraved ‘right’ and an arrow pointing forward to assist with the correct fitting of parts.
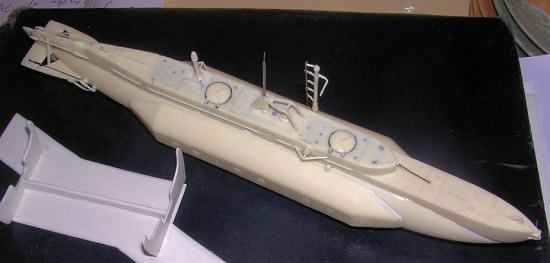
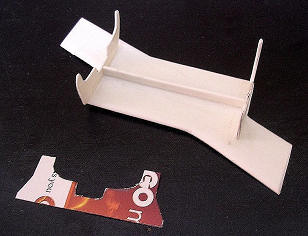
Apparently, Carmel built a stand for this kit as he sent photos of it that I've included. Pavla needs to consider adding this feature to its boat/ship kits. Ed
| COLORS AND MARKINGS |
I painted the interior of upper deck in medium grey while the rest of the X-craft was overall dark ocean grey ten added stains at the sides in way of drains. The aluminium bronze propeller was painted in bronze colour. The kit was finally given an overall airbrush coat of semi matt clear varnish, Revell brand.
| CONCLUSIONS |
 The
detailed craft looked somewhat fragile and needed delicate handling. I had
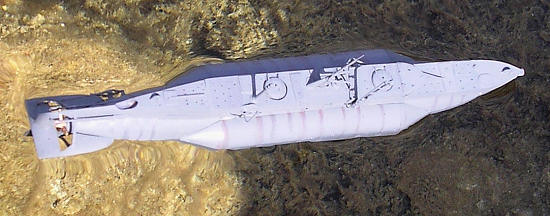
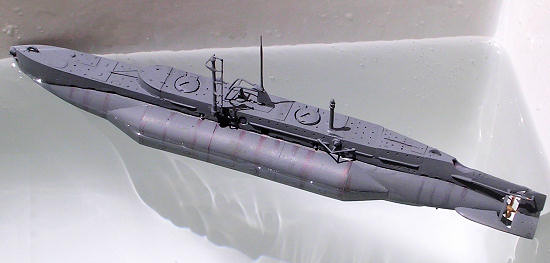
an idea and gently placed the craft in water which to my amazement
discovered that it floated like the real thing, considering it was empty
inside. In fact I took pictures of the craft floating in water and it looked
so realistic.
I am sure this kit will appeal to all naval craft enthusiasts and I highly recommend this kit particularly to those keen on submarines.
August 2008
Copyright ModelingMadness.com
If you would like your product reviewed fairly and fairly quickly, please contact the editor or see other details in the Note to Contributors.