| KIT #: | ? |
| PRICE: | $ |
| DECALS: | None |
| REVIEWER: | Carmel J. Attard |
| NOTES: | Short run, detailed resin model complete with side mounted torpedoes |
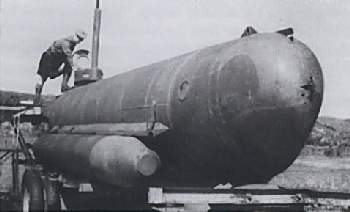
| HISTORY |
Designed by Dr. Heinrich Drager,
the
Molch (Salamander) was an
unsuccessful, one-man series of German midget submarine created during World War
Two Built in 1944, it was the first mini-submarine of the
Kriegsmarine, but was not
successful in combat operations and suffered heavy losses.
 The
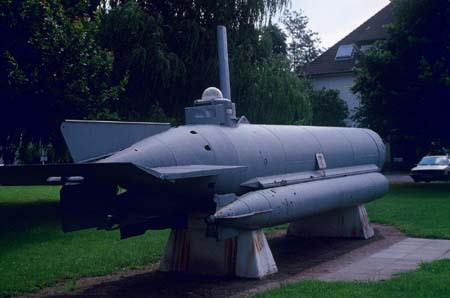
Molch was based on
torpedo technology, and carried two
G7e torpedoes attached externally on either side of the craft. It was fully
electrical and was created for coastal operations, with a range of 64 km (40
miles) at 5 knots (9.26 km/h).
As the Molch did not have an engine
for surface running, this meant that it suffered from very limited endurance. To
compensate for this, a large proportion of the hull was allocated for battery
storage. This resulted in positive buoyancy which made the submarine almost
impossible to dive. As a result, the submarine was robbed of a vital asset –
concealment.
The front section of the boat held a large battery. Behind the battery was the
operator's position, which sat between two small trimming tanks. Behind the
operator sat an electric motor. The complicated system of tanks made it
difficult to control during combat operations. The first boats were delivered on
June 12th. Production was largely
centred at the works of Deschimag A G Weser at Bremen.
The
Molch was based on
torpedo technology, and carried two
G7e torpedoes attached externally on either side of the craft. It was fully
electrical and was created for coastal operations, with a range of 64 km (40
miles) at 5 knots (9.26 km/h).
As the Molch did not have an engine
for surface running, this meant that it suffered from very limited endurance. To
compensate for this, a large proportion of the hull was allocated for battery
storage. This resulted in positive buoyancy which made the submarine almost
impossible to dive. As a result, the submarine was robbed of a vital asset –
concealment.
The front section of the boat held a large battery. Behind the battery was the
operator's position, which sat between two small trimming tanks. Behind the
operator sat an electric motor. The complicated system of tanks made it
difficult to control during combat operations. The first boats were delivered on
June 12th. Production was largely
centred at the works of Deschimag A G Weser at Bremen.
The craft can be devided into two sections. The fore section containing the
batterie. The size of the battery meant that the Molch was a comparatively large
craft with an impressive underwater range although whether the single operator
could stand such a voyage was another matter. Behind the battery in the aft
section was the single operator position. He sat between two trimming tanks
whose relatively small size and position must have made them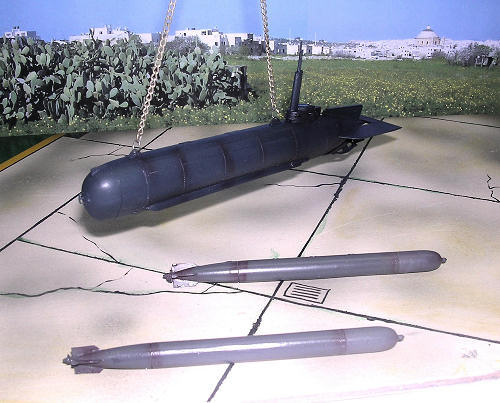 useless in compensating for the weight of the battery. In fact when the first
production model went out on trials it proved impossible to make her submerge
and therefore the Molch operations were carried out with the craft running
awash. The controls were extremely simple, a magnetic compass was fitted
externally although in some boats an automatic auto pilot was installed together
with a simple hydrophone. A perescope was fitted but its use was negated
by the fact that it could only be
rotated 30 degrees either side of the centre line. Finally behind the operator
was the electric motor. A total of 393 units being completed.
useless in compensating for the weight of the battery. In fact when the first
production model went out on trials it proved impossible to make her submerge
and therefore the Molch operations were carried out with the craft running
awash. The controls were extremely simple, a magnetic compass was fitted
externally although in some boats an automatic auto pilot was installed together
with a simple hydrophone. A perescope was fitted but its use was negated
by the fact that it could only be
rotated 30 degrees either side of the centre line. Finally behind the operator
was the electric motor. A total of 393 units being completed.
The Molch were first used in the Mediterranean against the Allied Operation Dragoon in 1944. The submarines were a part of the K-Verband 411 flotilla. On the night of September 25 they attacked allied battleships, losing ten out of the twelve Molch submarines in the flotilla. Shortly after, the remaining two were sunk by allied warship bombardment off of the San Remo coast. Other Molch flotillas were sent to Holland in December 1944, but were also unsuccessful. From January to April 1945, Molch and Biber submarines went out on 102 sorties, , lost 70 of their own and only sank 7 small ships for a total of 491 tons and damaged 2 for 15,516 tons.
| THE KIT |
The Molch midget submarine kit comes in a sturdy cardboard box the type
that Pavla Models packs the resin kits and conversion parts. On the box lid
there is a colour side view that proves useful when it comes to paint the model.
Resin moulded parts, light
 tan,
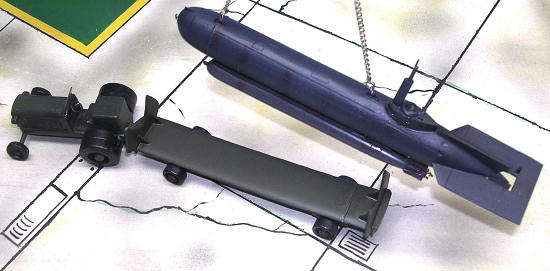
are sealed in plythene bags; three in all. One contains a pair of detailed
torpedoes complete with delicately moulded contra rotating propellers. Care is
taken to preserve this detail during assembly since if broken it will be hard to
pick the missing part and fit it back in place due to the small size. The
overall length of each torpedo is ¾ the length of the hull and looks huge
compared to the hull of the submarine. They have recessed panel lines and some
rivet detail. The 4 tail fins are all there but these are very thin and
beautifully represented. There was a slight mismatch to one side of the torpedo
but this only require some filler and smooth fairing to rectify the situation.
Be careful when separating the torpedoes from the runner particularly the tail
fin area in order to avoid damage. Another bag contained the two hull halves and
a third contained detail parts, 24 in number. There are also two astrodomes in
clear vac form acetate. Among the detail parts are tail fins and horizontal
stabiliser, propeller parts, rudder, coning tower and full cabin interior
detail. The single crew compartment is quite small and the interior detail will
not be appreciated if the tower is closed. There is a 5 page of A5 size
instructions and there are 6 stages of construction, one page is devoted to kit
parts and another page has colour detail in labelled form.
tan,
are sealed in plythene bags; three in all. One contains a pair of detailed
torpedoes complete with delicately moulded contra rotating propellers. Care is
taken to preserve this detail during assembly since if broken it will be hard to
pick the missing part and fit it back in place due to the small size. The
overall length of each torpedo is ¾ the length of the hull and looks huge
compared to the hull of the submarine. They have recessed panel lines and some
rivet detail. The 4 tail fins are all there but these are very thin and
beautifully represented. There was a slight mismatch to one side of the torpedo
but this only require some filler and smooth fairing to rectify the situation.
Be careful when separating the torpedoes from the runner particularly the tail
fin area in order to avoid damage. Another bag contained the two hull halves and
a third contained detail parts, 24 in number. There are also two astrodomes in
clear vac form acetate. Among the detail parts are tail fins and horizontal
stabiliser, propeller parts, rudder, coning tower and full cabin interior
detail. The single crew compartment is quite small and the interior detail will
not be appreciated if the tower is closed. There is a 5 page of A5 size
instructions and there are 6 stages of construction, one page is devoted to kit
parts and another page has colour detail in labelled form.
If you would like to see the parts, please visit the preview.
| CONSTRUCTION |
The first three stages deal with assembly of crew cabin complete with
steering wheel, side console and instruments integrally moulded with the hull
parts, and a seat. A forward and rear bulkhead separates the tiny crew
compartment from the battery station at the front and the steering compartment
at the rear. After fixing all the interior detail and painting the interior as
per instructions then the two hull sections are brought together. These contain
no locating pegs and corresponding holes. Great care is taken to match the two
parts together when in the end takes the form of a cigar shaped hull. Stage 4
deals with detailing
 the
hull and the prow. Fins, stabilisers, lifting eyes, rear pointed cone end all
fitted to the hull. An astrodome fits to the entry hatch which can be fixed open
or closed. The conning tower contains small rectangular windows from which very
little can be seen once Kristal Kleer is added as glazing instead of cut
rectangular clear Perspex suggested in the instructions. Instruments inside the
crew compartment also include a compass and a hydrophone for detecting distance
sounds. A mast and a periscope complete the coning tower detail. The torpedoes
which are fitted during the final stages, ie after painting the kit should go
inner of the lengthwise shallow stabilisers and these should not be mistaken as
pylons since this is not apparently clearly indicated in the instructions.
the
hull and the prow. Fins, stabilisers, lifting eyes, rear pointed cone end all
fitted to the hull. An astrodome fits to the entry hatch which can be fixed open
or closed. The conning tower contains small rectangular windows from which very
little can be seen once Kristal Kleer is added as glazing instead of cut
rectangular clear Perspex suggested in the instructions. Instruments inside the
crew compartment also include a compass and a hydrophone for detecting distance
sounds. A mast and a periscope complete the coning tower detail. The torpedoes
which are fitted during the final stages, ie after painting the kit should go
inner of the lengthwise shallow stabilisers and these should not be mistaken as
pylons since this is not apparently clearly indicated in the instructions.
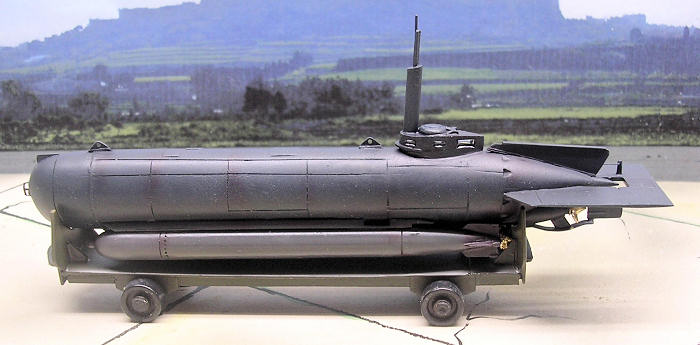
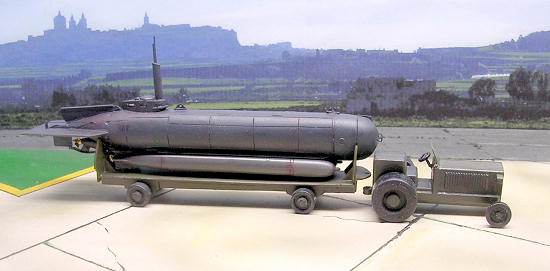
Like previous Pavla midget submarine, there is no stand which will hold
the model in a display position. This should not deter anyone from getting the
kit as it is a simple task to scratch built one from plastic card. I designed
one after looking at reference material on the web. One should only calculate
the dimensions of a carrier trolley from the kit size and section. I then added
4 heavy wheels and could display the kit as I desired.
| COLORS & MARKINGS |
| CONCLUSIONS |
In the end a small but impressive kit is produced. The kit is definitely not beyond the capability of most modellers and in view of the few parts it contains it can be definitely recommended for a first time try one’s hand on a resin kit.
| REFERENCES |
If you would like your product reviewed fairly and quickly , please contact the editor or see other details in the Note to Contributors.