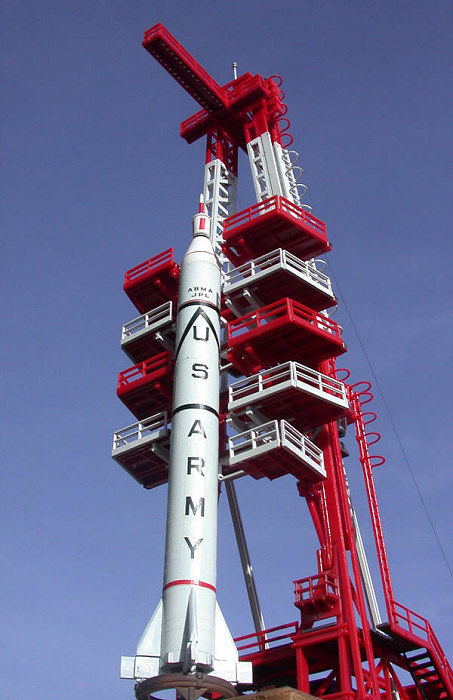
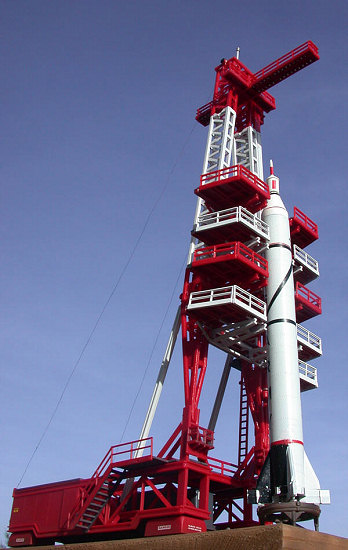
Revell 1/110 Jupiter C with launch pad
| KIT #: | 88126 (H-1819) |
| PRICE: | Approx €20.00 |
| DECALS: | One option |
| REVIEWER: | Frank Spahr |
| NOTES: | Workable features, base and figures |
Revell 1/110 Jupiter C with launch pad
| KIT #: | 88126 (H-1819) |
| PRICE: | Approx €20.00 |
| DECALS: | One option |
| REVIEWER: | Frank Spahr |
| NOTES: | Workable features, base and figures |
| HISTORY |
I can easily skip that one and refer to Scott´s preview of usual excellence.
| THE KIT |
To me (born in 1962) getting and building this kit was one of those trips down memory lane, to those childhood years that get invariable gilded in one´s memory. The nostalgic look of the whole thing, from the box over the instructions up to the heap of plastic in the box just whet my appetite and I got to commit I indulged in building this thing as straightforward as I could and with as much fun factor as possible. Maybe it´s time to insert a litttle disclaimer here:
In building this kit, no sink marks or ejector pin marks were harmed. Likewise, all alignment is strictly non-euclidic!
| CONSTRUCTION |
Well, this kit
is basically a huge and intricate gantry structure with a very nice base to put
on, and somehow there´s a little rocket to fit in, too. So there were three
things to address more or less simultaneously. I started with cleaning up the
various missile parts (not that many of them) and gluing them together. The
delicate raised panel lines were of course harmed by cleanup, and in spite of
using Mr Surfacer here, I couldn´t get the seam invisible. Hence I planne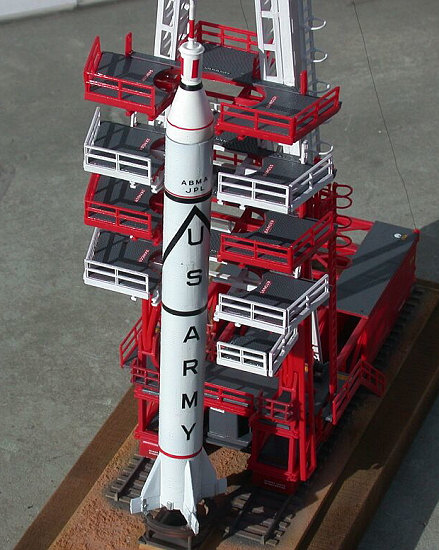 d
to run the decals over the offending area.
d
to run the decals over the offending area.
As I tend to experiment with something new in most of my projects, I used acrylics as far as possible with my hitherto limited stock of them. The rocket was sprayed with enamel primer first and then received a number of coats of Xtracrylix white. Details were picked out with acrylic black and enamel silver as per instructions. The decals worked fine using MicroSol, but were of course fiddly to apply. I found that the circular stripes were a bit short, so had to patch with acrylic black which went just fine and dried very fast into the bargain.
I´ve got to say that were it not for the acrylics, I couldn´t have completed this project that fast. Their fast drying time and near immediate ability to be handled made things a lot easier, and with Xtracrylix you get the added benefit of not having color shade variations between sprayed and brushed paint as often noted with enamels.
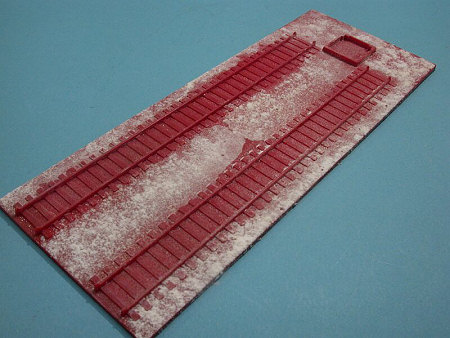 The base shows
finely depicted double tracks and some gravelly structure, plus the base for the
launch pad. I cleaned up and assembled the remaining parts for the launch pad
and treated the base as one subassembly. As I wasn´t satisfied with the gravel
stuff, I brushed a cheap nail polish remover containing ethyl acetate on the
areas I meant to build up in order to lightly dissolve the styrene. This didn´t
work as well as with pure ethyl acetate, yet I think doing so is a feasible
method. I then added baking soda from our kitchen to the areas to give them a
The base shows
finely depicted double tracks and some gravelly structure, plus the base for the
launch pad. I cleaned up and assembled the remaining parts for the launch pad
and treated the base as one subassembly. As I wasn´t satisfied with the gravel
stuff, I brushed a cheap nail polish remover containing ethyl acetate on the
areas I meant to build up in order to lightly dissolve the styrene. This didn´t
work as well as with pure ethyl acetate, yet I think doing so is a feasible
method. I then added baking soda from our kitchen to the areas to give them a
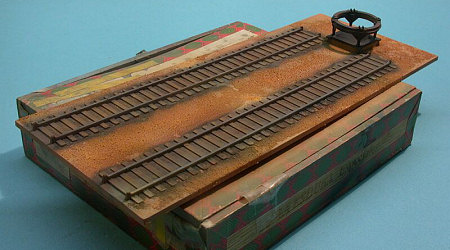 bit
more of a structure. After that, I got the airbrush out and sprayed the
base in the following sequence: The track areas were sprayed some dark grey, the
remaining base in some sand flat. Now came shading and weathering work. I
sprayed the track area ligthly with rust red and picked out the sleepers with
ochre pastel chalk. The tracks were drybrushed with Model Master Steel
Metalizer. The sand areas were also shaded a bit with rust red. The launch pad
was sprayed first beige, then grey, then rust red and then dark grey and black -
always slightly blending and never fully covering. Voilà! The launch pad was
then glued to the base and the entire base sealed with some handy clear coat,
Xtracrylix satin coat, IIRC. I had a piece of plywood cut to size at the
hardware supermarket and glued it under the styrene base with hot glue, after
spraying the visible areas with appropriate sand and beige paint.
bit
more of a structure. After that, I got the airbrush out and sprayed the
base in the following sequence: The track areas were sprayed some dark grey, the
remaining base in some sand flat. Now came shading and weathering work. I
sprayed the track area ligthly with rust red and picked out the sleepers with
ochre pastel chalk. The tracks were drybrushed with Model Master Steel
Metalizer. The sand areas were also shaded a bit with rust red. The launch pad
was sprayed first beige, then grey, then rust red and then dark grey and black -
always slightly blending and never fully covering. Voilà! The launch pad was
then glued to the base and the entire base sealed with some handy clear coat,
Xtracrylix satin coat, IIRC. I had a piece of plywood cut to size at the
hardware supermarket and glued it under the styrene base with hot glue, after
spraying the visible areas with appropriate sand and beige paint.
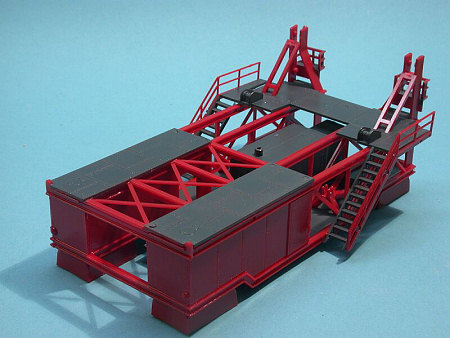 Now
with the small and easy stuff done I can relate the construction of the gantry.
I did it as per instructions and started on the tower base. Very early on, I
decided not to paint the red areas of the model. Well, I´ve got to admit that
the last time I did that was in the late 70ies, but it somehow seemed right with
this nostalgic build. So it was a matter of identifying and spraying what was
not to be red and that was mainly grey. So I broke out Model Master Gunship grey
and set to work, after assembling and cleaning up the two-part power plant. With
the parts dried, I started assembling. I guess the base was slightly warped (as
is most of my model), but generally fit was good and things proceeded smoothly.
I just ran into trouble in step 3 with the rear platforms that needed some
trimming until agreeing to sitting there all three of them next to each other
without quarreling and lifting. I should have started on the decals earlier, but
did so only after the base was built, but I was able to get where I had to with
some Geduld and fine tweezers. I only decalled after thoroughly futuring
and leaving the Future at least one day to dry prior to using MicroSol on it, so
I was a bit hesitant with that. Adding the various railings and support braces
was, well uneventful, so the base was pretty soon complete.
Now
with the small and easy stuff done I can relate the construction of the gantry.
I did it as per instructions and started on the tower base. Very early on, I
decided not to paint the red areas of the model. Well, I´ve got to admit that
the last time I did that was in the late 70ies, but it somehow seemed right with
this nostalgic build. So it was a matter of identifying and spraying what was
not to be red and that was mainly grey. So I broke out Model Master Gunship grey
and set to work, after assembling and cleaning up the two-part power plant. With
the parts dried, I started assembling. I guess the base was slightly warped (as
is most of my model), but generally fit was good and things proceeded smoothly.
I just ran into trouble in step 3 with the rear platforms that needed some
trimming until agreeing to sitting there all three of them next to each other
without quarreling and lifting. I should have started on the decals earlier, but
did so only after the base was built, but I was able to get where I had to with
some Geduld and fine tweezers. I only decalled after thoroughly futuring
and leaving the Future at least one day to dry prior to using MicroSol on it, so
I was a bit hesitant with that. Adding the various railings and support braces
was, well uneventful, so the base was pretty soon complete.
 I added the four
wheel housings early on but had to remove one at the very end as things ended up
lop-sided so far that the rocket wouldn´t center in front of the tower. I
shimmed up the one housing until things sat firmly down on the tracks and the
rocket sat reasonably straight in front of the tower assembly. So my hint would
be to check this out at an earlier stage if possible.
I added the four
wheel housings early on but had to remove one at the very end as things ended up
lop-sided so far that the rocket wouldn´t center in front of the tower. I
shimmed up the one housing until things sat firmly down on the tracks and the
rocket sat reasonably straight in front of the tower assembly. So my hint would
be to check this out at an earlier stage if possible.
I ran into trouble
with the tower arms. Quite a lot of the parts had left their not so secure home
at the sprues and were happily gallivanting around the box. It was very handy
that most parts bear their number, but there seems to be some room for
mis-identification yet. I planned to sub-assemble the white and red parts of
the tower, paint them and then assemble them, touching up paint in the
overlapping areas in the end. This went well in the end but not without
problems. Firstly, you got t o watch out which parts go where pretty intensely,
as they have locating holes and grooves for the elevator and the working
platform that should possibly end up at the right place. I falied to get that
one clear. Moreover, in assembling the upper, lower and middle parts, you have
different arrangements of locating pins and holes (quite Tamiya-style, even back
in 1958) to allegedly prevent mishaps in assembling. Well, I couldn´t get the
parts to fit the way they should for love nor money. Not only had I the risk of
breaking up the seams while bending the parts with the pins to let them slide
over and snap into the holes, but even worse although perfectly fitting with
instructions as per the location of the holes and grooves, the locating pins and
holes wouldn´t match. So I resorted to the last means of shaving off the
offending pins and assembling the parts as how I deemed it correct. Well, many
an IKEA cupboard has been grossly mis-assembled by people doing right that, so I
was pretty concerned I might end up with an unsusable structure, but somehow
things worked out. I´m unable to determine whether this was a mistake in the kit
or one on my part but which I somehow managed to fiddle subconcsiously around to
arrive at a working result. Use your own judgement and get out of the glue fumes
while doing so.
o watch out which parts go where pretty intensely,
as they have locating holes and grooves for the elevator and the working
platform that should possibly end up at the right place. I falied to get that
one clear. Moreover, in assembling the upper, lower and middle parts, you have
different arrangements of locating pins and holes (quite Tamiya-style, even back
in 1958) to allegedly prevent mishaps in assembling. Well, I couldn´t get the
parts to fit the way they should for love nor money. Not only had I the risk of
breaking up the seams while bending the parts with the pins to let them slide
over and snap into the holes, but even worse although perfectly fitting with
instructions as per the location of the holes and grooves, the locating pins and
holes wouldn´t match. So I resorted to the last means of shaving off the
offending pins and assembling the parts as how I deemed it correct. Well, many
an IKEA cupboard has been grossly mis-assembled by people doing right that, so I
was pretty concerned I might end up with an unsusable structure, but somehow
things worked out. I´m unable to determine whether this was a mistake in the kit
or one on my part but which I somehow managed to fiddle subconcsiously around to
arrive at a working result. Use your own judgement and get out of the glue fumes
while doing so.
My memory of working features on styrene models is that the hinges would usually break off pretty soon, so I didn´t spend a thought on making the gantry collapsible. Instead I glued it to the base using the hinged braces so obviously marked with "Do not Cement". Here, fit was so-so, and I had to fidlde around a bit to get things marginally reasonably lined up. I´d also seriously doubt if the tower base hinges would stand many working cycles.
Adding the elevator was mostly hassle-free, save the lower elevator guide that rests only - and pretty loosely - at a small platform #61. Adding the ladder with its well over a dozen of "crocket-hoops" was fun.
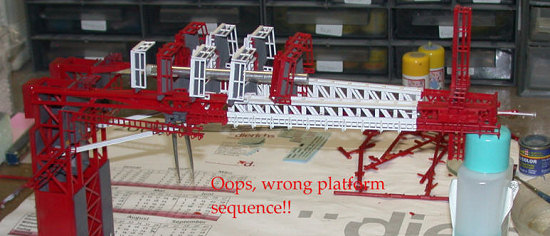 Work on the four
platforms was a bit more of a challenge for various reasons. Firstly, it was a
matter of identifying which of the bazillion of railing parts went where, and
had to end up red or white. Secondly, some of the platform supports were broken
and had to be re-assembled. And thirdly, the platform mechanism is a bit on the
fiddly side and easily glued tight, effectively ending its sliding days. I
managed to get two platforms in working order and the other two are glued in the
open position. Aligning them between the tower arms wasn´t easy, too, as they
didn´t really fit between the assigned grooves, at least in my case. I´m pretty
sure that these isues would have sent me into a tantrum in my younger and less
settled days (cough!), but somehow I got the things glued tight (it needed
several attempts, and of course I managed to mis - arrange the red and white
platforms at the first go).
Work on the four
platforms was a bit more of a challenge for various reasons. Firstly, it was a
matter of identifying which of the bazillion of railing parts went where, and
had to end up red or white. Secondly, some of the platform supports were broken
and had to be re-assembled. And thirdly, the platform mechanism is a bit on the
fiddly side and easily glued tight, effectively ending its sliding days. I
managed to get two platforms in working order and the other two are glued in the
open position. Aligning them between the tower arms wasn´t easy, too, as they
didn´t really fit between the assigned grooves, at least in my case. I´m pretty
sure that these isues would have sent me into a tantrum in my younger and less
settled days (cough!), but somehow I got the things glued tight (it needed
several attempts, and of course I managed to mis - arrange the red and white
platforms at the first go).
The upper floodlight
platform didn´t pose any difficulties, save that the more flimsier railings were
broken and had to re-assembled around the platform. The signal pole (or maybe
lightning rod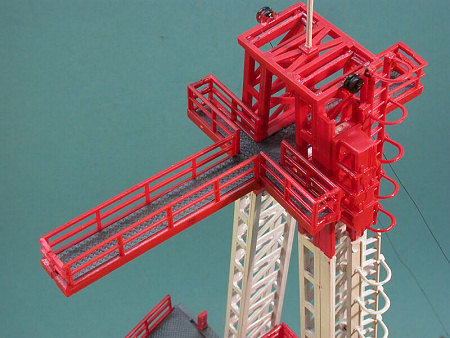 ?) crowned the
rather impressive tower.
?) crowned the
rather impressive tower.
The wheel housings and tower base were dirtied up a bit by spraying the same color as the surrounding sand, then the entire structure received some good coats of Future prior to adding the remaining decals. Rigging was done with thin copper wire, but Lycra would have been better, as the wire isn´t quite tight, Dr. Evil. Finally everything was sealed with Flat Future (Future mixed with Tamiya acrylic flat base).
Upon mating the structures I found the abovementioned alignment problems which I fixed as far as I thought possible without destroying anything.
I didn´t so far add the figures. First of all, I don´t like figure painting and I´m really bad at it. And then, those figures started looking like the Village People ever more upon painting them with their cutesy silver hard hats and stuff. The thought of them breaking out in the chorus of "YMCA" upon placing them in decorative poses was too ridiculous for me, so they´re still awaiting my final decision.
| CONCLUSIONS |
 Go for it! This kit
can be pure fun, given the right attitude. It´d sure be easy to turn this into a
year-long endeavour. One could so easily end up with re-manufacturing big parts
of it and torturing oneself in failing to find references for the correct angle
of this crossbeam or that.
Go for it! This kit
can be pure fun, given the right attitude. It´d sure be easy to turn this into a
year-long endeavour. One could so easily end up with re-manufacturing big parts
of it and torturing oneself in failing to find references for the correct angle
of this crossbeam or that.
But just assume for argument´s sake you´d do without that uber-accuracy, you might end up with a bit of fun and even - as in my case - a positive comment from your GF, SWMBO or whatever person dearest and closest to you on "the first really colorful model in a long time - much nicer than your boring greys!"
November 2006
Copyright ModelingMadness.com
If you would like your product reviewed fairly and fairly quickly, please contact the editor or see other details in the Note to Contributors.