
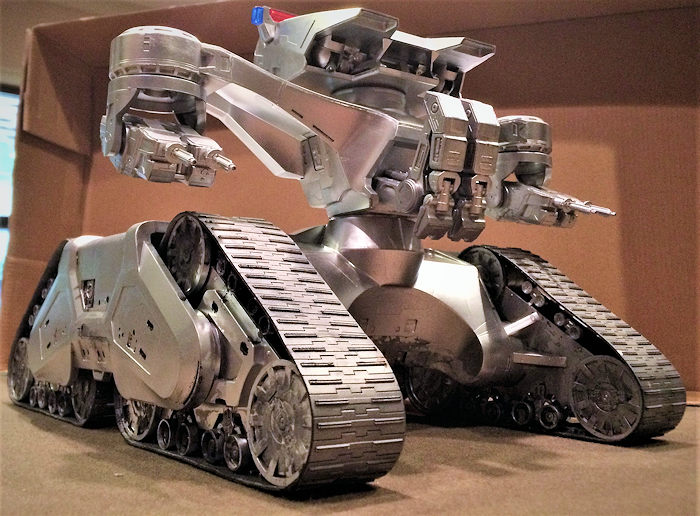
Pegasus Hobbies 1/32 T2 Hunter-Killer Tank
| KIT #: | PEG9015 |
| PRICE: | $75.00 |
| DECALS: | None required |
| REVIEWER: | Donald Zhou |
| NOTES: |
Advantages: Well detailed, simple, and easy to set up for lighting. Disadvantages: Some details simplified, tracks are vinyl, and road wheels are not made to spin |
| HISTORY |
…3 billion human lives ended on August 29th, 1997. The survivors of the war known as Judgment Day…They lived only to face a new nightmare.
A
jagged steel, metallic foot crushes a skull on the desolate, barren, hell beaten
landscape of what was Los Angeles, the camera pans to reveal not one, but
hundreds, thousands, even millions of jagged skulls being crushed by steel,
metal, machine skeletons and
 a
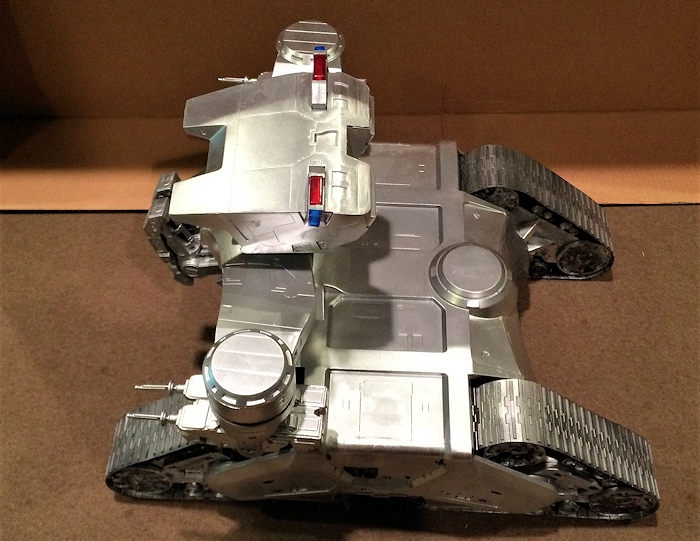
massive machine on four treads rolling through the desolate landscape, firing
four plasma cannons while on the move.
a
massive machine on four treads rolling through the desolate landscape, firing
four plasma cannons while on the move.
Thus was the opening of a classic Sci-Fi move, Terminator 2: Judgement Day, or T2 for short. Previously, the original movie, “The Terminator” was released in 1984 on very short budget of only 6 million. However, that movie became a blockbuster and shot both a little known director (then) by the name of James Cameron and of course, “AHHH-NNOOLLLDD” into fast track for stardom.
Now, for the movies, several vehicles have been build. The most iconic of course is Cyberdyne System T-101 Model 800. Now, whether the “Hyperalloy” combat chassis without its camouflage covering, used as shock troops by Skynet, or the iconic “infiltration” unit that look suspiciously like a certain Austrian bodybuilder, the T-101 Armored Endoskeleton is one of the most iconic vehicles in Sci-Fi history. However, what is lesser known are the “HK’s” or Hunter-Killers. These includes the aerial one and the ground one with four treads. The subject of the model is the ground HK or Hunter Killer tank and is supposed to be based on the original studio model.
| THE KIT |
The kit can be seen at my preview here.
Everything said in the preview applies except one little detail. During construction, I noticed the instruction sheet said the model parts are made out of ABS plastics so no regular cement except Tamiya extra thin cement or super glue. Since the parts are large and Tamiya extra thin cement dries really fast, I used super glue for all the constructions.
| CONSTRUCTION |
 Again,
main construction is easy. The only really big, and this problem is plenty
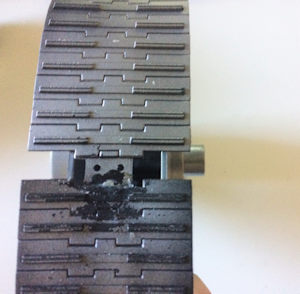
BBBIIIIGGG problem I had was the vinyl plastic track. No, it did not cement onto
the wheels, the big problem was as it turned out, they were all one link short!
This meant that there was a big missing piece in the back. Luckly, all four of
the drive section have to be inserted into the main hull. This meant the back
was mostly covered up so I hid the big boo boo there.
Again,
main construction is easy. The only really big, and this problem is plenty
BBBIIIIGGG problem I had was the vinyl plastic track. No, it did not cement onto
the wheels, the big problem was as it turned out, they were all one link short!
This meant that there was a big missing piece in the back. Luckly, all four of
the drive section have to be inserted into the main hull. This meant the back
was mostly covered up so I hid the big boo boo there.
To make the above easier, I designed the main drive and idler wheels to move. You have to be careful just to put a touch of superglue on the inner wheels so they can be inserted through the drive section plates before connecting to the two outer wheel coverings. If you do it right, then the main wheels will move. This is just to facilitate the problem above.
 The
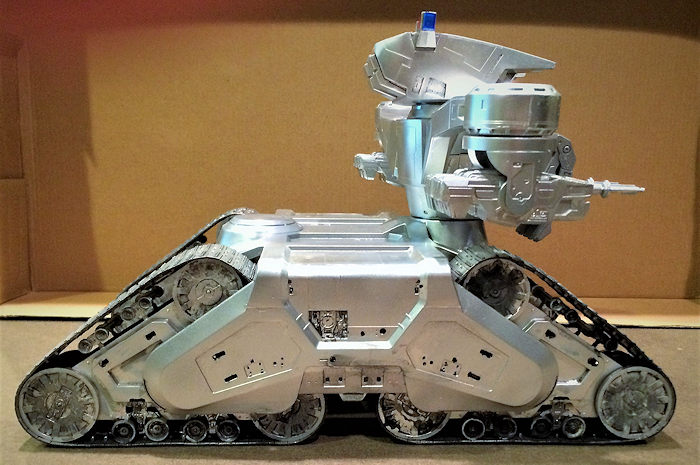
rest of the construction proceeded smoothly. Just be aware that both the plasma
cannon arms, the waist and head can rotate so read the instruction carefully.
The only problem left is the fact superglue leaves a little bit of seams behind,
which took some work to fill and sand smooth. Leave off the clear parts for
later. The model are also left in their major assemblies, Main hull, drive
sections, torso and head in order to facilitate painting. With that done, which
took only about 4 hours, it’s time to hit the paint shop.
The
rest of the construction proceeded smoothly. Just be aware that both the plasma
cannon arms, the waist and head can rotate so read the instruction carefully.
The only problem left is the fact superglue leaves a little bit of seams behind,
which took some work to fill and sand smooth. Leave off the clear parts for
later. The model are also left in their major assemblies, Main hull, drive
sections, torso and head in order to facilitate painting. With that done, which
took only about 4 hours, it’s time to hit the paint shop.
| COLORS & MARKINGS |
Painting have to be natural silver. However, 1. I’m a lazy bum and 2. I’m going for slightly realistic look here, I decided the main joint parts should show some razzle. This is because The HK’s that appeared in the movie all occurred late in the war where Skynet was losing badly against the human resistance. I would wager when it comes to ground HK, Skynet doesn’t care about a clean joints as that would be redundant and waste of effort. Also, no matter how tough “Hyperalloy” maybe, I would wager the bottom do have scratches etc. Weathering are kept to a minimum cause in the movies, it does show the tank being mostly silver.
After
all the seams are filled, I carefully sanded down with 400 grit, then 600,
before applying my turtle wax polishing compounds, rough and sm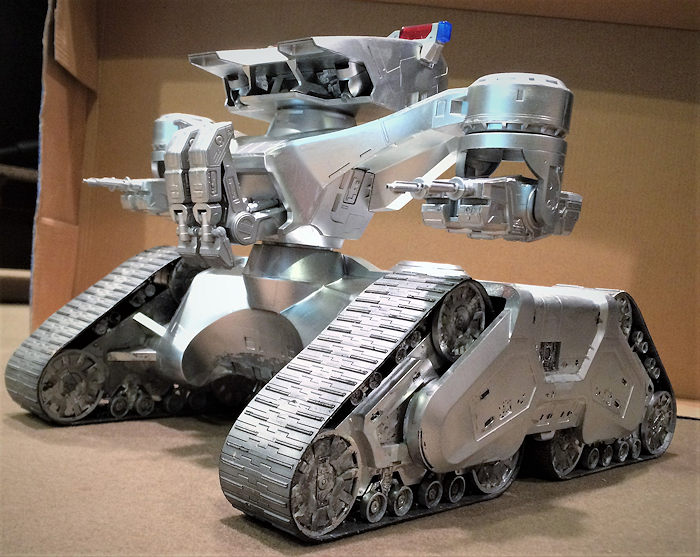 ooth.
This is especially applies to the head and despite several passes, the first
paint section still showed some rough spots, forcing me to go through it again.
The arms and shoulder joints and the main hull joints did not have that many
passes to show some wear and tear. The bottom joints only was sanded smooth with
400 and 600 grit sand paper to really show scratches that would occur in this
area. Afterward, painting can begin.
ooth.
This is especially applies to the head and despite several passes, the first
paint section still showed some rough spots, forcing me to go through it again.
The arms and shoulder joints and the main hull joints did not have that many
passes to show some wear and tear. The bottom joints only was sanded smooth with
400 and 600 grit sand paper to really show scratches that would occur in this
area. Afterward, painting can begin.
I used Testor’s Chrome Silver paint for this since the movie show all Skynet vehicles to be a shiny silver. Testor’s chrome silver is shiny, but not chrome plated shinny as that, in my opinion, is too shinny. After slight weathering to the drive section, it was blasted on, followed by more weathering before a second and third coat was applied. Afterward, Tamiya flat black and a little bit of artistic cream was used to show dirt and wear along the tracks and running wheels. This is kept to a minimum as the tanks shown in the movie isn’t all that dirty but I do want to show some dirt for realism here.
For the tracks, I spray them with Tamiya’s Titanium Silver. This isn’t all that silvery and along with the black vinyl, really gives the tracks a burnt look as constant operation, the track do heat up a bit. To accentuate the look, I applied a little Tamiya Metallic Grey also. No rust. As an operational vehicle rarely if ever have rust over the tracks least which Hyperalloys probably is rust proof. Even if doesn’t, the constant grinding against the wheels and the ground, plus all the dirt kicked up means any rust will quickly be grounded away anyways.
| FINAL CONSTRUCTION |
When all the painting is done, time to bring it
all together since there are no decals. The first to go on are the four drive
sections. Be sure you have the right orientation. The instructions will have you
attach the drive sections onto the main hull and then seal them shut. However,
if you seal the main hull shut first, and just leave the bottom tab uncemented,
you can actually pry the sections apart just
 enough
to get the drive sections in there before supergluing the bottom shut. This way,
it’s not only easier for the paint session, but also make the drive section
movable. Also, be sure to swing the tracks with the missing link section to the
rear so it can be hidden.
enough
to get the drive sections in there before supergluing the bottom shut. This way,
it’s not only easier for the paint session, but also make the drive section
movable. Also, be sure to swing the tracks with the missing link section to the
rear so it can be hidden.
Next are the torso. Attach the plasma cannon first, then attach it to the main hull. Both the cannons and the torso are design to move so you don’t need to fix it with superglue. The torso is a bit loose. At first I thought about using a brass rod but thought better since being loose means it’s easily detachable for moving.
Finally, with the head, the police warning lights are added first, before the search light “eye lens” are added. Then the head is attached to the top of the shoulders. Again, it is designed to be rotated so no superglue are needed.
That completes the model.
| CONCLUSIONS |
Well, that’s about all. It is simple and the parts are large and make into an imposing vehicle when done. Should be a great kit for beginners and T2 fans alike!
If you would like your product reviewed fairly and fairly quickly, please contact the editor or see other details in the Note to Contributors.
Back to the Main Page Back to the Review Index Page Back to the Previews Index Page