| HISTORY |
Bandai 1/72 X-Tie Interplanetary Racer
| KIT #: | 0214474 & 0202289 |
| PRICE: | $25.00 each |
| DECALS: | Either decals or stickers |
| REVIEWER: | John Summerford |
| NOTES: | Kit-bash |
| HISTORY |
With the conclusion of the galactic revolt, most beings could resume their lives and leave their homes again. They could attend events again en masse, like fairs, festivals; and races, without any governmental entity telling them that they could not.
 Courses for interplanetary
races are generally laid out in the atmosphere of a planet for several laps,
then into the vacuum of space to fly figure 8’s around a pair of moons, (or
weave around multiple moons) maneuver through an asteroid belt, and return to
atmosphere for more laps, to the start/finish line.
Courses for interplanetary
races are generally laid out in the atmosphere of a planet for several laps,
then into the vacuum of space to fly figure 8’s around a pair of moons, (or
weave around multiple moons) maneuver through an asteroid belt, and return to
atmosphere for more laps, to the start/finish line.
Points are awarded in descending order of value to the order of finishers – first place gets the most points. At the end of the season, the top three earners in points compete for the Coveted Kenobi Cup
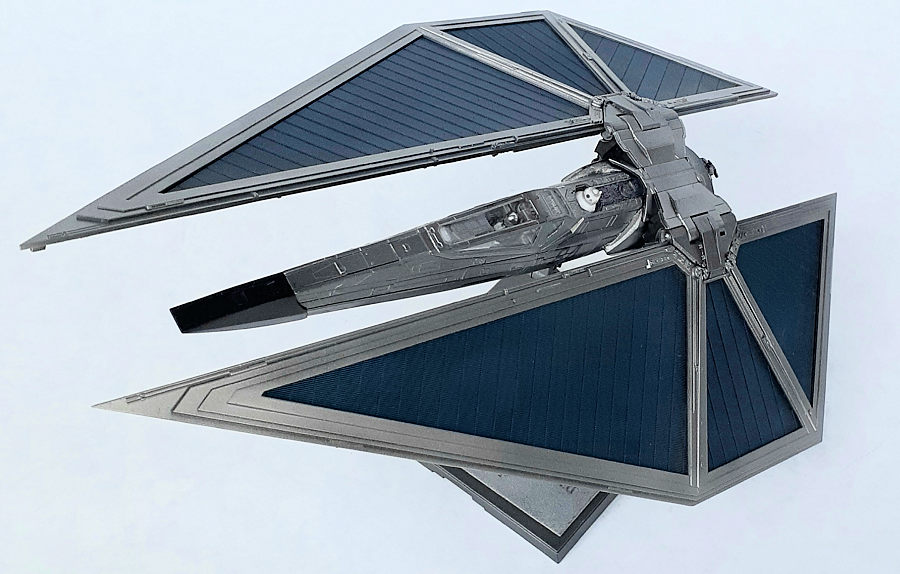
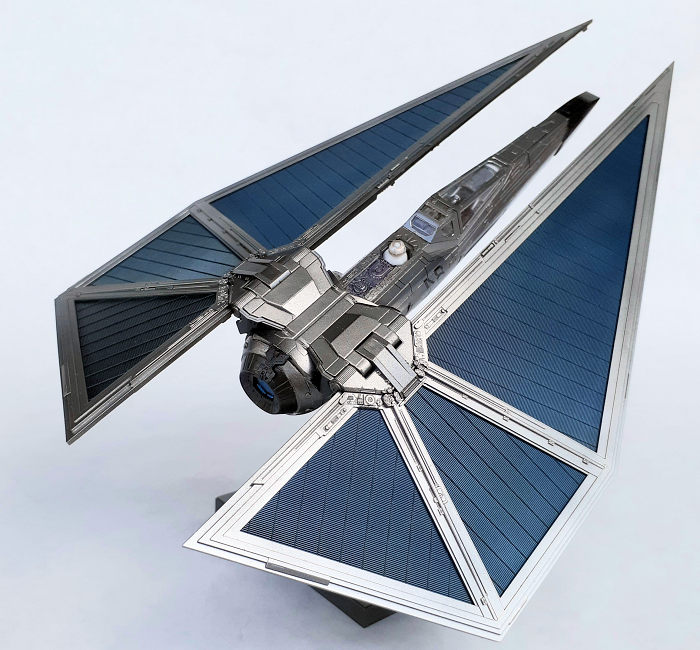
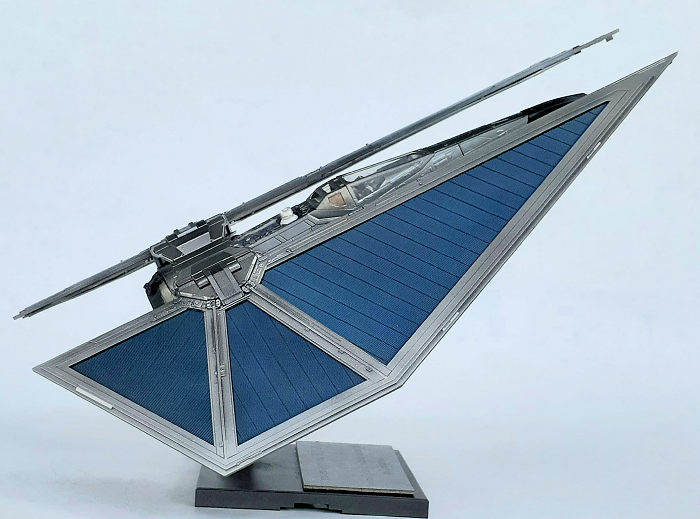
Rising to the challenge, the X-TIE Interplanetary Racer is a combination of parts “salvaged” from a TIE/sk x1 experimental air superiority fighter and a T-70 X-wing starfighter. The racer uses the ion stream projector propulsion unit and the adjustable pointed wings of a TIE striker that are specially designed for in-atmosphere combat. Also included are twin-port deflectors that can be manipulated individually for fine control and counterbalancing, making for high maneuverability.
From the X-wing comes a repulsorlift for slow flight in planetary atmospheres and an inertial dampener to protect the pilot from high-g maneuvers. The droid assistant can help with navigation and maneuvering by constantly adjusting the wing anhedral.
With the armament removed, a double bonus is obtained by reducing mass and freeing up more power for thrust. The result is a light, fast, and nimble racer.
At least, that’s how I imagine it.
| THE KIT |
Two features of the kits stand out. Most of the parts have oversized pins and deep sockets that don’t require glue and several of the sprues are multi-colored. There are relatively a lot of parts for 72nd scale, 61 for the TIE Striker and 90 for the X-wing, including display stands and ground crew silhouettes. Detail is very crisp.
Each step in the instructions has several sub-steps. The marking scheme gives a nod to novices in the form of types available--either peel and stick, or water slide decals. Specific brands of paint are not called out, but acrylics are recommended and mixing formulas given.
| CONSTRUCTION |
Planning required some test
fitting. The major upper and lower X-wing fuselage pieces were pressed together.
The TIE wing hinge mechanism was partially assembled and the location to graft
it onto fuselage was identified. Using progressively larger drill bits, a hole
was bored by hand into the upper rear of the fuselage to accept the deep socket
of the hinge plus a slit cut to the rear to accept more of the hinge structure.
More test fitting and plastic removal ensued. I pressed together all of the
parts of the left side of
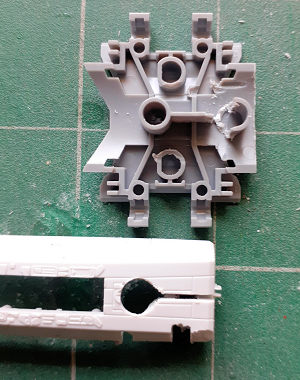 the hinge in order to deduce what structural bits to
add around the shoulder.
the hinge in order to deduce what structural bits to
add around the shoulder.
The nozzle of the ion stream projector from the TIE was placed at the rear and, again, scratch building was planned. (My sweetheart looked over my shoulder to see what I was doing. I pointed out all of the voids that needed filling and she asked, “This quarantine is getting to you isn’t it?”)
I started construction by adding blanking plates to the lower fuselage half in the location of the X-wings. The rest of the fuselage is built up in typical fashion of the cockpit first. The stickers here made for short work. It seemed that more effort went into painting the pilot figure. The rest of the fuselage builds easily. Pin and sockets plus judicious use of splines support no-glue press fits. I chose to use liquid cement on some inside surfaces. The parts are also designed so that builders, such as yours truly, cannot install them incorrectly. The nose piece was left off for installing after painting. In about an hour, this step was completed.
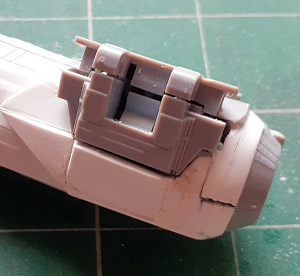
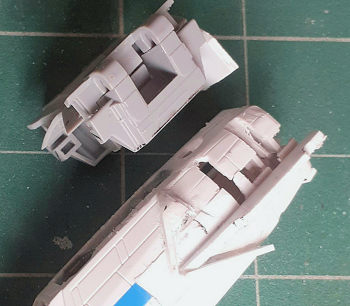 Building up the shoulder
around the wing hinge however, required the most amount of time. I used the
trial-and-error strategy and lessons learned on one side made duplicating the
step on the other side easier.
Building up the shoulder
around the wing hinge however, required the most amount of time. I used the
trial-and-error strategy and lessons learned on one side made duplicating the
step on the other side easier.
A framework was built up to hold skin panels. Using a rotary tool, a trench was gouged into the fuselage sides for the leading edges of the shoulder and to remove material for new panels on the bottom. Strip stock used to form the leading edges. With the wing fold mechanism in place, a center frame longeron piece was traced out and cut to shape. That piece was glued to the fuselage, again with the mechanism in place as a guide. The lower half of the rear end was built up and then the bottom plates added followed by the side plates.
 Looking ahead to the next
step, I painted the wing solar panels and the stand from the TIE kit. They’re
both molded in black plastic, so I skipped applying a gloss base and sprayed on
Alclad II Magnesium. Later, the solar panels were over sprayed with transparent
blue, which created a nifty effect.
Looking ahead to the next
step, I painted the wing solar panels and the stand from the TIE kit. They’re
both molded in black plastic, so I skipped applying a gloss base and sprayed on
Alclad II Magnesium. Later, the solar panels were over sprayed with transparent
blue, which created a nifty effect.
With the paint curing I returned to fuselage and cleaned up seams and finished building up the aft end by laminating layers of .060-inch styrene and sanding to shape. Just for fun, I added some detail by punching out six 2-mm discs out of .010 sheet and gluing them just ahead of, and arrayed around, the nozzle. The canopy was glued on and masked.
Wing frames, hinge detail parts, and nose were prepared for painting. On the fuselage, the area behind the cockpit, socket for the display stand and pin for the nose were masked and it was time for paint.
| COLORS & MARKINGS |
A coat of Alclad II gloss black base was sprayed on and more sanding and touch-ups done on the fuselage. In the next painting session, gun metal was sprayed on the bottom and aluminum on the top in front of the windshield and sides for the number back drop as well as the wing frames and hinge mechanism top.
 The bottom of the fuselage
was masked and also the dark aluminum stripe on top. One half inch diameter
circles masked the backdrop on the sides. The lower portion of the fuselage
sides were sprayed with magnesium. When ready, the magnesium was masked and the
upper portion of the fuselage and the ring around the nozzle was painted
stainless steel.
The bottom of the fuselage
was masked and also the dark aluminum stripe on top. One half inch diameter
circles masked the backdrop on the sides. The lower portion of the fuselage
sides were sprayed with magnesium. When ready, the magnesium was masked and the
upper portion of the fuselage and the ring around the nozzle was painted
stainless steel.
Because I sprayed over the previous coat of paint instead of the blak base, I didn’t achieve the contrast I imagined I’d get between the magnesium, steel, and aluminum, but the subtle effect still looks good. Once again, I leaned something new about Alclad II paint.
The hexagon at the center of the nozzle was painted metallic blue to represent the ion stream.
Decals for the number 84 came from the decal dudgeon. Why #84? That was the number on Tex Johnston’s stripped-down Thompson Trophy winning P-39. NOBODY gave him a chance of winning against all of the heavier, up-engined P-38s, P-51s and Corsairs in the field. There’s a lot to be said for light and nimble.
| FINAL CONSTRUCTION |
Moving on, the nose was pressed into place. The wings build up in a matter of minutes—more effort went into painting the components. They were captured in the hinge mechanism so that they can articulate through about 30 degrees. Finely, the pair were glued to the fuselage. The droid unit was glued in place and the model was complete.
Lead weight was glued to the bottom of the display stand and a label proclaiming the racer to be the winner of the sixth Kenobi Cup was glued on the top. The stand allows for three positions in the pitch axis and three in roll axis. I chose UP and LEFT before gluing on the model.
| CONCLUSIONS |
Much attention by Bandai has been paid to making assembly as easy as possible, much like Gundam suits. Each kit could be built without glue or paint in a couple of hours. The bulk of the time spent on this project was spent on the area where the wings graft onto the fuselage. I wonder if the aftermarket resin folks could produce a conversion set in three pieces and also if it would be worth their time. Regardless, I think it is fun for anyone who wants to create a 'what if' model.
19 September 2020
Copyright ModelingMadness.com
If you would like your product reviewed fairly and fairly quickly, please contact the editor or see other details in the Note to Contributors.
Back to the Main Page Back to the Review Index Page Back to the Previews Index Page