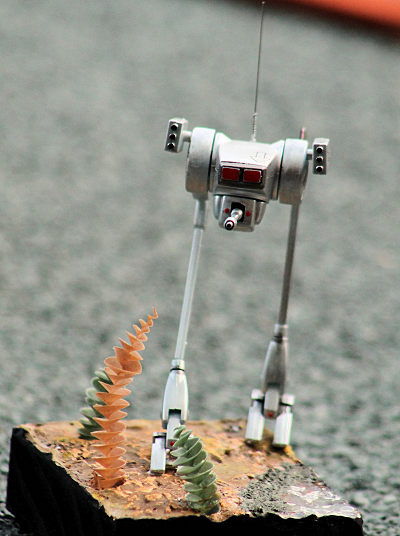
Nitto 1/48 Ostall
| KIT #: | 23007 |
| PRICE: | AUD$5.50 |
| DECALS: | None |
| REVIEWER: | George Oh |
| NOTES: |
| HISTORY |
 ‘Crusher
Joe’ was a series of novels written by Haruka Takachiho from 1977 to 2016. It
was made into an animated film (aka, cartoon) in 1983, with two additional
episodes in 1989.
‘Crusher
Joe’ was a series of novels written by Haruka Takachiho from 1977 to 2016. It
was made into an animated film (aka, cartoon) in 1983, with two additional
episodes in 1989.
Future History.
In the early days of space exploration, a group of rugged individuals took on the job of destroying asteroids to clear and define navigable lanes through space (aka, Space lanes). Because of their work, they called themselves the ‘Crusher Council’, and were nicknamed "Crushers", which eventually became their business moniker. They expanded their resume, and took-on other assignments ranging from freight hauling to terraforming and everything in between. They subscribed to only a few steadfast rules. Once the Union accepts a case, the Crushers are honour-bound to follow it through. Unethical and illegal assignments are taboo, and any Crusher accepting one, is barred from the Union. Of course, shady clients try to trick the Crushers into accepting such assignments.
Among the various worlds, the Crusher Council has an impressive reputation, and among the Crushers, their most elite team is the one led by Crusher Dan and his successor/son, Crusher Joe. Joe’s spaceship is the Minerva, which carries a pair of VTOL fighters (Blue 1 and Red 2), a bulldozer/tank (the Galleon), and an assistance robot, Dongo, with a warped sense of humour.
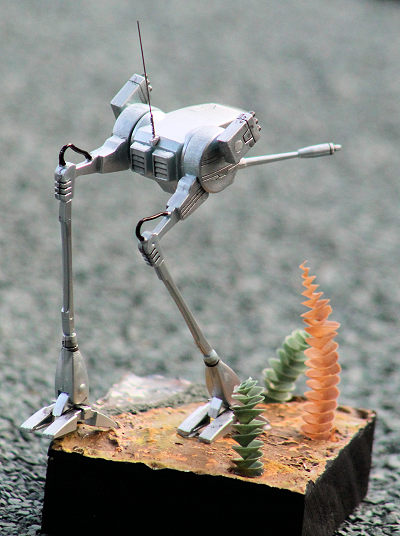
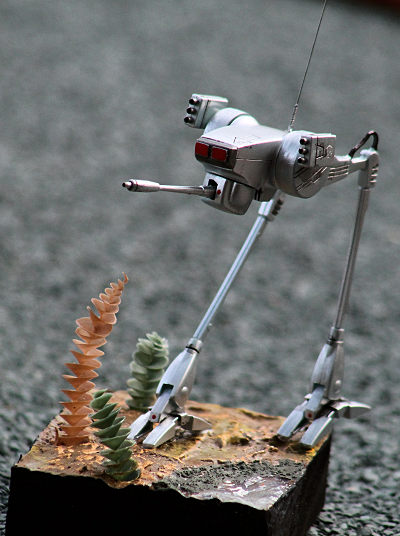
The Crusher’s main opponents are the Murphy pirates, who live on the swamp planet Lagoll. The pirates use several types of terrain-specific armed robots/droids – airborne Gadflies, water-borne Skateboys, and land-based Crawlers, Diskounds, and Ostalls. The droids (but not the ones you’re looking for) operate in groups, and serve as guards against intruders, or hunters of escapees. The Ostall (= Locust) is a bipedal walker armed with an underside laser turret, and 2 x triple missile launchers.
| THE KIT |
 This kit
fell into the possession of My Lady, who, at the conclusion of a Swap n’ Sell,
took pity on a seller who had forgotten to display the contents of a large
carton. It contained all-manner of small and medium-sized sci-fi kits (her
favourite genera), so she bought the lot (70+ - and had me pay for them – but
THAT is another story). I’d never heard of the ‘Crusher Joe’ series, and this
machine’s shape intrigued me. So, unobserved by her, I extracted it (and a few
others) from that carton and hid them amongst my stash. Years later (= last
month), I extracted it when I was sorting-out my stash and I couldn’t get this
tiny box back in to its carton. (Yeah, right!! Ed)
This kit
fell into the possession of My Lady, who, at the conclusion of a Swap n’ Sell,
took pity on a seller who had forgotten to display the contents of a large
carton. It contained all-manner of small and medium-sized sci-fi kits (her
favourite genera), so she bought the lot (70+ - and had me pay for them – but
THAT is another story). I’d never heard of the ‘Crusher Joe’ series, and this
machine’s shape intrigued me. So, unobserved by her, I extracted it (and a few
others) from that carton and hid them amongst my stash. Years later (= last
month), I extracted it when I was sorting-out my stash and I couldn’t get this
tiny box back in to its carton. (Yeah, right!! Ed)
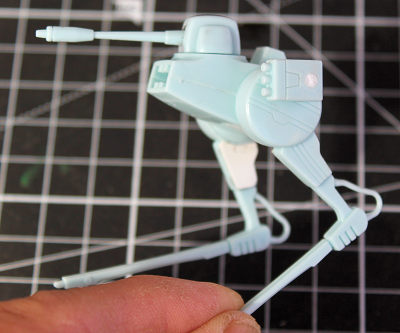
Inside the tiny (hand-sixed) lid-&-tray box were 2 sprues that framed only 20 small parts. All were well-moulded, though marred by little mould seams caused by a slight mould miss-match. The 2-step instructions were printed (equally small) on the inside of the lid of the box. All directions are in Japanese(?) characters (which, to my detriment, I am unable to read), so there may, or may not, be any painting instructions. Some parts/assemblies can be movable (chin turret & gun, and legs at the ‘hip’ & ‘ankle’ joints). The rocket launchers could have been, with a little more engineering, and they still can be – with a little behind-the-scenes scratch-building.
| CONSTRUCTION |
 I started
building this kit (unintentionally – honest!!) when, as I examined the plastic,
I painted the inside of the chin turret (black, naturally), inserted the gun and
then trapped it between the turret halves. Fit was good (but a little filler WAS
needed). Next, I trapped the movable piece between the ‘ankle’ halves and glued
them together. Mould seams were scraped from the ‘toes’ before they were glued
to the movable ‘ankle’ pieces. There were two identical units, and while no
filler was needed, my beef is that the toes are hollow. But I was building this
in my lunch break, and the hollows face each other, so I’ll live with it.
I started
building this kit (unintentionally – honest!!) when, as I examined the plastic,
I painted the inside of the chin turret (black, naturally), inserted the gun and
then trapped it between the turret halves. Fit was good (but a little filler WAS
needed). Next, I trapped the movable piece between the ‘ankle’ halves and glued
them together. Mould seams were scraped from the ‘toes’ before they were glued
to the movable ‘ankle’ pieces. There were two identical units, and while no
filler was needed, my beef is that the toes are hollow. But I was building this
in my lunch break, and the hollows face each other, so I’ll live with it.
Making the launchers movable was easy – once I’d come-up with a plan. With much trepidation, I snipped-off from the hollow ‘hips’, the locating pins for the rocket launchers and drilled a hole instead. I pushed a length of plastic rod through the hole till it touched the ‘head’, then drilled a corresponding hole right through the launchers. They were slid down the rod (to stand-off from the ‘hips’), glued there, and then the rest of the rod (that protruded past the outside of the launchers) was snipped-off flush with the outside. Now, they’ll elevate/depress, and friction holds them at the set angle. The ‘thighs’ were also hollow, and I opted for the easy way out by covering them with a strip of plastic card.
I hit a snag when assembling the ‘head’ of the Ostall. The chin turret is supposed to rotate by the usual means of a retaining ring that is to be glued around a pin that projects inside the head. But the pin is too short, the fit of the ring is sloppy, and so glue would have dribbled down and glued the turret solid. My fix was to jam a longer length of tube over the pin, and then to poke a wee bit of Superglue gel into it and down onto the pin. Fit of the upper head to the lower was pretty good, but I first scraped at the outer edges of the joining surfaces to create a groove/panel line that I’d be filling with a dark wash (later) to break-up the plainness of the model – advance planning.
| COLORS & MARKINGS |
 Internet
sources show the Ostall as metallic, grey, blue-grey, dark grey (with purple
highlights), dark green, and even yellow. Silly me went for an overall metallic
silver using SMS Super Silver (which doesn’t need a black undercoat). The boxart
shows quite a few small details on the ankles and turret, so I dotted them
(whatever they are) on with paint. Engraved detail was repaired/deepened with a
razor saw then a dark wash was soaked into them. The ‘beak’ of the head was
brush-painted with CM Iron Warriors, and the ‘eyes’/sensors(?) were painted CM
Bloodangels red (as per the box art). The 2 x rear vents(?) were painted black,
then dry-brushed (downwards only) with silver. Finally, the antenna(?) was
painted with Molotow chrome – a bright silver ink. I didn’t weather it (much –
see below) because it is a home-team sentry – not a battlefield warrior.
Internet
sources show the Ostall as metallic, grey, blue-grey, dark grey (with purple
highlights), dark green, and even yellow. Silly me went for an overall metallic
silver using SMS Super Silver (which doesn’t need a black undercoat). The boxart
shows quite a few small details on the ankles and turret, so I dotted them
(whatever they are) on with paint. Engraved detail was repaired/deepened with a
razor saw then a dark wash was soaked into them. The ‘beak’ of the head was
brush-painted with CM Iron Warriors, and the ‘eyes’/sensors(?) were painted CM
Bloodangels red (as per the box art). The 2 x rear vents(?) were painted black,
then dry-brushed (downwards only) with silver. Finally, the antenna(?) was
painted with Molotow chrome – a bright silver ink. I didn’t weather it (much –
see below) because it is a home-team sentry – not a battlefield warrior.
There were no decals for me to stuff-up – Yay!!!
| FINAL BITS |
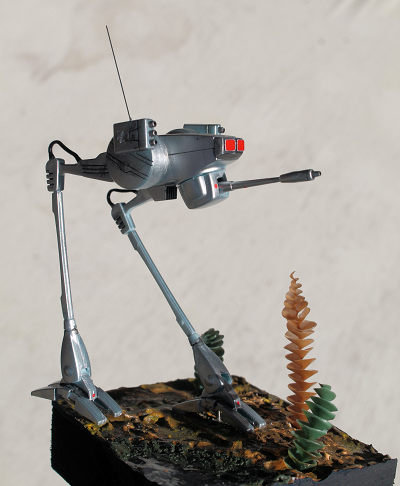 As usual, I
dropped the antenna into the Black Hole of the Model-building Area. Rats!!! As a
replacement, I wrapped a fine soft wire (to replicate a spring) around a fine
stiff wire. This was superglued into a small-calibre hole I drilled into a small
(but long) plastic square-section rod (the 4th try was the best). This rod
reaches all the way down into the ‘head’ (for stability) and was glued there.
Yay, me!!!
As usual, I
dropped the antenna into the Black Hole of the Model-building Area. Rats!!! As a
replacement, I wrapped a fine soft wire (to replicate a spring) around a fine
stiff wire. This was superglued into a small-calibre hole I drilled into a small
(but long) plastic square-section rod (the 4th try was the best). This rod
reaches all the way down into the ‘head’ (for stability) and was glued there.
Yay, me!!!
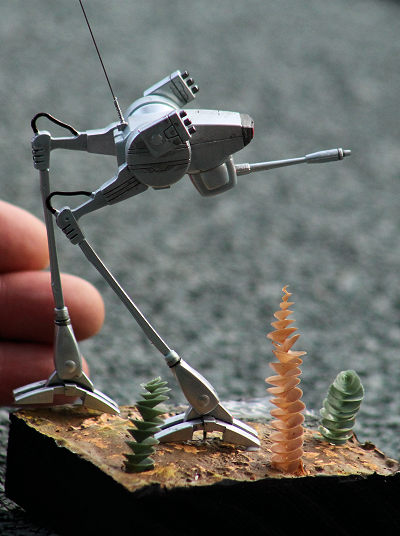
Because of the inherent instability of the biped, a stand/base is mandatory. It’s nothing fancy – just a small piece of scrap board with a bit cut away to form a slight depression (I do this a lot!!). I surrounded it with cheap tape, then trowelled a thin layer of plaster over it (poking it onto the corners with a skewer). When it was dry, the level area was painted with a medium brown, and a darker brown went into the depression. The flat area received dry-brushings of a light brown and a yellow. Luckily, the water-based paint exposed some of the underlying plaster. The weird plants are the peelings (= swarf) produced when I had to drill holes into thick plastic boxes at work (about 3 years ago?). I saved them BECAUSE they looked like weird plants (to me), but I’ve never had a chance to use them – till now. They were screwed tightly into holes drilled through the plaster and into the base, then they were secured with a dollop of wood glue.
Several applications of a medium-density water effects mousse was trowelled over the depression, to fill it. The top layer was honey-like Liquitex to produce a level surface. And because I’ve had it for years (and never used it), I stippled some green CM textured paint along the water’s(?) edge.
Because the Ostal is a biped, positioning it on its two flat feet suggests that it is stationary, whereas positioning it on one foot, and in a slightly off-balance pose, suggests that it is moving forwards, or even running. Alternates are tripping and falling forwards, or falling-over backwards. The key to blending the model onto the base is to use the ground work. Embed the feet (slightly), then dirty them up with some of the substrate, and (if possible) to put a ‘foot print’ somewhere logical, on the base, behind the subject. This Ostall was pinned to the base (under its left foot), secured by another dollop of wood glue, and is balanced/supported by its right. In truth, the base took longer to finish, that the model.
| CONCLUSIONS |
Because we humans are have an efficient bipedal gait, many Sci-fi writers seem to believe that a bipedal machine could be equally efficient. I don’t know which came first – Haruka’s Ostall, the Veritechs & Destroids from ‘Robotech’, or George Lucas’ AT-ST (‘Empire Strikes Back’ / Battle of Hoth). Or is it just (another) case of convergent evolution?
This model is listed as 1/48-scale, but without a known yardstick (like a figure, a car or ladder), its size and scale is conjecture. It was a fun kit to build and unusual in appearance, so I’m happy to recommend it to other modellers. Incidentally, since I like to build the odd tank or two, to satisfy my curiosity, and for laughs, I flipped the ‘head’ and put the turret on top. The Ostall suddenly looked more-believable to me (and larger), because now, it had a real head (the turret) and a ‘body’ (the former head). But who am I to argue with Haruka Takachiho (the author. Remember?) ‘cos I didn’t write this stuff (though I wish that I had). And I’ve yet to see any of the ‘Crusher Joe’ series.
| REFERENCES |
Just some internet research.
PS – I eventually found the top half of the broken antenna. Anyway, my scratch-built replacement is more robust, and more in-scale.
13 August 2026
Copyright ModelingMadness.com. All rights reserved. No
reproduction in part or in whole without express permission.
If you would like your product reviewed fairly and fairly
quickly, please
contact
the editor
or see other details in the
Note to
Contributors.