1/3.5m Death
Star
|
KIT #: |
No kit: conversion from common household item. |
|
PRICE: |
One Oz-buck |
|
DECALS: |
Eh? |
|
REVIEWER: |
George Oh |
|
NOTES: |
The club made me do it |
 The Galactic
Empire was introduced to us in the film ‘Star Wars’ (which morphed into the
fourth Star wars film and was re-titled, ‘Star Wars - A New Hope’). To
supplement its fleet of Star Destroyers, Super Star Destroyers, TIE-fighters and
other craft, the Empire built the first Death Star – a huge spherical spaceship
built around a correspondingly-huge beam weapon that is capable of instantly
destroying a planet. Various ‘knowledgeable’ sources cite the Death Star as
being anywhere between 140 to 1,000Km in diameter, having any number of
crew-members & intrinsic ships, having various defensive measures including
‘guns’, beams, a magnetic shield and (only 6?) fighters, and having offensive
systems including long-range tractor beams and that big gun. If you don’t know
what happened to the first Death Star, I strongly recommend that you emerge from
under your rock and see “Star wars – A New Hope”.
The Galactic
Empire was introduced to us in the film ‘Star Wars’ (which morphed into the
fourth Star wars film and was re-titled, ‘Star Wars - A New Hope’). To
supplement its fleet of Star Destroyers, Super Star Destroyers, TIE-fighters and
other craft, the Empire built the first Death Star – a huge spherical spaceship
built around a correspondingly-huge beam weapon that is capable of instantly
destroying a planet. Various ‘knowledgeable’ sources cite the Death Star as
being anywhere between 140 to 1,000Km in diameter, having any number of
crew-members & intrinsic ships, having various defensive measures including
‘guns’, beams, a magnetic shield and (only 6?) fighters, and having offensive
systems including long-range tractor beams and that big gun. If you don’t know
what happened to the first Death Star, I strongly recommend that you emerge from
under your rock and see “Star wars – A New Hope”.
AMT produced a volleyball-sized, 8-piece model of the Death
Star, but a college advised me that it is difficult to get right (so it is
hiding in the bowels of my stash). When the Display co-ordinator of my modelling
club announced that the Club’s display at the international Model Expo (in
Melbourne, Australia) was to be ‘Models built from ping-pong (aka table-tennis)
ball’, I had to rack my brain(cell?) to come-up with something I could build to
contribute. This is one on my ideas. FYI, a ping-pong ball is a shade under 40mm
in diameter and it’s inside pressure is a little over one STP atmosphere.
This will be a small review,
because the model is only small. To convert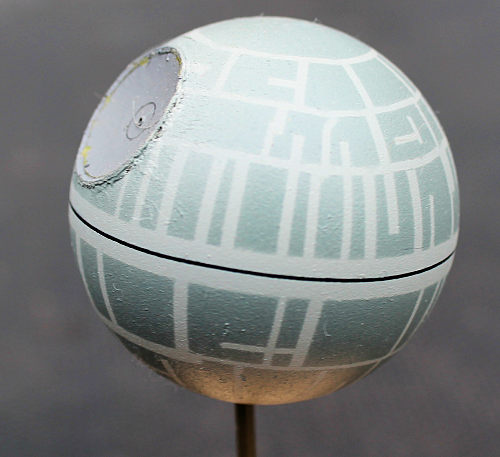 a ping-pong ball into a model of a Death Star, I’d need the dish of the big gun
and a representation of the various zones, especially its equatorial trench.
a ping-pong ball into a model of a Death Star, I’d need the dish of the big gun
and a representation of the various zones, especially its equatorial trench.
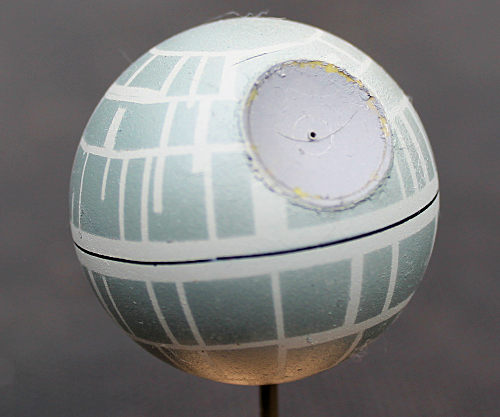
After taking various measurements
from photos I estimated the diameter of the dish, halved it to get its radius,
and set this measurement on a pair of screw-adjustable geometry dividers. With
this, I cut a disk from the surface of the ping-pong ball. Initially, I didn’t
know if this could be done, or not. But, nothing ventured - nothing gained. I
thought that the wall of the ping-pong ball would be as thin as a vac-form model
part, but I discovered that was thicker that I presumed. Generous amounts of
superglue allowed me to glue it back in position but in a reversed orientation,
to produce the dish. Impaling the Death Star on a pin through the disk’s centre
pin hole gave me a handle on it and allowed me to manoeuvre it for the next
phases of construction.
By using the dish as a datum point,
I was able to approximate (ie, guess at) the location of the Death Star’s
equatorial trench, and to spray-paint the zone black (with a very generous
overspray area). The trench was masked-off with a length of 0.4mm-wide masking
tape. Getting this equator perfect was the hardest part of the whole build (in
my opinion).
 With the mask
in place, the whole Death Star got an all-over coat of light grey. Then the work
started. Other rings of latitude had to be place down on the surface and
positioned parallel to the equator. I feared placing them accurately would be a
difficult job, but those dividers helped to make it so much easier. Most rings
could be achieved with that 0.4mm tape, but the ones near the ‘polar’ regions
had to be cut from the edges of circles of tape. Next, meridians of longitude
had to put down at irregular intervals. Generally, they had to connect to the
rings of latitude and be of varying widths and lengths – so, lots of work with
tape, a steel ruler and a sharp blade. They don’t follow any pattern or plan - I
put them down anywhere. Just for the heck of it, I put some bits down that
suggest my initials.
With the mask
in place, the whole Death Star got an all-over coat of light grey. Then the work
started. Other rings of latitude had to be place down on the surface and
positioned parallel to the equator. I feared placing them accurately would be a
difficult job, but those dividers helped to make it so much easier. Most rings
could be achieved with that 0.4mm tape, but the ones near the ‘polar’ regions
had to be cut from the edges of circles of tape. Next, meridians of longitude
had to put down at irregular intervals. Generally, they had to connect to the
rings of latitude and be of varying widths and lengths – so, lots of work with
tape, a steel ruler and a sharp blade. They don’t follow any pattern or plan - I
put them down anywhere. Just for the heck of it, I put some bits down that
suggest my initials.
A coat of dark grey followed, then
all of the masking was removed. I didn’t do much detailing inside the dish
because I feared that removing the tape would pop the dish out of its hole.
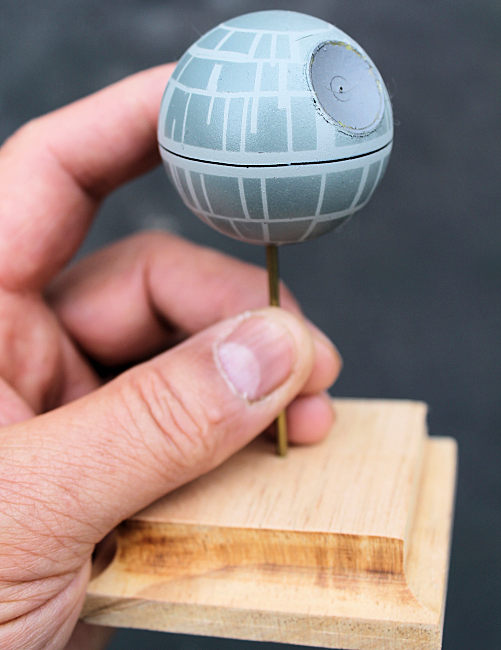
To display my Death Star, I impaled
it on a slim brass rod that entered its South Pole and extends up to contact the
inside under the Death Star’s N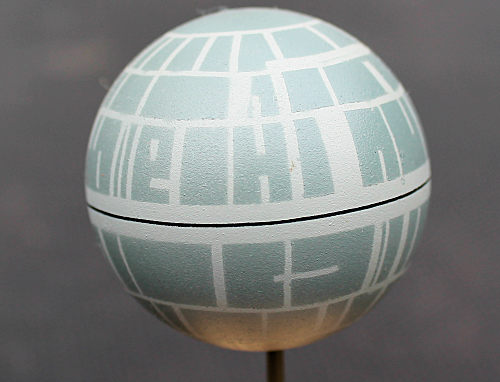 orth
Pole. The rod was embedded into a square of scrap wood which had been run-up
against a spinning router bit to make the edge look a little fancy.
orth
Pole. The rod was embedded into a square of scrap wood which had been run-up
against a spinning router bit to make the edge look a little fancy.
I reckon that I was successful
because anyone who looks at my ping-pong ball immediately recognises it as the
Death Star. Other modellers complimented me on my little model, and club members
appreciated my thought process to get an unusual contribution to the Club’s
display. I was not initially confident that I could transform this ping-pong
ball, but once I’d come-up with an attack-plan, I found the execution was pretty
easy. I’m also glad that I was sane enough to steer away from doing an
in-progress Death Star, and the large AMT kit (for now)…………...
Just photos from the movies and the
internet. Historical blurb from Wikipedia.
George Oh
14 September 2017
Copyright ModelingMadness.comIf you would like your product reviewed fairly and fairly quickly, please
contact
the editor or see other details in the
Note to
Contributors.
Back to the Main Page
Back to the Review
Index Page
Back to the Previews Index Page