| KIT #: | 9101 |
| PRICE: | $25.00 |
| DECALS: | One option |
| REVIEWER: | John Summerford |
| NOTES: | Decals from the dungeon and from sheet for Pegasus’ Alpha Centauri UFO kit. |
| HISTORY |
Courtesy the instruction sheet
Designed to safely transport its two-man crew to wherever their mission takes them, it also provides them with an all-around view never available to previous astronauts. Hyper-dynamo-tension rocket engines give the Apollo 27 an acceleration rate that staggers the mind, yet completely protects the crew from the massive number of G’s that would normally crush them! This makes far journeys possible in just a few short months, not decades. Mars is just a hop away now!
| THE KIT |
This offering is part of Pegasus’ Rockets and UFO’s
collection and is reminiscent of 1950’s spaceship designs. The low parts count
is also like kits from that era. The engineering, however, is up-to-date. The
flight deck and canopy are cleverly designed to be inserted to the upper body
half from inside onto
 mounting pegs. A test fit showed that the holes in the
pieces that slip over the pegs needed reaming to fit. No filler is needed around
the seam. No flash was present in my copy and some mold seams were present on
the astronauts and the pylon mounting plates. The rocket pods and body halves
also fit well together.
mounting pegs. A test fit showed that the holes in the
pieces that slip over the pegs needed reaming to fit. No filler is needed around
the seam. No flash was present in my copy and some mold seams were present on
the astronauts and the pylon mounting plates. The rocket pods and body halves
also fit well together.
22 pieces are molded in white styrene and one is clear. Three pairs of US markings are on the decal sheet. Instructions are on a two-fold sheet and cover six assembly steps on one side with paint and decaling information on the other.
Step 1 covers the flight deck and crew. In number 2 the dorsal and ventral pods come together with the port and starboard completed in step 3. The main body comes together with the side pods from the previous step. Step 5 mates the other pods to the body and the final step brings the nose cone and rear nozzle.
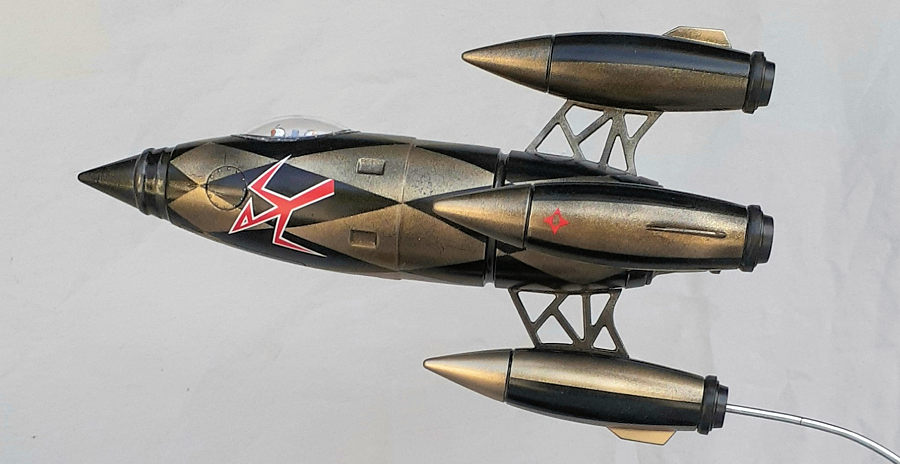
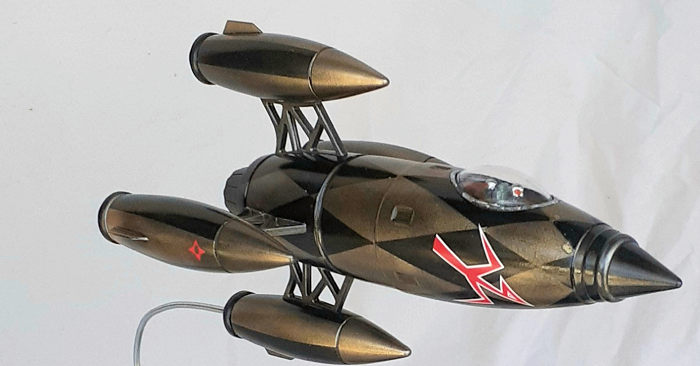
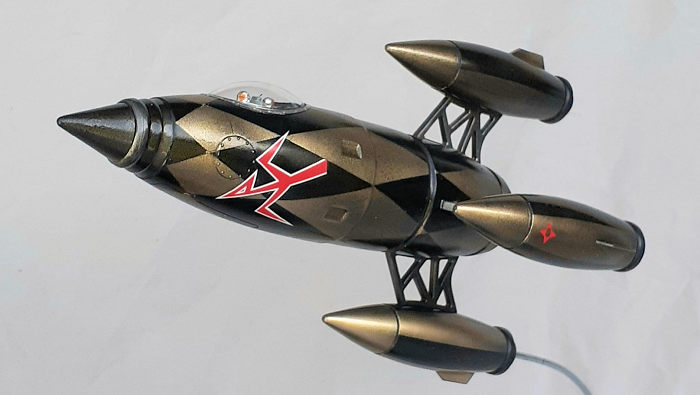
The paint scheme and decals echo the Saturn V rocket with mostly white body with black bands and rectangles.
| CONSTRUCTION |
If one desires, the kit could be assembled in about an
hour after some clean-up and depending on how the flight deck is painted. So, of
course, I treated it like a blank canvass and had to modify some of the parts to
facilitate painting. The port and starboard pylons fit over mounting pegs in the
fuselage. I cut the outer portions of the “ears” that fit over the pegs so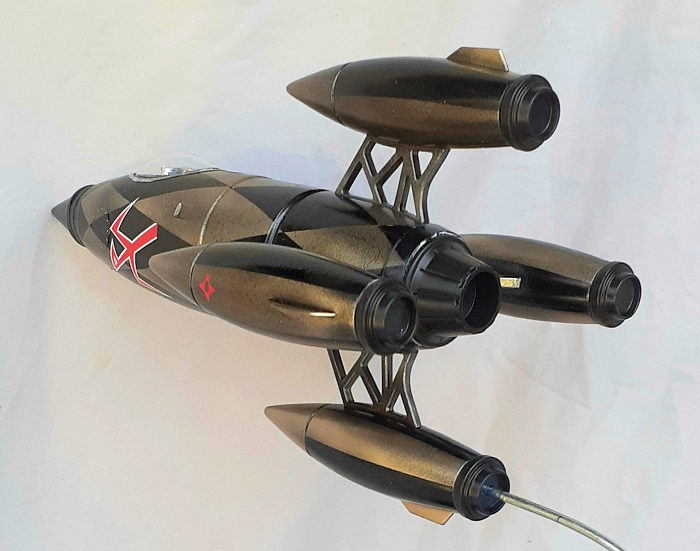 that
I could glue them in place after the fuselage was painted. The troughs that the
pylons fit in were cleaned up while I was at it. The seams on the other pylons
were also cleaned up.
that
I could glue them in place after the fuselage was painted. The troughs that the
pylons fit in were cleaned up while I was at it. The seams on the other pylons
were also cleaned up.
Some cyano glue was used as filler around the necks of the flight crew figures to make them appear less Human and more Humanoid. The helmets were modified for a head with eyes more on the sides than the front. The flight deck tub, seats and figures were primed, painted, then decals from TSDS applied.
With that completed, the canopy, flight deck, and a part that looks like an access hatch were glued in place, then the main body was closed up. The canopy was masked and several sessions of seam filling and sanding followed to get a smooth surface.
| COLORS & MARKINGS |
Alclad II black primer was sprayed on in several coats with a light sanding in between onto the main body, pods, nose cone and exhaust nozzles. Stainless Steel was sprayed on the nose cone, pylons, and the recessed bands on the pods and main body. These are were masked and yet another coat of primer was applied.
Then the real work started.
Discs of tape with tick marks at the edges
representing the even numbers of the clock face (Noon, 2, 4, 6 etc.) were
pressed onto the nose and rear of the main body. This gave reference points for
a very thin strip of tape to be applied, starting at 12 O’clock at the nose to 6
O’clock at the rear rotating cloc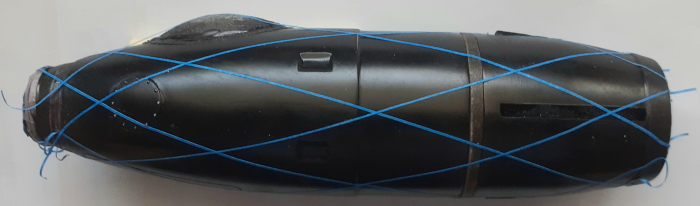 kwise. Another strip ran from 2 O’clock to 8
O’clock and repeated around the dial. The procedure was repeated going counter
clockwise. Getting the spacing correct required repeated attempts.
kwise. Another strip ran from 2 O’clock to 8
O’clock and repeated around the dial. The procedure was repeated going counter
clockwise. Getting the spacing correct required repeated attempts.
This defined the corners of the diamonds and the black primer diamonds were masked. I lost count of how many hours this procedure took, but it stretched over a week. I might have been crazy to mask for diamonds on the main body, but I wasn’t dumb enough to do it again for the pods, so I just masked them for stripes. The pods and main body were sprayed Alclad Pale Burnt Metal and the nozzles Jet Exhaust.
After unmasking the main body and pods, they were sprayed with a rattle can of acrylic clear coat. Unfortunately, this caused some crackling, but, in a weird way, it works. (At least, enough to not do it all over again.) Decals were scavenged from the dungeon. I recall that they came from Hasegawa’s 32nd scale Ki -61 Tony kit and were intended for the tail fin.
| FINAL CONSTRUCTION |
A base was made from scrap wood and 1/8th inch rod epoxied to it. Both ends of the rod were ground down to create a square profile so that they wouldn’t spin when epoxied in place. Finely, the canopy was unmasked. The nozzles for the main body plus the side and dorsal pods were installed. The nose cone was also added.
 Attaching the model to the displayed stand was tricky.
A 1/8th inch hole was drilled through the center of the ventral nozzle and slid
onto the rod, making sure it faced the correct direction. A larger hole was
bored out at the aft end of the ventral pod, then it was glued to the main body.
Both the model and the front edge of the base were placed in jigs, with their
noses down and the rod inserted all the way to the inside of the pod’s nose.
Slow setting epoxy was drizzled into the pod to hold the rod in place. The
nozzle was slid up the rod and glued to the pod, centering the rod in the pod.
Attaching the model to the displayed stand was tricky.
A 1/8th inch hole was drilled through the center of the ventral nozzle and slid
onto the rod, making sure it faced the correct direction. A larger hole was
bored out at the aft end of the ventral pod, then it was glued to the main body.
Both the model and the front edge of the base were placed in jigs, with their
noses down and the rod inserted all the way to the inside of the pod’s nose.
Slow setting epoxy was drizzled into the pod to hold the rod in place. The
nozzle was slid up the rod and glued to the pod, centering the rod in the pod.
In the following morning, the model and stand were placed upright, concluding the project.
| CONCLUSIONS |
This kit is an easy build. Even the intended paint scheme would take much more effort to apply than the assembly. Some thought is required regarding how to display the model. It’s too bad that a stand is not included. I chose do display the model in flight mode, but perhaps treating it like a ship model with two pegs would be simpler to do. Resting the model on the nozzles is another option, but that looks odd for the aft crew member who would be facing down.
I learned a lot creating the diamond pattern. My biggest take-away is that, If I ever do another checkerboard scheme, I’ll use decals.
April 2022 Copyright
ModelingMadness.com. All rights reserved. No reproduction in part or in whole
without express permission. If you would like your product reviewed fairly and fairly quickly, please
contact
the editor or see other details in the
Note to
Contributors.