AMT/ERTL 1/537 USS Reliant
| KIT #: | AMT 667 |
| PRICE: | $40.00 or so |
| DECALS: | One option |
| REVIEWER: | Donald Zhou |
| NOTES: | Advantages: Well detailed, simple, corrected some inaccuracies of the old kit, and easy to set up for lighting. Disadvantages: decals incomplete, A LOT of fit issues, details missing. P.S. Separate Aztec details used. |
| HISTORY |
When the Federation built the Constitution class
cruisers/explorers, they became the backbone of the entire Starfleet.
However, deep space exploration proved to be extremely dangerous and a good
number of the Constitutions were lost despite the Enterprise became famous
as the first starship to complete her five year exploration. Many however,
didn’t make it. To support and fill the losses, the Federation soon
developed the Anton class. The Anton class is simply a modular modification
of the Constitution class. It uses the Constitution class saucer, cutting
both developmental and production costs. In order to be operational, a huge
“hard back” was attached to the saucer to contain the engineering section
with the anti-matter reactor and its associated anti-matter and deuterium
pods, the impulse engine and two small shuttle bays. The Constitution class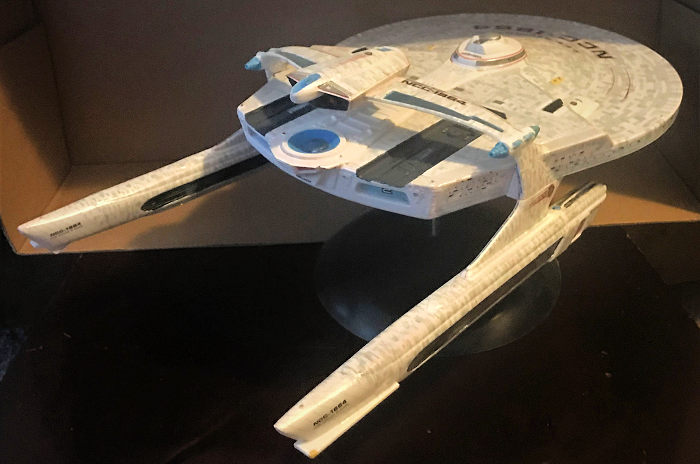 warp drives were also adapted, but hung below the saucer with pylons
instead. Originally, the Antons were lightly armed, saving most of its
interior spaces for science labs. Unfortunately, in the incessant, non-stop
intercene conflict with the Klingons, and to some extent the Romulans, the
Antons proved to be a poor match, with many Klingons regal themselves with
songs on how they conquered a hapless Anton! When the Constitutions were
refit and massively upgraded, the Antons were too. Foremost was the addition
of six dual phaser banks on the saucer, three on top, three on the bottom
and a massive “roll bar” that contain extra sensors and most importantly,
four photon torpedo launchers, two forwards, two aft with four mega phasers
on top of the extended pylons that support the warp drives, with two facing
forward and two aft. This improvement gave the ship an immense boost in its
firepower and with the improved and boosted shields, can easily take on a
Klingon Ka’Tinga and survive. The new ship, now the Miranda class cruisers,
were a nasty surprise to the Klingons since they still expected the ship to
be easy prey like the Antons. To their sorrows, which they left out of their
songs, the Mirandas were another story and song and left many running with
their tails behind them at the first initial encounter.
warp drives were also adapted, but hung below the saucer with pylons
instead. Originally, the Antons were lightly armed, saving most of its
interior spaces for science labs. Unfortunately, in the incessant, non-stop
intercene conflict with the Klingons, and to some extent the Romulans, the
Antons proved to be a poor match, with many Klingons regal themselves with
songs on how they conquered a hapless Anton! When the Constitutions were
refit and massively upgraded, the Antons were too. Foremost was the addition
of six dual phaser banks on the saucer, three on top, three on the bottom
and a massive “roll bar” that contain extra sensors and most importantly,
four photon torpedo launchers, two forwards, two aft with four mega phasers
on top of the extended pylons that support the warp drives, with two facing
forward and two aft. This improvement gave the ship an immense boost in its
firepower and with the improved and boosted shields, can easily take on a
Klingon Ka’Tinga and survive. The new ship, now the Miranda class cruisers,
were a nasty surprise to the Klingons since they still expected the ship to
be easy prey like the Antons. To their sorrows, which they left out of their
songs, the Mirandas were another story and song and left many running with
their tails behind them at the first initial encounter.
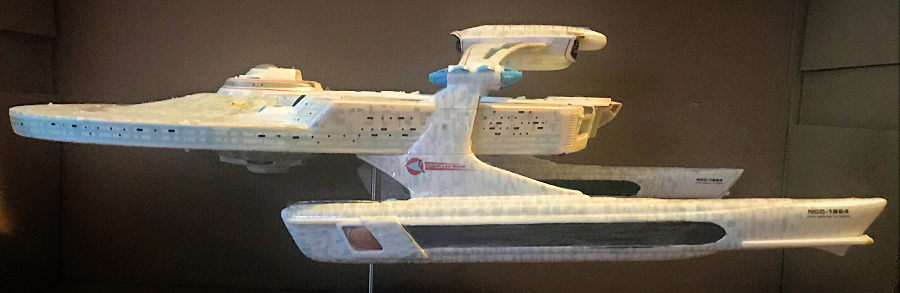
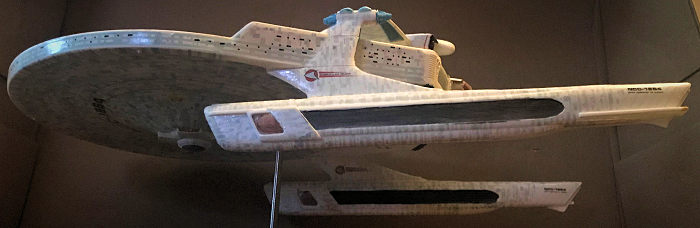
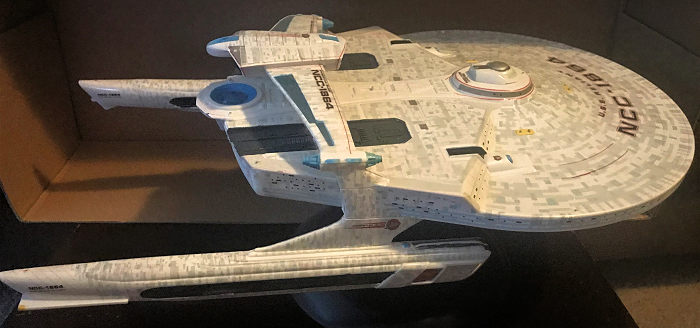
One of the most important, or rather infamous Mirandas has to be the U.S.S. Reliant when she was ship-napped by an avenging Khan (The original scream please! KKKKKAAAAHHHHNNNNNN) and also stole the Genesis Device in order to trick and trap Kirk. Kirk and the Enterprise of course escaped when Spock went in the radioactive engine chamber to effect emergency repairs (the good of the many, out weight the good of the few, or one. It’s only logical Captain!). Kahn blew himself, the ship and the rest of his crew up when the Genesis Device detonated (later of course, Kirk would steal the Enterprise to rescue and reunite Spock’s katra with his body, resurrected by the Genesis Planet. The good of the few, or the one, outweigh the good of the many. It’s only logical).
| THE KIT |
I originally bought the Reliant when it first came out in 1994……..Funny cause it was 10 years and more after Star Trek II: The Wrath of Khan. Why the hell AMT didn’t release a Reliant when the movie came out is beyond me. Anyways, the original kit was heavy, with very heavy and thick plastic in a box that was so big, you can fit three Reliants inside! The model was generally good, with good details that stood on two clear display stands that supported the warp nacelles. However, it did have some minor faults. The least of which the saucer was a bit larger and the ribbing on the saucer was very pronounced. This caused the leading edge slant to slant far more inwards the real thing. The model also was a fit nightmare with seams everywhere. After graduating from college, I gave the model up to a friend and moved on.
 Warp (pun intended) over a dozen years later. I
always wanted the Reliant back. When AMT, now Round 2 announced they will
re-release the original kit 2 years ago, I jumped at the chance! The new kit
comes in a standard sized box, not too small, not too large, just big enough
to fit the saucer in. The part count is still the same and the assembly the
same. Now, Round 2 did correct some of the faults of the original kit. One
of which is the saucer’s edge. This is correct in that it is smooth and the
slant is also corrected. The second is the plastic now is much thinner and
thus, not as heavy. AMT also replaced the two clear supports for the
nacelles and instead uses a large display dome on a metal rod instead.
Warp (pun intended) over a dozen years later. I
always wanted the Reliant back. When AMT, now Round 2 announced they will
re-release the original kit 2 years ago, I jumped at the chance! The new kit
comes in a standard sized box, not too small, not too large, just big enough
to fit the saucer in. The part count is still the same and the assembly the
same. Now, Round 2 did correct some of the faults of the original kit. One
of which is the saucer’s edge. This is correct in that it is smooth and the
slant is also corrected. The second is the plastic now is much thinner and
thus, not as heavy. AMT also replaced the two clear supports for the
nacelles and instead uses a large display dome on a metal rod instead.
However, the kit also have some faults. Again, the Aztec is separate. Good on Round 2 for giving us the option but again, I can understand why. But the most egregious has to be the removal of some of the details. The details are generally much softer than the original kit. In fact, the rows of the window on the front of the “hardback” was completely eliminated. In order to replicate them, you have to get the Aztec decals. To this this a big THUMBS DOWN is to say the least! Ohh well, that’s the end of it right? RIGHT?!?!?!?!?!? UMMM…Not Really!
| CONSTRUCTION |
 Again, unless you jump the shark and get one of the
1/350 scale Enterprises, the refit especially (soon for me, to be joined by the
1/350 scale Ka’Tinga class Klingon cruiser…I’m just waiting on the Kronos One
version), the rest of the Star Trek kits are simple and easy to make. This one
is no exception. Add the shuttle bay doors (sprayed black from the inside), add
the clear impulse crystals from the inside, insert the clear impulse drive from
the inside (painted red from the inside), now the top and bottom saucer can be
cemented together.
Again, unless you jump the shark and get one of the
1/350 scale Enterprises, the refit especially (soon for me, to be joined by the
1/350 scale Ka’Tinga class Klingon cruiser…I’m just waiting on the Kronos One
version), the rest of the Star Trek kits are simple and easy to make. This one
is no exception. Add the shuttle bay doors (sprayed black from the inside), add
the clear impulse crystals from the inside, insert the clear impulse drive from
the inside (painted red from the inside), now the top and bottom saucer can be
cemented together.
Warp engines are easy too. Cement the bussard ram scoops at the front, and then cement the two halves together. That’s it. Now the pylons. A small container piece is assembled to the back, and then it is cemented onto the saucer. Here, the biggest problem presented itself, the seams. Both pylons do not attach to the saucer too well. Down below, they don’t join the warp nacelles too well either. Other the saucer, no matter what, a pass is needed with the red epoxy putty to putty up the seams, the biggest seams are here. It took me three days to patch up the worst until I gave up…Between the back and the saucer, the connection to the warp nacelles, some razzles can still be seen…It’s not bad but it’s no where where I would like it to be.
The roll bar was assembled last. Front, back and then the pylon..That was it. This was left off since there are different colors on the bottom and the fact you need to put Aztec underneath the pylon if you got the sheet. Same thing with the mega phaser emitters. These are light blue so I left them off.
| COLORS & MARKINGS |
Painting overall is semi-gloss white, the closest to pearlescent white. I use Testor model master…sigh, with the upcoming elimination of the Model Master line by Rustolium (Testor’s parent company)…….I now have to find a substitute. But anyway, took me three passes to get the coverage I needed…Grr…..White just does not cover other colors well…Took that much to cover all the red spot putty glazings.
 After that are all the color details…The one that got
me was the two long trenches along the side of the hardback. My first one, I
painted it light blue. Which is no right…..The painting instruction calls for
blue grey..Which looks wrong. Finally I went with medium blue for a compromise.
The rest are also highlighted, such as gunship grey for the band around the
bridge dome. Silver for the dome itself. And various light blue details. The
photon torpedo launchers are light blue backing, with black tube and red
launcher. The painting was done rather quickly. Now the decals.
After that are all the color details…The one that got
me was the two long trenches along the side of the hardback. My first one, I
painted it light blue. Which is no right…..The painting instruction calls for
blue grey..Which looks wrong. Finally I went with medium blue for a compromise.
The rest are also highlighted, such as gunship grey for the band around the
bridge dome. Silver for the dome itself. And various light blue details. The
photon torpedo launchers are light blue backing, with black tube and red
launcher. The painting was done rather quickly. Now the decals.
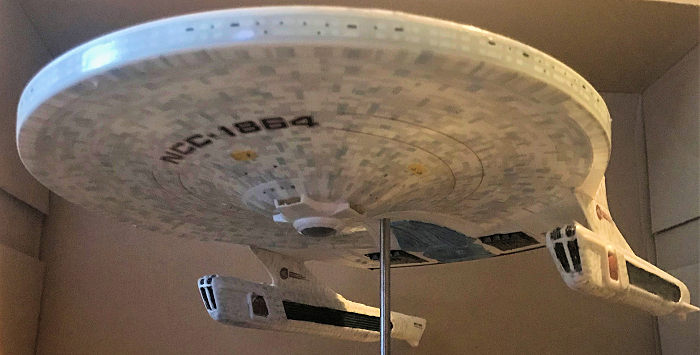
This starts on the saucer section with the sensor lines. Just becareful with the windows as they can be tricky to put up. Sigh, again, one of the biggest fault of the kit other than the messy fit situation are the windows. The older kit, despite the incorrect slant, had windows molded in. This version, you have to use the Aztec decals.
After that, the warp pylons and the warp nacelles. The ones on the back of the pylons were tricky but I was able to get them in place. Then come the hardback and the photon torpedo launcher. These are carefully blended in due to the compound shape.
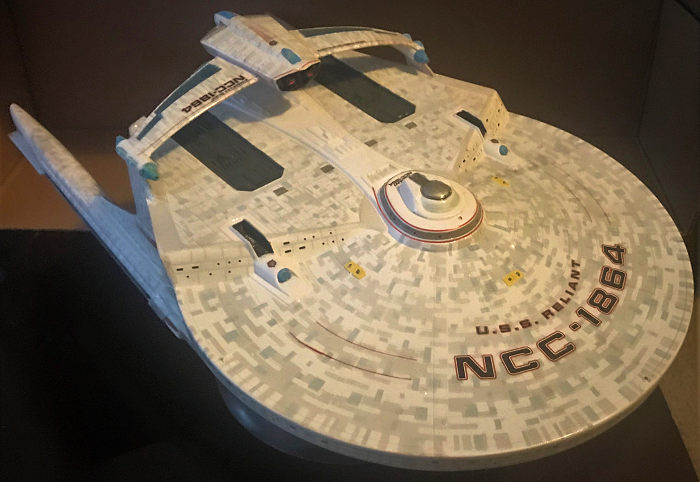
 Then come the saucer. This one is the most complex.
Again, the large size of the saucer triangle decals needs to be mostly washed
out of its decal film or else they will roll up. Fortunately, unlike my 1/350
Enterprise-A, these are thicker so unfurl them were easier. But still, since
they are a lot smaller, you don’t need to cut them up to make the more
manageable. Just do be patient and becareful and you should be able to get
through them no problem. The only hitch were the six phaser emitters on the
saucer, three on top, three on the bottom. I had to wait until the decals are
mostly dry, then use a very sharp hobby knife to cut out the excess decals in
order to allow them to fit. After the top is done, I waited an entire night
before starting on the bottom. It took me three days to finish everything.
Then come the saucer. This one is the most complex.
Again, the large size of the saucer triangle decals needs to be mostly washed
out of its decal film or else they will roll up. Fortunately, unlike my 1/350
Enterprise-A, these are thicker so unfurl them were easier. But still, since
they are a lot smaller, you don’t need to cut them up to make the more
manageable. Just do be patient and becareful and you should be able to get
through them no problem. The only hitch were the six phaser emitters on the
saucer, three on top, three on the bottom. I had to wait until the decals are
mostly dry, then use a very sharp hobby knife to cut out the excess decals in
order to allow them to fit. After the top is done, I waited an entire night
before starting on the bottom. It took me three days to finish everything.
Time to bring everything together. The first to added was the roll bar. Had to use superglue and a lot hand strength to bond it to the upper warp pylons without any seams. Then the mega phaser emitters were added. As a final, yellow was painted on the tail fins RCS area, and the phaser emitter banks, with the emitter themselves being silver. Model done
| CONCLUSIONS |
Ahhh…Well, as much as I want a 1/350 scale of this to go and fight my Enterprise, the nasty fit problems precluded that. It’s recommended if you want to complete you Star Trek collection…Otherwise, I actually recommend the original Reliant kit if you can track them down, and then get the aztek decal sheet to complete that, the wrong slant of the saucer notwithstanding.
23 October 2020
Copyright ModelingMadness.com
If you would like your product reviewed fairly and fairly quickly, please
contact
the editor
or see other details in the
Note to
Contributors. Back to the Main Page
Back to the Review
Index Page
Back to the Previews Index Page