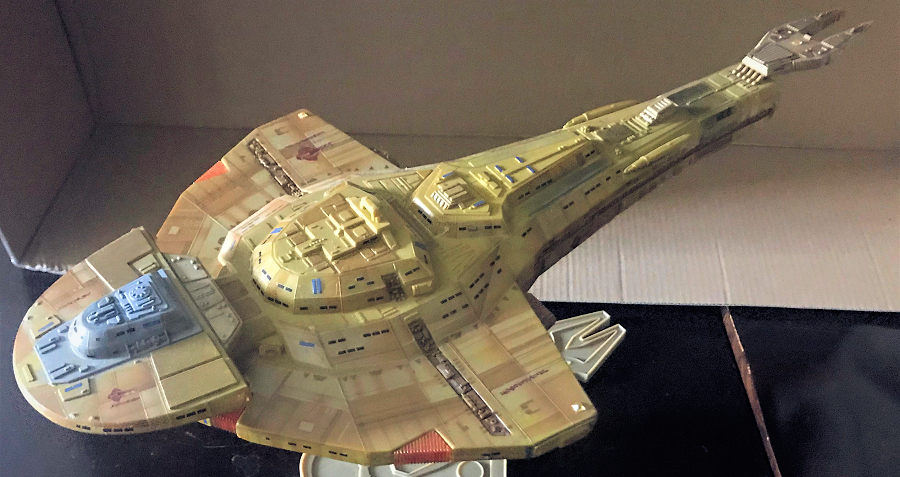
AMT 1/750 Cardassian Galor Class Cruiser
| KIT #: | 1028 |
| PRICE: | $35.00 |
| DECALS: | One option |
| REVIEWER: | Donald Zhou |
| NOTES: | Advantages: Well detailed, simple, large. Disadvantages: decals incomplete, some fit issues, rest of markings separate.. Cardassian Galor Class Aztec Decals used. |
| HISTORY |
When the Federation
took over the Cardassian space station “Terok Nor” after the Cardassians
abandoned the planet Bajor, they found the stations in ruins. The “Carddies”
did a great job of trashing the station completely, necessitating the
Federation, who came in to help Bajor at the behest of the Bajorian
provisional government,
 to
nearly completely rebuild the station. The rebuild took on a whole new
meaning when then Commander Sisko made contact with the “wormhole aliens”
and opened up a stable wormhole to the Gamma Quadrant, shaving years of
travel at warp speed to only a few seconds. This immediately made the Bajor
sector of strategic importance to the Federation and DS9 of vital
importance, especially since once Cardassians heard the news, they
constantly tried to incur upon the territory to see if they can get the
wormhole under their control.
to
nearly completely rebuild the station. The rebuild took on a whole new
meaning when then Commander Sisko made contact with the “wormhole aliens”
and opened up a stable wormhole to the Gamma Quadrant, shaving years of
travel at warp speed to only a few seconds. This immediately made the Bajor
sector of strategic importance to the Federation and DS9 of vital
importance, especially since once Cardassians heard the news, they
constantly tried to incur upon the territory to see if they can get the
wormhole under their control.
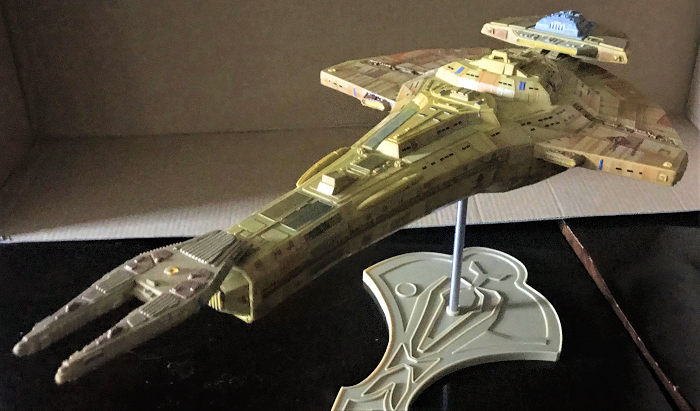
At the forefront of Cardassian challenges to DS9 is the Galor class cruiser. Large, powerful and pack full of firepower, it was a mainstay during the Cardassian and Federation border skirmishes that lasted years. Though not up to par with a Galaxy class starship, it still is more than capable. When the Wormhole was discovered, Cardassian made more than one incursions to see if they can take it over, more than once led by Gul Dukat. When Cardassians joined with the Dominion, the Galor class once again, was at the forefront of the war until the Union joined the Alliance when the Dominion badly miscalculated Cardassian will. Afterward, the leftover ships was used to patrol a badly damaged Cardassian Empire before Cardassia itself became an ally of the Federation.
| THE KIT |
 I
originally bought the kit way back in 1994, when then AMT/Ertl released the
original Galor class. I still have the ship but the clear parts are all
missing…..GAWAHHHHH!! CRIES! Then two years ago, AMT, now Round 2 released…Or
should I say finally Re-Released this ship with far more and corrected details
and a separate Aztec decal set for the ship. Again, I would like this decal set
to be included in the model itself. But I also understand why Round 2 kept it
separate cause 1, can you say money grab? But also 2, it does keep the price to
a reasonable average for the layman cause I bought this off of Amazon for only
$25! With the decal set, less than $40 total! Still a good deal. But for those
who does not care, $25 for a good sized Star Trek ship is a bargain! Hence why
Round 2 have always kept the Aztec separate.
I
originally bought the kit way back in 1994, when then AMT/Ertl released the
original Galor class. I still have the ship but the clear parts are all
missing…..GAWAHHHHH!! CRIES! Then two years ago, AMT, now Round 2 released…Or
should I say finally Re-Released this ship with far more and corrected details
and a separate Aztec decal set for the ship. Again, I would like this decal set
to be included in the model itself. But I also understand why Round 2 kept it
separate cause 1, can you say money grab? But also 2, it does keep the price to
a reasonable average for the layman cause I bought this off of Amazon for only
$25! With the decal set, less than $40 total! Still a good deal. But for those
who does not care, $25 for a good sized Star Trek ship is a bargain! Hence why
Round 2 have always kept the Aztec separate.
| CONSTRUCTION |
Constructions, like all
Star Trek ships are easy! There are only around 35 parts and around a dozen
clear parts, most of that are the tiny triangular phase energy beam weapon
projectors the Cardassians like to use. Construction begin with the “head” of th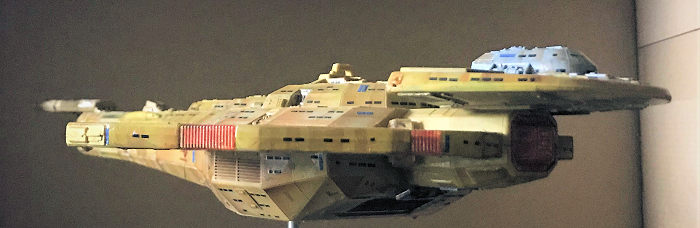 e
ship. If you are going to use the Aztec decals, DO NOT cement the head onto the
ship body itself since A LOT of decals goes under the body.
e
ship. If you are going to use the Aztec decals, DO NOT cement the head onto the
ship body itself since A LOT of decals goes under the body.
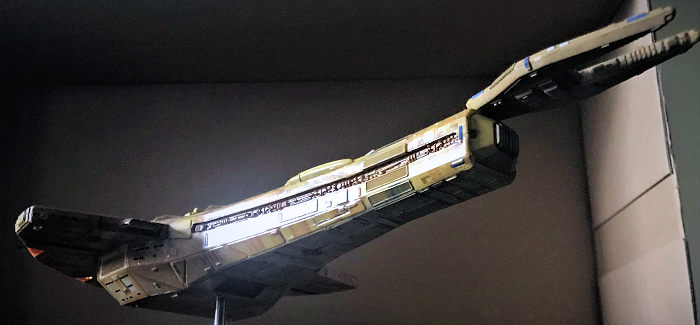
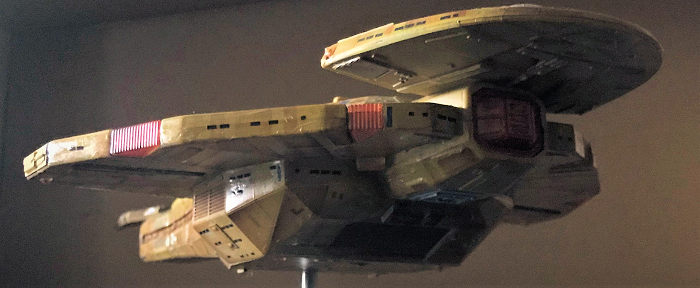
The bottom “fuselage” contains several bays….Probably shuttle and cargo bays. These are carefully assembled on. Next are two what looks like either warp drives or sensor blades are cemented onto the lower fuselage. Afterwards, the top and bottom are brought together. There are several details, including a senor fan on top of the ship and the stingray like tail. Now, with the original model, that tail kept on breaking off! This time I left it off to be cemented on after final assembly. The final thing is the end cap which was cemented on the tail. The big problem with the kit though, are the seams…This was present on the original kit and due to the fact the molds are now much older, the seam problem has gotten worse. I had to use three passes to get all the seams patched up. To the paint shop we go!
| COLORS & MARKINGS |
Main color is Yellow Zinc
Chromate from Testor’s. At first, I thought based on the box art, the paint
would be too light. I actually bought a bottle of Panzer Desert Yellow but that
proved to be too dark. Finally, deciding to jus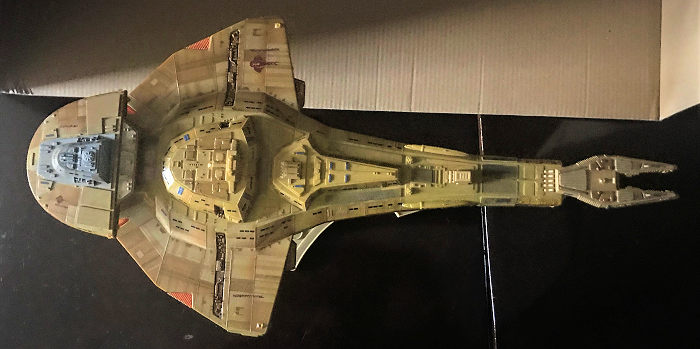 t
bite the bullet, I sprayed the ship with yellow zinc chromate. As it turned out,
it is the right color cause the call out has the Aztec decals in mind. With the
decals on, the color is just right! I painted various details such as the warp
coils (or sensor blades), the bays, impulse housings etc dark tan. Then there is
the bridge dome on top of the “head”, I painted like what it’s called in the
instructions, Dark Ghost Grey. However, after seeing several DS9 episodes, I’m
not so sure. Like what Round 2 calls for in the Vor’Cha Class Attack Cruiser
kit, where in TNG and DS9, there are no red brown highlights (it looks like
Green Zinc Chromate instead), the bridge dome on the Galors seen in DS9 looks
like tan instead, not dark ghost grey. Ohh well, I’m not gonna correct it.
Afterwards, I gave the ship a light wash of jet black to pop out the details.
t
bite the bullet, I sprayed the ship with yellow zinc chromate. As it turned out,
it is the right color cause the call out has the Aztec decals in mind. With the
decals on, the color is just right! I painted various details such as the warp
coils (or sensor blades), the bays, impulse housings etc dark tan. Then there is
the bridge dome on top of the “head”, I painted like what it’s called in the
instructions, Dark Ghost Grey. However, after seeing several DS9 episodes, I’m
not so sure. Like what Round 2 calls for in the Vor’Cha Class Attack Cruiser
kit, where in TNG and DS9, there are no red brown highlights (it looks like
Green Zinc Chromate instead), the bridge dome on the Galors seen in DS9 looks
like tan instead, not dark ghost grey. Ohh well, I’m not gonna correct it.
Afterwards, I gave the ship a light wash of jet black to pop out the details.
| FINAL CONSTRUCTION |
The first thing to go on are the clear parts sans the phased energy beam projectors (the small triangles). These are painted from the inside with clear Testor’s Taillight Amber except the front navigational deflector, which was painted red from the inside and taillight amber from the outside. These went on easy except the navigation deflector piece since this was meant to be cemented on while under construction but I left it off to ease painting. I had to scrape the outside housing several times before finally got it to snap fit on. Now, the decals….
 The
Aztec decals has to be fitted on first before the kits decals can be put on.
The Aztecs are in three big sheets. I started on the bottom first. The
decals are large but thank goodness not as large as the 1/350 Enterprise-A
decals so they don’t fold up on the slightest whim or get stuck to your
fingers! Due to the complex contours of the ship, its best to get the first
one down pat, but do not put on Mr. Mark softener. Then put on the second
one. This way, you can apply water to the first decal, and move both around
to adjust for position to get the best coverage. This was tedious and rather
monotonous for the next three days. The decals are generally good and
respond well to Mr. Marks but due to the fact these are printed by Cartograf,
they get crinkled to hell if you let Mr. Marks stay to long so I switched to
Tamiya mark softener instead. The only thing I don’t like is again, the
windows are all “off” since they are all black instead having some with the
lights “on”. Finally, after the last piece went on and fully dried out, I
cemented the “head” and put on the phased energy beam projectors. The last
thing I did was to again, apply a coat of jet black wash to tone down the
decals and pop out the details. Model done!
The
Aztec decals has to be fitted on first before the kits decals can be put on.
The Aztecs are in three big sheets. I started on the bottom first. The
decals are large but thank goodness not as large as the 1/350 Enterprise-A
decals so they don’t fold up on the slightest whim or get stuck to your
fingers! Due to the complex contours of the ship, its best to get the first
one down pat, but do not put on Mr. Mark softener. Then put on the second
one. This way, you can apply water to the first decal, and move both around
to adjust for position to get the best coverage. This was tedious and rather
monotonous for the next three days. The decals are generally good and
respond well to Mr. Marks but due to the fact these are printed by Cartograf,
they get crinkled to hell if you let Mr. Marks stay to long so I switched to
Tamiya mark softener instead. The only thing I don’t like is again, the
windows are all “off” since they are all black instead having some with the
lights “on”. Finally, after the last piece went on and fully dried out, I
cemented the “head” and put on the phased energy beam projectors. The last
thing I did was to again, apply a coat of jet black wash to tone down the
decals and pop out the details. Model done!
| CONCLUSIONS |
This was a fun build. Like all Star Trek models, unless you jump the shark and get the 1/350 Enterprises (now joined by the 1/350 Ka’Tinga class Battle cruiser. I will be getting that ship but is waiting patiently for the Kronos One version), they are easy to build, not a whole lot of parts and come out great whether you get the Aztec decals or not. I certainly love it and is considering getting another decal set to finish my original AMT/Ertl one….If I can Round 2 to only send me the clear parts!
21 February 2021 Copyright
ModeingMadness.com. All rights reserved. If you would like your product reviewed fairly and fairly quickly, please contact the editor or see other details in the
Note to
Contributors. Back to the Main Page
Back to the Review
Index Page
Back to the Previews Index Page