AMT 1/1000 NX/NCC-2000 Excelsior
| KIT #: | 84312 |
| PRICE: | $25-$35.00 |
| DECALS: | Two options |
| REVIEWER: | Donald Zhou |
| NOTES: | Advantages: Well detailed, massive improvements made, contain different parts to make either NX or NCC-2000. Disadvantages: Aztec decals separate, instruction does not denote which parts (NX or NCC) is which, different colors means you need to plan ahead, and still slight misfit issues. P.S. AMT Excelsior Aztec decal set MKA017/06 used for both ships |
| HISTORY |
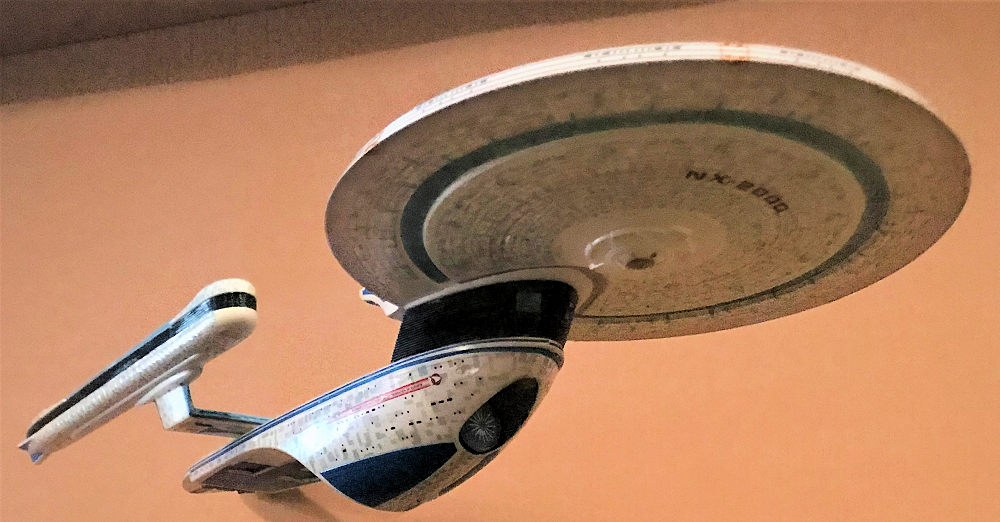
Of all the Federation starships,
one of the most beautiful has to be the Excelsior. Known as the “great
experiment” in trying to break the warp barrier, it was never successful. The
embarrassment caused her to be mothballed for at least two years while the
admiralty board decided what to do with her. Finally, cooler heads prevailed as
it was decided although the experiment was a failure, the design of the ship
itself was sound and the ship was converted with conventional warp drive engines
and gave great years of service. In fact, the original NCC-2000, under the
command of Captain Hikira Sulu, was instrumental in bringing
 peace between the Klingons and the Federation when it was she that was first caught in the Praxis
explosion and then, along with the Enterprise, protect the peace conference at
Khitomer. In fact, after the decommissioning of the Enterprise-A, the next
Enterprise in line, the Enterprise-B was a slightly modified Excelsior. The ship
soon proved to be a workhorse for the Federation. Doing everything from yeoman
duty, deep space exploration, cargo hauling and patrolling the Romulan neutral
zone. In fact, several of the ships were heavily involved in the Tomed Incident,
the end result which caused the reclusive species to not appear for several
decades.
peace between the Klingons and the Federation when it was she that was first caught in the Praxis
explosion and then, along with the Enterprise, protect the peace conference at
Khitomer. In fact, after the decommissioning of the Enterprise-A, the next
Enterprise in line, the Enterprise-B was a slightly modified Excelsior. The ship
soon proved to be a workhorse for the Federation. Doing everything from yeoman
duty, deep space exploration, cargo hauling and patrolling the Romulan neutral
zone. In fact, several of the ships were heavily involved in the Tomed Incident,
the end result which caused the reclusive species to not appear for several
decades.
By the time the Enterprise-D entered service some 80 years later, the Excelsiors were still in service such as the Hood, Potemkin, and the Gorkon. In fact, due to the drain on resources by the Dominion War, dozens of Excelsiors, heavily modified with improved phasers and the ability to fire quantum torpedoes, also saw service in the war, almost 100 years after the original Excelsior first entered service! It was only after the war was over that the tired ships were finally decommissioned. Overall, the class service spoke for itself, fully nullifying the lead ship’s initial embarrassment and failure.
| THE KIT |
 See my preview of
this kit
here.
See my preview of
this kit
here.
This kit is so good that I got two
of them to do one in NCC-2000 and one in NX-2000 and got two sets of the
separate Aztec decal sets to finish them properly. Actually, you need the decal
sets to do them properly if you want an accurate ship. There is a slight color
differences between the NX and NCC. The blue that run around the bridge section
on the top of the saucer, and the blue padding streaks that run on the bottom of
the secondary hull are different. NX is more of a true blue color, NCC more
teal. Not as teal as NCC-1701-B USS Enterprise, but light bluish enough that the
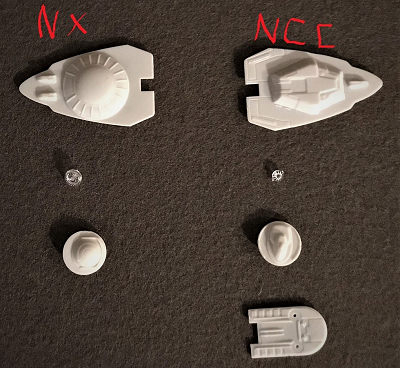
difference is quite telling. I captured several photos of the difference not
only to highlight these differences but also the difference in parts that make
the NX and NCC different. Namely the bridge section with the different
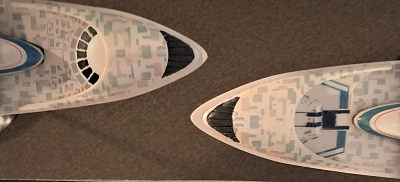 bridges
and the impulse drive section and the shuttle bay. If you choose to forgo the Aztect decal set, use light sky blue for NCC and True Blue for NX around these
sections.
bridges
and the impulse drive section and the shuttle bay. If you choose to forgo the Aztect decal set, use light sky blue for NCC and True Blue for NX around these
sections.
Otherwise, the rest of the preview applies…its still easy and still not a whole a lot of parts. There were some minor hitches here and there, but nothing that detract from the models.
| CONSTRUCTION |
I’ve always said, Star Trek models, unless you jump the shark and got the 1/350 scale kits, shouldn’t take more than 2 hours to assemble. This kit however, do need to take some things into consideration right off the bat. Unless you bought two kits like me, you have to decide which version to build. As stated in the previews however, the instructions do not denote which part is which. Again, I’ve taken a few shots of the differences. Hope that helps.
The construction starts with the
saucer. Again, one of the kit biggest pit fall is the bottom back impulse plate
that go on the rear bottom of the main impulse engines. As stated in the
Enterprise-B kit, the saucer is brand new molding and copied directly from the
Enterprise-B kit, just without the two side mounted extra impulse engines. The
detail are better (still overstated for my tastes) and far more correct (The
prominent saucer ridge lines in the original is gone. The forward “delta” raised
section just in front of the neck that is missing from the original is in this
one). It fit better too, but still need a pass with putty to close the seam. But
the majority of the work, like the Enterprise-B is that bottom back impulse
plate. It just will not go into place and juts the whole entire thing out. I had
to dremel sand the bottom flat, then went to wo rk with three passes of Squadron
white and red spot putty glazing to make it smooth enough for painting. This is
the only major hitch of the entire kit. The rest goes a lot better. This is
because once again, I think the bottom plate is one of the original 1995
survivor, and just does not mesh well with the new molded saucer. Also, notice
I’m mentioning the Enterprise-B kit a lot. As a certain Vulcan would say, “it’s
only logical” as both kits are similar and both kits are the similar class and
follow the same break down.
rk with three passes of Squadron
white and red spot putty glazing to make it smooth enough for painting. This is
the only major hitch of the entire kit. The rest goes a lot better. This is
because once again, I think the bottom plate is one of the original 1995
survivor, and just does not mesh well with the new molded saucer. Also, notice
I’m mentioning the Enterprise-B kit a lot. As a certain Vulcan would say, “it’s
only logical” as both kits are similar and both kits are the similar class and
follow the same break down.
P.S. for some strange reason, since I bought the “NX” kit later, the later saucer fit is much better, with the bottom seam much smaller than the NCC one…Maybe Round 2 went and adjusted the mold?
Once the bottom is finished, turned it over to the top part. The bridge section, use the one with the big round circular dome for the NX. The NCC bridge dome is much smaller with a raised platform. Again, see pictures.
The rear end section. Do not do anything if you are building the NX, for the NCC, add in the back plate with the smaller impulse crystals. Both type of crystals are clear and painted from the inside with light sky blue. Leave the clear parts for now. Once that was done, I left the saucer for now. Assembly again, follows the Enterprise-B, namely they are all separated into their major subassemblies since the color of the neck and the warp pylon support are gun metal and now of course, with the entire Aztec decals, you’ll want them to be in subassemblies to help with the decal session.
Lower hull goes on so much better it wasn’t even funny! To start, I painted the inner hull, where the bottom “cargo bay” is located, medium blue….Now, when light up, this should be light blue. But I added medium instead to tone that color down a bit since I’m not lighting the models up. This cargo bay is actually a misnomer. It’s actually the hold that contains the anti-matter pods for the warp drive reactor. Four smaller plugs are located here and they grip the bay tight. You don’t need to even cement it but I did and added a few drops of super glue on top to really seal it in.
Then I put cement onto the lower
hull before putting the upper hull on top. The six plugs again, are tight, and
need some serious hand strength to force them together. It’s only afterwards,
and this is most prominent in the later “NX” kit, it seems the front ones are
slightly too big and that juts up the front upper hull a bit, leaving a slight
seam there. Nothing but some putty will cure. I also putty up the entire joint
as there is a glue line there….Nothing you can do, it’s just the limitation of
the medium at hand. But a simple putty session and sanding aft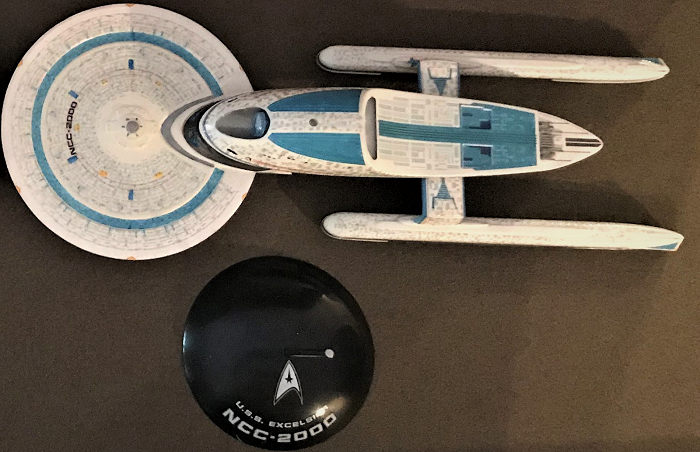 erward solved that
real quick. Compared what happened to the original kit and the Enterprise-B,
with their massive seams and misalignment issue, this is a MASSIVE improvement!
I think if you simply sand down the plugs a little, and then don’t go that hog
wild with the cement, you can avoid this problem. Besides, as I’ve find out
later, the stripe that runs along the top of the secondary hull serves a good
job of covering up this spot to the point you can’t even notice anything that
went wrong here! Serious kudos to Round 2 for redesigning and remolding the
secondary hull to the point that it is almost fool proof! I left off the
deflector dish since they are all clear. I colored the back plate, which is
clear, clear blue, but the dish itself is in light sky blue. There is also a new
rear photon torpedo launcher. Now, on the old kit, and the new Enterprise-B kit,
the old launcher is…umm….ohh….Not all that good to say the least and look
nothing like the movie part. Now, Don and Don Light and Magic do create a resin
replacement that’s night and day comparison to the old kit part (see my
Enterprise-B build). However, in this new kit, Round 2 made an improvement part
that’s a serious improvement over the old one. In fact, the old part is still
there and you can compare them….There is no comparison! Just laugh at the old
part and toss it!
erward solved that
real quick. Compared what happened to the original kit and the Enterprise-B,
with their massive seams and misalignment issue, this is a MASSIVE improvement!
I think if you simply sand down the plugs a little, and then don’t go that hog
wild with the cement, you can avoid this problem. Besides, as I’ve find out
later, the stripe that runs along the top of the secondary hull serves a good
job of covering up this spot to the point you can’t even notice anything that
went wrong here! Serious kudos to Round 2 for redesigning and remolding the
secondary hull to the point that it is almost fool proof! I left off the
deflector dish since they are all clear. I colored the back plate, which is
clear, clear blue, but the dish itself is in light sky blue. There is also a new
rear photon torpedo launcher. Now, on the old kit, and the new Enterprise-B kit,
the old launcher is…umm….ohh….Not all that good to say the least and look
nothing like the movie part. Now, Don and Don Light and Magic do create a resin
replacement that’s night and day comparison to the old kit part (see my
Enterprise-B build). However, in this new kit, Round 2 made an improvement part
that’s a serious improvement over the old one. In fact, the old part is still
there and you can compare them….There is no comparison! Just laugh at the old
part and toss it!
The pylon assembly is the same as Enterprise-B, and like that kit, I painted both the neck and the pylon support gun metal, and then cemented them to the secondary hull and pylon, with super glue reinforcement on the back end. I waited a day to let everything dry before the paint session. Again, the kit assembly took less than 2 hours. The putty and sanding session took 9!
| COLORS & MARKINGS |
The paint session is very much like the Enterprise-B since well, again, they are the same basic kit. All of the subassemblies are sprayed in the main color, semi-gloss white, doing best to cover up the red spot glazing putty. Saucer details include yellow phaser emitter base and silver emitters. You can forgo painting the thruster triangles yellow since there are decals on the main sheet for them. However, I did add the thrusters on the warp nacelle fins. Other than that, I sprayed the warp expellers dark sea blue and the top cover light sky blue. Now the decal session.
The decal session was complex since as can be imagined, the whole entire Aztec decals will be needed to put on first before the main markings. To start off, study the Aztec decals and where they go carefully first before what goes what. Again, the NX colors are a lot bluer than the NCC, what Round 2 calls “strongback” decals. Now, the Aztec decal sets also contain markings and registry numbers for the Hood, Valley Forge, and Melbourne. So yes, you can get a fleet of Excelsiors going if you want to.
 The sessions starts with the
saucer. These decals are made by Cartograf and they are just right for my
tastes! Not too thick so you won’t have a B***hing time putting them down but
not too thin either where if they roll up on you……Then good luck………The decals
are ruined! This is why I prefer my decals to be a little thicker. I have
several ways of putting down thick decals…..But thin? The instant they roll up
on you, it’s done! The decal is gone! These decals will still sometimes roll on
you. But since they are thicker, a few splashes of water and with a dull hobby
knife, I can usually get them unfurled in no time. And then it’s a few splashes
of this time, Tamiya’s decal softener. Yes, I bought a bottle of that stuff just
to try it out. It works just as fine as Mr. Marks. A few application and around
4 minutes, squeeze the rest of the moisture and air bubbles out and the decals
are settle down pat on the model.
The sessions starts with the
saucer. These decals are made by Cartograf and they are just right for my
tastes! Not too thick so you won’t have a B***hing time putting them down but
not too thin either where if they roll up on you……Then good luck………The decals
are ruined! This is why I prefer my decals to be a little thicker. I have
several ways of putting down thick decals…..But thin? The instant they roll up
on you, it’s done! The decal is gone! These decals will still sometimes roll on
you. But since they are thicker, a few splashes of water and with a dull hobby
knife, I can usually get them unfurled in no time. And then it’s a few splashes
of this time, Tamiya’s decal softener. Yes, I bought a bottle of that stuff just
to try it out. It works just as fine as Mr. Marks. A few application and around
4 minutes, squeeze the rest of the moisture and air bubbles out and the decals
are settle down pat on the model.
Even then, above all, be patient. There are four rather large sheets. Not as large as the 1/350 Refit Enterprise (-A) kit’s decal sheets, but plenty to keep you going for several days.
The big problem with the saucer section decals though is that several decals goes on the edge of the bridge area where the area is extremely tight and small. Because of the decal backing film, it tends to push the decals outward. Be patient, use a lot of Mr. Marks or Tamiya decal softener to knock the edge down and get them to settle. The big problem I had was with the decals that supposed to cover up the spots with what look like two small vertical stabilizer fins, just in front of the impulse crystals. On the decal sheet, the decals have white, empty spots to allow them to go over the fins. However, the empty spots are not empty. The backing film is still there. I found out too late with the first set and ruined them. Luckily I have the other set so I raided the extras on that sheet. This time, I cut a straight grove with two horizontal ones through the empty spot so the decals can go over the fins easier….Cartograf should have kept these spots completely empty! Otherwise, it just take time to do everything as mentioned. The main Aztecs that covers the saucers, much like the 1/350th Refit Enterprise (-A) kit, are divided into triangles. I wanted to cut them up into smaller sizes but as it turned out, you don’t need to. Again, the big advantage of these decals is that they are slightly thicker. So even with the bigger sizes, they do not roll up on you so you can apply them whole without cutting them to size. The only disadvantage is that they do not cover the phaser emitters all that well. I have to squeeze the water and air out first, and then using a sharp hobby knife, cut the emitter open. Still, if given the choice, I would pick the thicker decals and cut open the emitters, rather than thin decals. This is because, cutting them open, especially with thick decals is pretty easy with a sharp hobby knife. With thin decals, if it rolls on you…………Good luck trying to unfurl it!
Same with the secondary hull and
the warp pylons. Yes, as mentioned, the stripe that run along the entire upper
hull does a good job of covering up the minor seam joint there. Otherwise, just
be patient. It might take you a while to adjust the decals to their correct
positions on the hull. Unlike the saucer, there is really no distinct place that
just scream “place decals here!” except the blue chevrons that go across the
lower hull. You may wa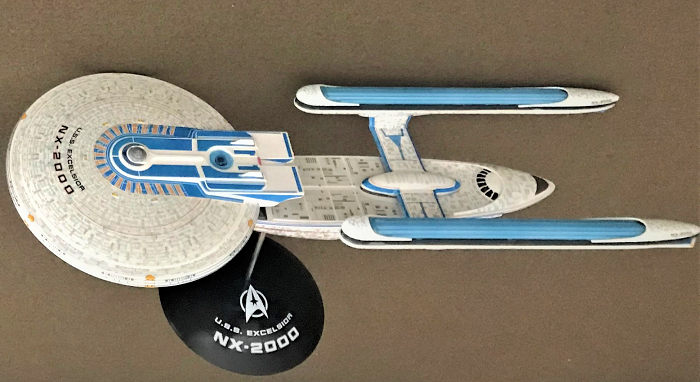 nt to put that down as a reference since the rest, it is
hard to judge their positions. Now, a slight problem with the warp pylons. On
the lower horizontal stabilizers, there are four blue “Y” shaped decals that are
supposed to put on the top and bottom of the stabilizers (sensor modules?), two
each. These decals SHOULD’VE been whole, unlike the bridge fin decals. However,
these decals are not whole. The two bottom stripes along with the top, the “v”
of the “Y” stripes tends to crumple together the instant you try to slip the
decals off the backing paper. I had to spend some time to unfurl them as a
result and wasted two when I couldn’t. Again, thank god I had two sheet and just
could raid the other sheet for the extras. Again, if Cartograf had just printed
these whole, it would’ve saved me a lot of headache. Also, something on the
sheet that screamed this is a cash grab, the sensor blades.
nt to put that down as a reference since the rest, it is
hard to judge their positions. Now, a slight problem with the warp pylons. On
the lower horizontal stabilizers, there are four blue “Y” shaped decals that are
supposed to put on the top and bottom of the stabilizers (sensor modules?), two
each. These decals SHOULD’VE been whole, unlike the bridge fin decals. However,
these decals are not whole. The two bottom stripes along with the top, the “v”
of the “Y” stripes tends to crumple together the instant you try to slip the
decals off the backing paper. I had to spend some time to unfurl them as a
result and wasted two when I couldn’t. Again, thank god I had two sheet and just
could raid the other sheet for the extras. Again, if Cartograf had just printed
these whole, it would’ve saved me a lot of headache. Also, something on the
sheet that screamed this is a cash grab, the sensor blades.
You see, the warp pylon leading and trailing edges, since the Excelsiors, are sensor blades, which are all blue with red warning lines. The main kit sheet has only the red warning lines. You have to paint the blue sensor blades. I was too lazy to do this for my Enterprise-B kit. Now here, the blue blade decals are included in the Aztec sheet……When they could’ve been easily included in the main sheet instead….Ohh well. They do not cover the front. Obviously since the sensor depression are too deep. Nothing some light sky blue paint will solve!
After that is all done, move onto the main kit sheet. The only things left are the registry number and the pennant. They go on easily. When doing the NCC marking though, becareful with the main red lines that are on the side of the NCC-2000 pennant marking. The kit instructions only shows NX-2000. There is a bit difference as the NCC-2000 marking is longer than the NX one. Thus, the placement of those two red lines are not correct. They should be lower on the saucer. Placing it as called for the instructions will have the red line collide with the “NCC” part of the markings.
Anyways, after the main sheet, the decals are done.
| LAST BITS |
 Final Construction involve putting
it all together. Again, the NCC kit, the neck still juts the saucer on the left,
causing the saucer to lean to the right. I again took a hobby knife and knocked
the left side location ridge down, and then used superglue on the left and half
of the rear and placed cement on the other side so the superglue could set the
model, allowing the cement on the other side to go to work. Interestingly
enough, the “NX” version, the neck do not have the same problem…..The saucer
goes on straight and true and no cutting are needed. Guess Round 2 fixed the
problem? Same with the pylon. The front and back had a bit of superglue to hold
things down while the cement in the middle can work. After that is all dry, I
put the warp expellers and the top on, follow by the front and rear covers, and
with the last four decals, the rear end pennant and registration numbers on. The
final details are the new and improved rear photon torpedo launchers, which are
painted dark ghost grey and the navigation deflector dish. Models complete!
Final Construction involve putting
it all together. Again, the NCC kit, the neck still juts the saucer on the left,
causing the saucer to lean to the right. I again took a hobby knife and knocked
the left side location ridge down, and then used superglue on the left and half
of the rear and placed cement on the other side so the superglue could set the
model, allowing the cement on the other side to go to work. Interestingly
enough, the “NX” version, the neck do not have the same problem…..The saucer
goes on straight and true and no cutting are needed. Guess Round 2 fixed the
problem? Same with the pylon. The front and back had a bit of superglue to hold
things down while the cement in the middle can work. After that is all dry, I
put the warp expellers and the top on, follow by the front and rear covers, and
with the last four decals, the rear end pennant and registration numbers on. The
final details are the new and improved rear photon torpedo launchers, which are
painted dark ghost grey and the navigation deflector dish. Models complete!
| CONCLUSIONS |
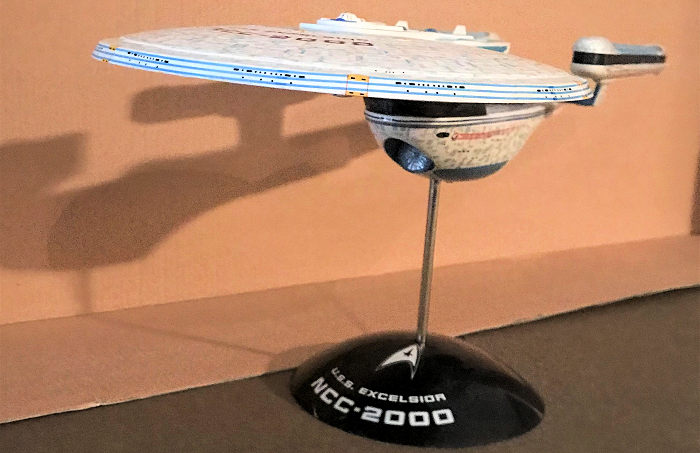
Ohh yes!! To say this was $35 well spent was to say the least (well, more like over $100 since I got two of these and two sets of the Aztecs!!! Still, money well spent) The Aztec decals really give the ship some character…But are they truly beautiful? Again, looking at my Enterprise-B kit, I have my doubts…..A great white ship has a beauty all to its own! That’s why history recorded that we once had a “Great White Fleet” that sailed around the world! Not to say the Aztec scheme is ugly, nope. It’s just….Different.
But still, seriously, just go out and get this kit. Even if you are not a serious Star Trek fan, this ship is so well made, it will just put a smile on your face, especially if you are a beginner modeler who just gotten your feet wet with glue models. The parts are miniscule, there no major pit falls except the saucer bottom impulse plate piece, and there are just enough skills involved to keep you on your toes. Yes, the Aztec decal sheets are a must for a Star Trek modeler like me, but for the average modeler, even without them, you can turn out a great looking Sci-Fi model without breaking the bank!
27 February 2018
Copyright ModelingMadness.com
If you would like your product reviewed fairly and fairly quickly, please contact the editor or see other details in the Note to Contributors.
Back to the Main Page Back to the Review Index Page Back to the Previews Index Page