
Polar Lights 1/350 NCC-1701-A (Refit) USS Enterprise
| KIT #: | POL 808/04 |
| PRICE: | $100.00 or so when new |
| DECALS: | Two options |
| REVIEWER: | Donald Zhou |
| NOTES: |
Advantages: Well detailed, huge, and
easy to set up for lighting. Disadvantages: Decals complex, saucer very heavy, Huge, details overstated. |
| HISTORY |
Space, the final frontier. These are the voyages of the star ship Enterprise. Its continuing mission, to explore strange new worlds, to seek out new life and new civilizations. To boldly go where no man…no one has gone before.
Of all the Federation starships
named Enterprise, the most famous one has to be James T. Kirk’s original
NCC-1701, no A, B, C, or D (and now E and F). After its original five year
mission, the Enterprise was extensively undated and upgraded to the “Refit”
version with new saucer details, swept back warp pylons and two new rectangular
warp drives for faster speed. It was under the command of Commander Decker when
Kirk was promoted to Admiral. It’s first of many important
 missions came when it
contacted the “V’ger” cloud, actually the ancient Voyager probe, now upgraded
heavily into an autonomous machine searching for its maker.
missions came when it
contacted the “V’ger” cloud, actually the ancient Voyager probe, now upgraded
heavily into an autonomous machine searching for its maker.
It was heavily damaged during a confrontation with KHHAAAANNNNNNN (The original scream please. DO NOT even mention the sad, face/palm worthy excuse of a substitute from Into Darkness. I walked out the theater after that sorry of an excuse), who stole the Genesis device and was only saved by Spock, “The good of the many outweigh the good of the few, or one. It’s only logical”, who went into the heavily irradiated reactor chamber to effect emergency repairs, giving the ship warp capability back.
The ship was destroyed after Kirk, who stole her from spacedock to rescue Spock, who transferred his “katra” (spirit, soul or whatever you want to call it) to Dr. Lenard “Bones” McCoy and his body was revived by the Genesis planet. Kirk ordered her self-destruct after tricking the entire crew of a Klingon Bird of Prey onboard and rescued his friend in the process, “Sometimes, the good of the few, or the ONE outweigh the good of the many. It is only logical!”
After a roundabout trip through time to 1984 San Francisco to rescue some humpback whales in order to talk to a probe from the future, who was destroying the planet, the crew was in for a shocking surprise when they were presented with the Enterprise-A, a renamed USS Yorktown. The crew finally “Voyaged Home” it seems
**We will pretend “The Final Frontier” does not exist. Even though I just rewatched it on Hulu, it’s STILL such a jumbled mess that I won’t even bother!”
 The Enterprise-A was finally
decommissioned, along with its legendary crew after its most important mission.
When the Klingon moon Praxis exploded, rocking the Excelsior, now commanded by
Captain Sulu. In a supposed secret meeting, the Enterprise was supposed to
escort the Klingon chancellor Gorkon and his entourage to Earth for secret
negotiations to end decades of hostilities after Spock “volunteered” them for
the assignment. The entire mission went completely awry when conspirators fired
photon torpedoes at the chancellor’s ship Kronos One and killed him, framing
Kirk and Bones for the crime in the process.
The Enterprise-A was finally
decommissioned, along with its legendary crew after its most important mission.
When the Klingon moon Praxis exploded, rocking the Excelsior, now commanded by
Captain Sulu. In a supposed secret meeting, the Enterprise was supposed to
escort the Klingon chancellor Gorkon and his entourage to Earth for secret
negotiations to end decades of hostilities after Spock “volunteered” them for
the assignment. The entire mission went completely awry when conspirators fired
photon torpedoes at the chancellor’s ship Kronos One and killed him, framing
Kirk and Bones for the crime in the process.
After an investigation and rescuing Kirk and Bones from Rura Penthe, a Klingon penal colony. Kirk was finally able to rat out Lt. Valeris as the conspirator who framed him and made several false entries into the ship’s computer due to something the Klingons presented during his “court” appearance. After a mind meld with Spock, it was now known that a Klingon Bird of Prey, which can fire while cloaked, did the deed of damaging Gorkon’s ship.
Racing now to Khitomer, the site of the peace conference, which Kirk got from Sulu, the Enterprise was heavily damaged by the Bird of Prey “Drakonok”, under command of General Chang (Have to mention played with absolutely aplomb by Christopher Plummer! “CRY HAVOC! And let slip the dogs of war!). However, like always, the crew was able to pull a magical rabbit out their hats when they figured out every time the Bird fires, it has to vent spent plasma gases through its cloak and modified one of its photon torpedoe to home in on the spent gases. The direct hit fully revealed the Bird and under a relentless assault from both the Enterprise and Excelsior, who joined the fray just in time, destroy it in time to save the conference.
As the mission ends, Kirk would utter his last Captain Log. “….. To boldly go where no man…where no one has gone before.”
| THE KIT |
Dan Lee previewed
the original kit
here. Guess it was too large for him to build… yes, it is too big…I
bought the kit think it would not be that big cause the box looks kinda ok and
squarish at the store. I then bought it online from a retail who charged only
$90 for it. This is the new Round 2 version. The only difference is the display
stand. The original version had three clear supporting struts that was not very
strong and broke easily. This kit is heavy to say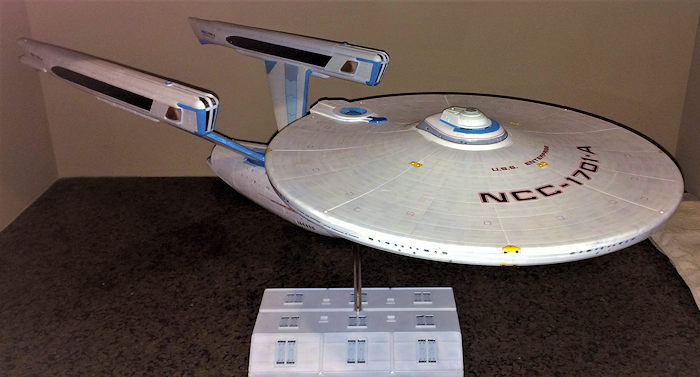 the least. This kit dispensed
with that and has a single large metal rod at the navigational deflector
section. This create another problem since the saucer is so heavy, it needs
support of some kind. Previously, the two clear supports support the saucer.
the least. This kit dispensed
with that and has a single large metal rod at the navigational deflector
section. This create another problem since the saucer is so heavy, it needs
support of some kind. Previously, the two clear supports support the saucer.
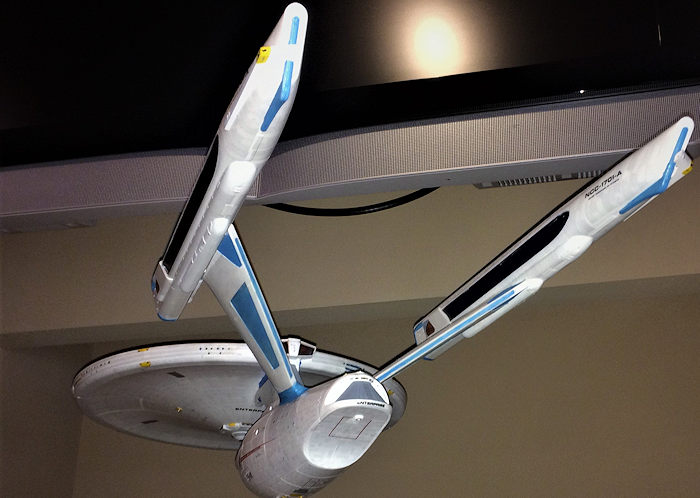
It was only after opening the box that I realize this son of gun will be HUGE when assembled! The squarish box barely contain the saucer section, with the two warp drive sections lying diagonal across the box. Good luck after you take them out cause getting them back in was impossible for me!
Details are generally excellent but yes, I have to agree, the lines running across the hull and saucer look like trenches. Wish they could tone it down some.
The only other major difference is that the Aztec paint scheme is now completely in decal! This saves a lot of time and effort in masking and painting (hence why so many did not build the first iteration, even if all the masks are included. It still is a hassle to mask first and then paint). However, this will create other problems if you will see later.
| CONSTRUCTION |
Star Trek kits are the simplicity of easy….Not this one! This one is detailed to the max! The first is the arboretum, the second is a complete shuttle bay. However, if you are building the –A Enterprise, then the shuttle bay has to go! I thought about opening it up but decided against it since with the –A, the warp reactor was changed to the secondary hull common with the Enterprise-D. This means the shuttle bay is far smaller. Now good folks like Don at Don’s Light and Magic shop makes the complete shuttle bay in resin. But I decided to forgo that and just close it up. The other is lighting. This kit was built with lighting in mind but with lighting prices going upward as much as $200 a pop…Yeah, had to forgo that too.
Construction is pretty much
straight forward although there are now A LOT of parts and steps. The saucer
section I did not reinforce the inside and guess what? You don’t need too. The
plastic is tough and thick enough that it does not need that. However, this
makes the saucer section incredibly heavy! Chec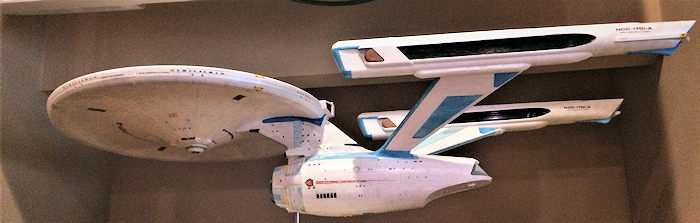 king the neck braces, there are
six plastic rods on the neck and six holes in the saucer to hold the weight.
Doubting that will hold though, I had to get two metal rods, both cylinders in
order to strengthen it. This was especially true after my youngest kid, come to
watch what I was doing, sat his cute little bun bun right on the neck and
crushed four of the rods right off!
king the neck braces, there are
six plastic rods on the neck and six holes in the saucer to hold the weight.
Doubting that will hold though, I had to get two metal rods, both cylinders in
order to strengthen it. This was especially true after my youngest kid, come to
watch what I was doing, sat his cute little bun bun right on the neck and
crushed four of the rods right off!
I first cut off the central secondary hull mounting peg that’s right infront of the arboretum. I replace this with a cylinder rod long enough to jut right through the top of the secondary hull and through the neck. You can guess where I’m going with this. Then I drilled out the bottom of the saucer section and put the other cylinder in so that the saucer now can be attached directly into the secondary hull cylinder and forced on with holding strength! This turned out perfectly as I dropped the ship onto the pool table while trying to photograph the bottom of the ship and nothing broke, especially the weak neck! The whole entire saucer was then attached to the neck and reinforced with two part epoxy glue, which dries very strong.
Speaking of the secondary hull, there are a lot of details here as mentioned. Some people toiled months on sprucing up the arboretum and the shuttle bay. But since I’m not lighting the ship up and the bay is closed, I just used the kit’s arboretum parts and cement it in. There was a nasty nasty seam along where the top and bottom of the hull was joined….And ohh, just becareful, there is supposed to be a difference between the refit and the –A and this is why two bottom hulls are included….The difference? Just a couple of trench lines...Why can’t Polar Lights just tell us, “for this version, fill in these line” and save us the money is beyond me! Other than that, it took one hell of a time to cure the seams, which has a nasty nasty running step between them, to the point where they are unnoticeable. I first had to dremel sander it, then sand it with coarse and soft sand paper, scrape and then fill it with both Squadron White and red spot glazing putty before once again, sand it smooth. It looks fine, but running you fingers along it, you can feel where the seam are.
Now for a piece of excellent
engineering. The warp pylons have always been a problem with Enterprise kits.
Especially the bottom hull connectors since the big heavy warp nacelles will
eventually crush them! Previously, people have used various methods to
strengthen this section, including replacing the w hole entire pylon locating
tabs with steel plates. Polar Lights solved this by dividing the hull into the
three parts. The upper half comes in their own two halves. This is to hold the
warp pylons in. The inner hull pylon connectors have two massive flanges
supported by heavy connectors inside the hull itself. This means the pylons have
to be inserted into place before the hull is closed up. Trust me, there is no
way to get them in afterwards no matter how awkward the painting session may be.
This is done to add strength to support the nacelles without breaking them apart
later. In fact, I also reinforced this section with super glue and two part
epoxy for added strength. Afterwards, the joint was so strong, it was not even
flexible! Great piece of thinking on Polar Light parts. The only sacrifice is
that there are some more step seams along where the upper hulls meet, which
required more attention. Small sacrifice though for the tough, strong,
unbreakable pylon joints though.
hole entire pylon locating
tabs with steel plates. Polar Lights solved this by dividing the hull into the
three parts. The upper half comes in their own two halves. This is to hold the
warp pylons in. The inner hull pylon connectors have two massive flanges
supported by heavy connectors inside the hull itself. This means the pylons have
to be inserted into place before the hull is closed up. Trust me, there is no
way to get them in afterwards no matter how awkward the painting session may be.
This is done to add strength to support the nacelles without breaking them apart
later. In fact, I also reinforced this section with super glue and two part
epoxy for added strength. Afterwards, the joint was so strong, it was not even
flexible! Great piece of thinking on Polar Light parts. The only sacrifice is
that there are some more step seams along where the upper hulls meet, which
required more attention. Small sacrifice though for the tough, strong,
unbreakable pylon joints though.
After the warp drives was assembled and everything taped off, time to hit the paint shop!
| COLORS & MARKINGS |
First of all, go to your model shop
or online and buy say, like 8 bottles of Testor’s Semi-Gloss White, the closest
equivalent to Pearl White. Next of course are taping off the colored sections
like the warp impellers. The windows are tricky. They are painted light sky blue
on the inside but covering them up took a bit. Eventually, what worked was Mr.
Mask. A liquid masking agent that dissolves in water. I can’t recommend it
enough! It goes on smooth, does a great job of covering and dissolves in water.
Afterwards, the first coat went on. No. No weathering. From the movies, unless
you want to model d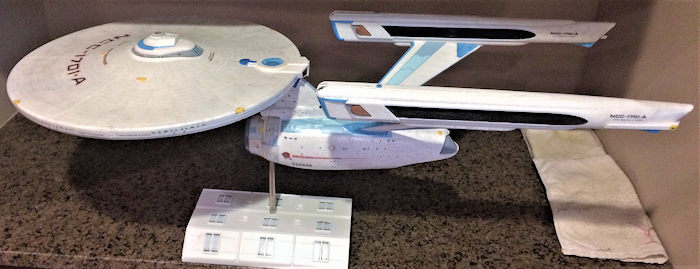 amages, the ship is clean. Space is a clean environment and
the ship has a huge navigational deflector in front of it too to push away dirt
and grime. After that is dry, the second and third coat goes on. Coverage is shooty at best so make your best effort. This is because the ship is so damned
big, it is hard to cover properly! The saucer section especially despite the
secondary hull was not attached!
amages, the ship is clean. Space is a clean environment and
the ship has a huge navigational deflector in front of it too to push away dirt
and grime. After that is dry, the second and third coat goes on. Coverage is shooty at best so make your best effort. This is because the ship is so damned
big, it is hard to cover properly! The saucer section especially despite the
secondary hull was not attached!
After the paint was dry, I did the detail painting, replacing duck egg blue with light sky blue instead. Decals time!
Decals is complex since four MASSIVE sheets worth of Aztecs are included, enough for the whole ship! I tried not cut up the decals since I did not want a seam between them as some of these are rather large, especially for the saucer section. Bad idea! These decals, if you keep them large, will fold on you in a hurry. I goofed on both the warp nacelles before learning my lesson! So yes, cut the decals up into manageable sizes and go from there. Otherwise, they go on ok with Mr. Mark Softer….Wasted nearly half a bottle of this stuff…And here I though a bottle will last me awhile! GO FIGURE! This hold true for the ship’s marking as well.
| FINAL CONSTRUCTION |
Time to bring it all together. The first to go on was attaching the neck to the secondary hull. Even with the brass rods holding everything together, I strengthened the section with epoxy. There is a small black back plate that is separate and I drilled out the hole there for this purpose. Same with the photon torpedo launcher (which is clear so paint it red on the inside). Which is also separate so I drilled a hole in the back of the holder so I can jam the epoxy tube down and shower the neck bottom with glue to strengthen it from the inside.
Careful when
attaching the nacelles. I broke the right connector rods off and had to super
glue it…And attached it at an angle…..Thanksfully, my youngest came to the
rescue again when he slapped the
 nacelle, and knocked it just enough to tip it
into the correct location! I quickly zapped it with super glue!
nacelle, and knocked it just enough to tip it
into the correct location! I quickly zapped it with super glue!
Finally, fixtures such as the clear deflector dish, the shuttle bay doors and the bottom sensor dome (keep this separate till the end or else you will be fighting the Aztec decals to no end!) are cemented before the display stand was assembled and the model attached.
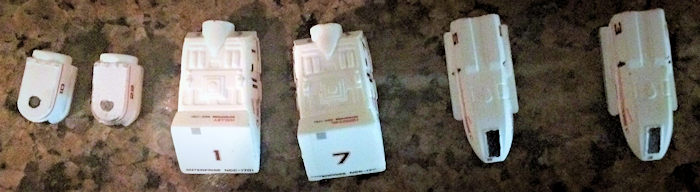
How could I forget, the kit also contain a bunch of accessory crafts, including two shuttles from the first movie and two warp capable shuttle crafts from V and two two person shuttle pods with a bunch of worker bees. I’ve included a photo of them separate without the worker bees as I forgot to color them! Silly me!
| CONCLUSIONS |
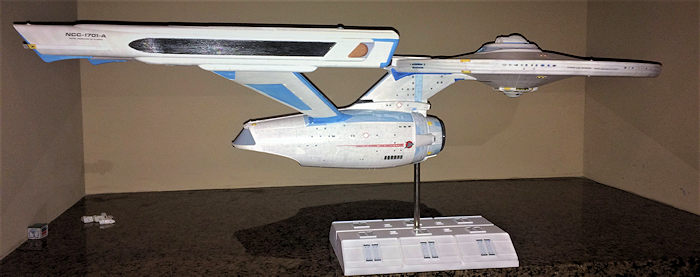
This thing is BBBIIIGGG! Over 32 inches long and there was hardly any place to put it except in the basement right below the basement tv, where the photos was taken as my normal methods will not contain something this big! It is an “eye drawer” to say the least! Again, not everyone will recognize the B, C or E. But everyone, or nearly everyone will recognize this and the D! Several friends who are trekkers have already taken a photo of this. This ship is long since out of production. eBay is asking around $500 min. right now and it cannot be found on round 2’s web site. Some model shops, like my local one still has it along with the original Enterprise……Might be a good idea to pick up another one in order to earn some money? Hrmm…..Might not be a bad idea!
Donald Zhou 31
January 2017 If you would like your product reviewed fairly and fairly quickly, please
contact
the editor or see other details in the
Note to
Contributors. Back to the Main Page
Back to the Review
Index Page
Back to the Previews Index Page