Polar Lights 1/32 Galileo Shuttle
| KIT #: | POL 909 |
| PRICE: | $53.99 SRP |
| DECALS: | Multiple options |
| REVIEWER: | Dan Lee |
| NOTES: |
| HISTORY |
The Shuttle Galileo was named after the great astronomer and heretic Galileo Galilei. It would become famous on its own as the main shuttle craft (among four or seven depending on the source) that the Federation Starship USS Enterprise carried.
 It first appeared in the
Star Trek episode Galileo Seven as Spock discovers that not everything in the
universe runs on logic especially primate cavemen like giants armed with
telephone pole size spears. The Galileo would appear in several more episodes of
the original series and various versions would appear in later series and
movies. The original set for the Galileo was actually built by Aluminum Model
Toys aka AMT, who wanted to make model kits of the various Star Trek ships and
equipment so they built the actual set as payment for those rights. The irony
was that when they later created a model kit of the set they built, the kit
became notorious for its inaccuracies in details, dimensions, shape and and
scale... (it seems quite baffling as they built the original!)
It first appeared in the
Star Trek episode Galileo Seven as Spock discovers that not everything in the
universe runs on logic especially primate cavemen like giants armed with
telephone pole size spears. The Galileo would appear in several more episodes of
the original series and various versions would appear in later series and
movies. The original set for the Galileo was actually built by Aluminum Model
Toys aka AMT, who wanted to make model kits of the various Star Trek ships and
equipment so they built the actual set as payment for those rights. The irony
was that when they later created a model kit of the set they built, the kit
became notorious for its inaccuracies in details, dimensions, shape and and
scale... (it seems quite baffling as they built the original!)
One of the problems with the Galileo was that it's interior was actually larger than its exterior much like a certain blue British Police box from Star Trek's contemporary, Dr Who.
Anyway, it wasn't till 2020 when Polar Lights (who bought the remains of AMT) would design and release this kit in 1/32 scale being accurate as possible to the original (which has been restored and currently at the Intrepid Museum in NYC.)
| THE KIT |
The Polar Lights kit comes
with 56 parts in grey and clear plastic on several sprues. The parts are well
molded and clear of flash while the clear parts have very little distortion or
imperfections which is great if you have the kit with an interior. I ended up
painting over most of the clear parts as mentioned later in the review.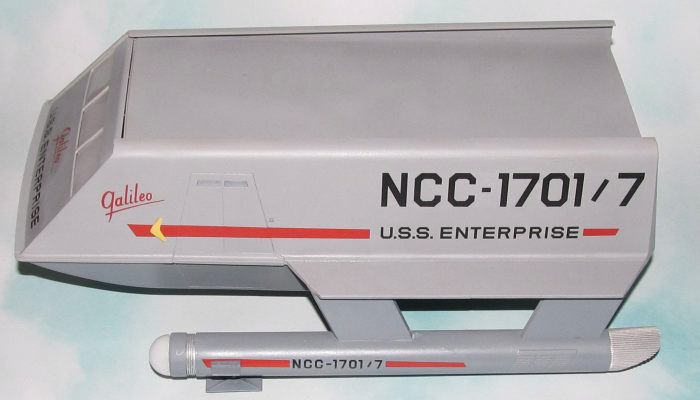
The instruction sheet is straight forward showing the parts breakdown and the placement details. One thing with Polar Lights kits is that you don't ever discard the box until the model is complete as it contains all the painting and decal instructions. It isn't a bad way to save on printing and packaging costs, but can be sometimes a headache if you're working on a kit that requires a lot of decals and/or painting.
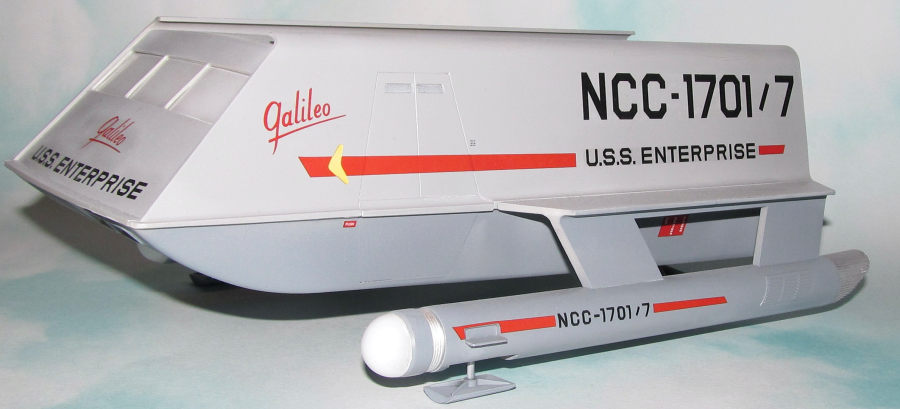
The decal sheet has all the decals needed to build any version of the shuttle as seen in the TV series. One thing about them is that they don't slide well and the long decals can fold onto each other. Otherwise they are okay with colors and printing. A number of GNDN (or Goes Nowhere Does Nothing) stencils are also provided.
| CONSTRUCTION |
 It all began with the
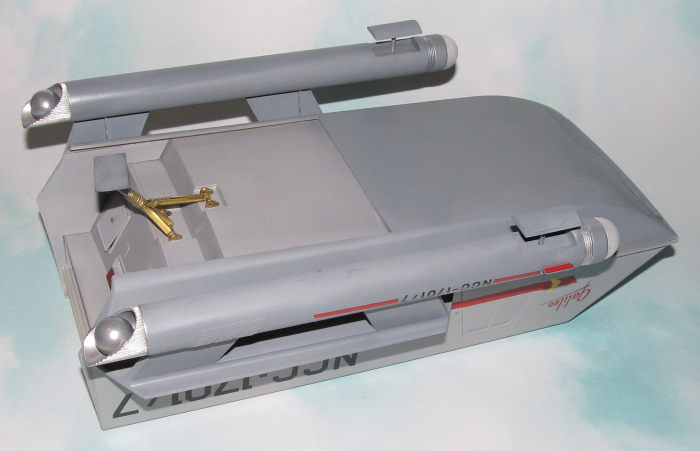
engine nacelles. The main tubes and supports were glued together with CA glue.
The seams were then sanded smooth and polished (several times.) Next the rear
landing leg was glued together with CA glue. When the piece was dry, it was
sanded and polished to remove the gaps/fill line.
It all began with the
engine nacelles. The main tubes and supports were glued together with CA glue.
The seams were then sanded smooth and polished (several times.) Next the rear
landing leg was glued together with CA glue. When the piece was dry, it was
sanded and polished to remove the gaps/fill line.
The various small parts and struts were glued together. Any obvious gaps were filled in with CA glue or Vallejo plastic putty and sanded.
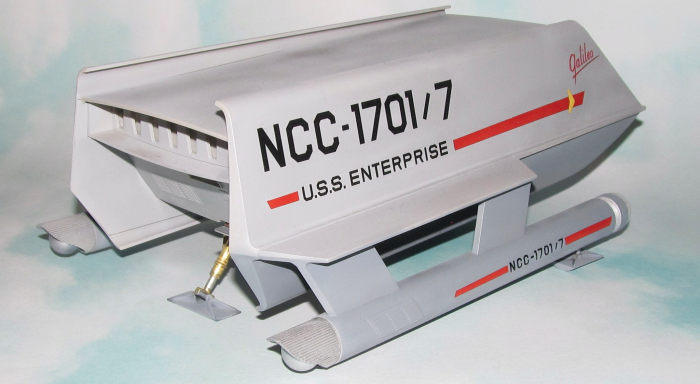
The rest of the bread box, er, fuselage was glued together with Tamiya extra thin cement except the roof which was kept unglued. The back panel was painted, decaled and installed in the opening in the rear.
The various clear parts were left off till after painting.
| COLORS & MARKINGS |
I used for the upper hull and stern Mission Models light ghost grey and dark ghost grey for the forward sections of lower hull and nacelles. The windows were sprayed with a coat of flat white paint to provide an opaque layer as there is nothing to see inside the hull. The rear landing strut and main landing gear were painted as per instructions.
 There were a couple of hull
inserts that were painted as per instructions. The base coat was airbrushed on
and the details were painted with a fine tipped brush.
There were a couple of hull
inserts that were painted as per instructions. The base coat was airbrushed on
and the details were painted with a fine tipped brush.
Once dry, I sprayed on Vallejo Clear Gloss in preparation for the decals.
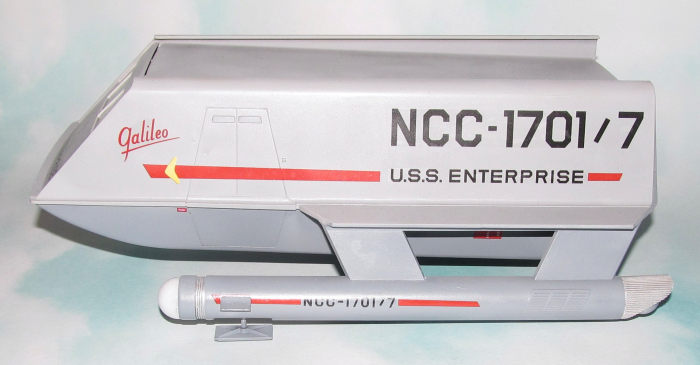
I used the original Galileo markings from the Galileo Seven Episode. Polar Lights decals went on without too much issue. However, make sure you have a decent amount of water or mild decal solution down first to allow the decal to slide into position as these decals have a tendency to stick in place. Once the decals were dry, the model was cleaned and sprayed with a flat coat.
The long decals require a lot of patience as they tend to fold over. I used a lot of water to keep the decals sliding along the surface.
I glued the windows and other clear parts in. Mounted the painted rear landing strut and forward landing gear in place.
| CONCLUSIONS |
It seemed kind of embarrassing that the company which actually made the Galileo Shuttle couldn't make an accurate kit of the original. However, I am glad that Polar Light corrected that with a very nice model of the Galileo Shuttle which means I didn't need to do a massive amount of plastic surgery to the original flawed Galileo Shuttle kit to correct it (I had been planning this for years and now happily scrap what was going to be a very time consuming and headache filled plan.)
In 2022, Polar Lights released a kit complete with interior. Considering that the interior was bigger than the actual shuttle, I'm happy with my exterior only model.
21 August 2023
Copyright ModelingMadness.com. All rights reserved. No reproduction in part or in whole without express permission.
If you would like your product reviewed fairly and fairly quickly, please contact the editor or see other details in the Note to Contributors.