| HISTORY |
AMT/ERTL 1/350 Klingon Bird of Prey
| KIT #: | 8230 |
| PRICE: | $ |
| DECALS: | One option |
| REVIEWER: | Shanee Cowland |
| NOTES: |
Pros: Nice fit, assembly in combat or cruising configuration Cons: Flash, poor decals |
| HISTORY |
“First seen in Star Trek III, The Search For Spock, the B’rel class Klingon Bird of Prey is a scout ship with a compliment of about a dozen Klingons, including officers and crew. It is equipped with a cloaking device and is capable of warp speed. Heavily armed for a ship of its size, the bird of prey has a centrally mounted photon torpedo in its nose and phaser cannons and guns in the wing tips. The Bird of Prey is also capable of atmospheric landings on planet surfaces.”
 The
Klingon Bird of prey has featured in Star Trek III, IV, V, VI and Star Trek
Generations movies as well as a number of episodes of Star Trek The Next
Generation.
The
Klingon Bird of prey has featured in Star Trek III, IV, V, VI and Star Trek
Generations movies as well as a number of episodes of Star Trek The Next
Generation.
In Star Trek VI a prototype Bird of Prey that can “fire when cloaked” is revealed to exist to Kirk and crew – that highlights the fact that previous Birds of Prey needed to uncloak in order to fire. It has long been my theory that Star Trek VI was inspired by the fall of the Berlin Wall as well as the movie The Hunt for the Red October. Both happened within about two years of Star Trek VI being released and in both the Red October and the Bird of Prey are prototype stealth ‘first strike’ weapons that would alter a delicate arms balance.
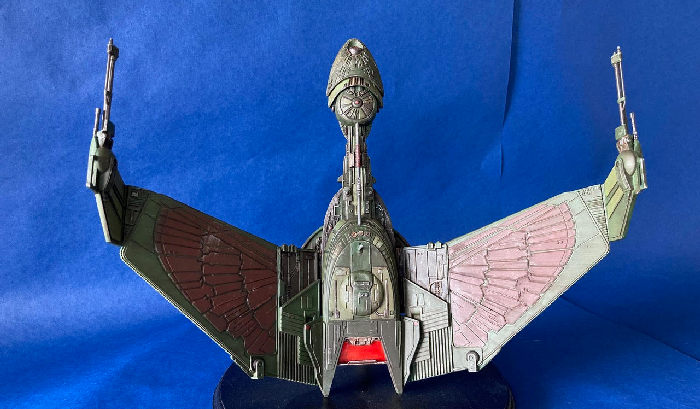
In my view it is the most interesting of all the Star Trek space ships with its aggressive design, swept forward wings and visible heavy armament. It’s the kind of design that leaves no ambiguity of purpose. It says “I mean business!” Klingon Birds of Prey have always been portrayed as being dirty and grungy (possibly from flying within dirty atmospheres as well as in the vacuum of space). This makes them, and painting them, all the more interesting.
| THE KIT |
This kit was a trade at a model swap meet and when I got it, the box was open and many of the parts had come off the sprue. It was something of a gamble that I would have a complete bird of prey that fortunately paid off.
As there are only about forty parts, there isn’t much in the box. Several sprues molded in light grey plastic, a clear parts sprue with two parts and a small decal sheet (literally just a couple of square inches) with four decals.
The instructions were clear and printed on a large double sided sheet of paper in black and white. One nice touch is that the instructions names the parts so that the builder understands what each thing ‘is’ on the Bird of Prey.
| CONSTRUCTION |
 The kit
went together very well considering it is over twenty years old. There was
some flash – as to be expected from a kit this old. Details were very
clearly engraved or raised from the surface and there were a minimum of
seams and fill lines.
The kit
went together very well considering it is over twenty years old. There was
some flash – as to be expected from a kit this old. Details were very
clearly engraved or raised from the surface and there were a minimum of
seams and fill lines.
Early on I needed to determine if I was going to build it with wings horizontal (cruising configuration) or lowered into attack mode. Sadly there is not the option of having the wings swept up slightly (as seen in the last scene of Star Trek IV when the Bird of Prey hovers over the whaling ship). This was the only configuration option provided and was a simple choice of which radiator baffles that would be used
Once the baffles were built, the wings were assembled, painted and decaled. Unlike most models, the this kit required painting of each sub assembly before final construction. Four locator pins in the bottoms of the radiator baffles joined onto the tops of the wings and held them positively in place. When dry fitting, I did find that there was a gap about 5mm wide along the bottom of the radiator baffles between the wing and fuselage. Although this is hardly noticeable, I used sheet styrene to block this in and painted in Tamiya Dark Iron (XF-84)before assembly.
The fuselage consists of an upper and lower and a
pair of fuselage sides and fuselage panels. Once the fuselage sides and
panels were attached to the lower fuselage I prepped an alternative stand.
Based on a review here by
Dan Lee I elected to build a less flimsy
stand. My simple solution involved gluing a styrene block into the lower
fuselage at its center
 of
gravity and then supergluing a thin 1.5 inch nail through the block and out
of the bottom of the ship. Then a new wooden base was purchased from a craft
store and drilled so that an acrylic rod could be glued into it. The top of
the acrylic rod was drilled so that the length of the nail would slide into
the acrylic rod.
of
gravity and then supergluing a thin 1.5 inch nail through the block and out
of the bottom of the ship. Then a new wooden base was purchased from a craft
store and drilled so that an acrylic rod could be glued into it. The top of
the acrylic rod was drilled so that the length of the nail would slide into
the acrylic rod.
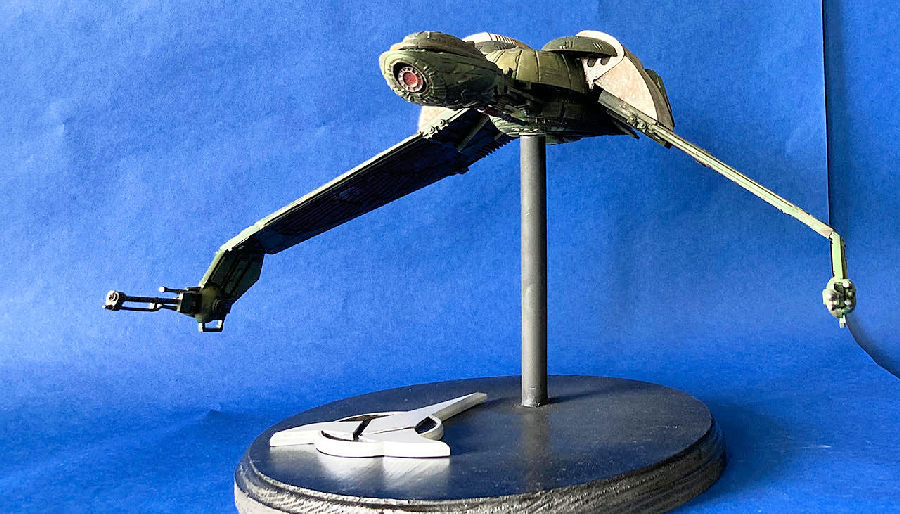
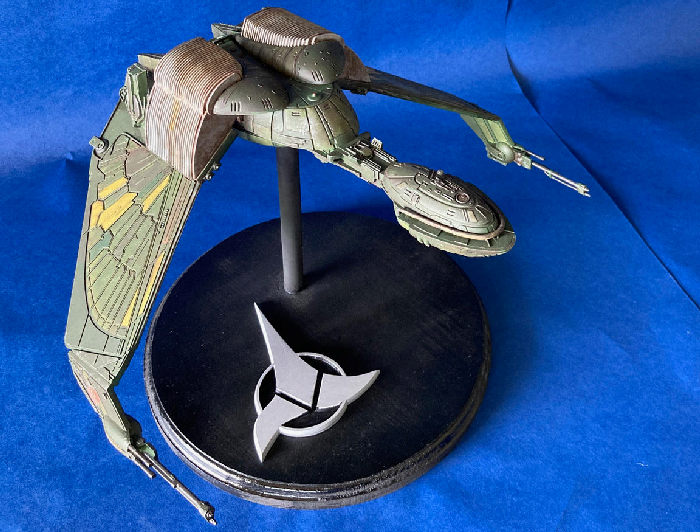
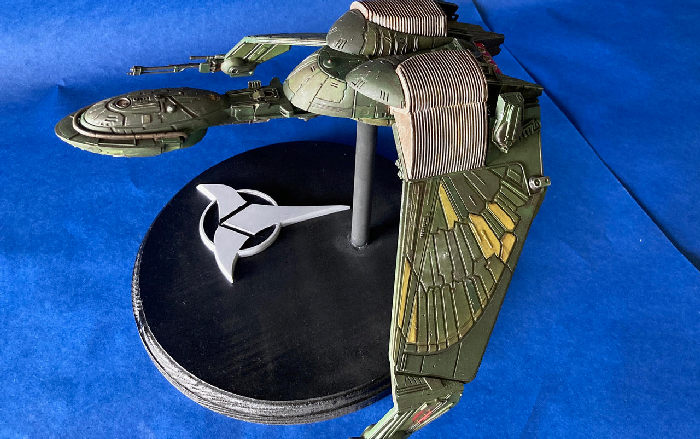
The result was far more robust. Because the base was much bigger and the wood grain was clearly visible, I downloaded a free Klingon emblem file from Thingiverse. This was printed by Hangar18 Hobbies in Raleigh using their resin 3D printer as I have neither the skill or equipment. The 3D print enabled me to produce the highly accurate geometry that makes up the symbol. I elected to use a resin printer as it gives a much smoother surface finish than spool printers.
Continuing with the Bird of Prey, I sealed top and bottom fuselage halves together, added the last few fuselage details before I attached the radiator baffles to the fuselage. The whole thing looked pretty cool when placing it on its stand for the first time.
While assembly was reasonably straight forward, this was interlaced with long periods of painting. In all, I’d say that it took two or three times the construction time in painting time.
| COLORS & MARKINGS |
I took some liberties with the color scheme as some of the colors were not easy to identify and after a lot of research, there were not that many clear pictures of the bird of prey.
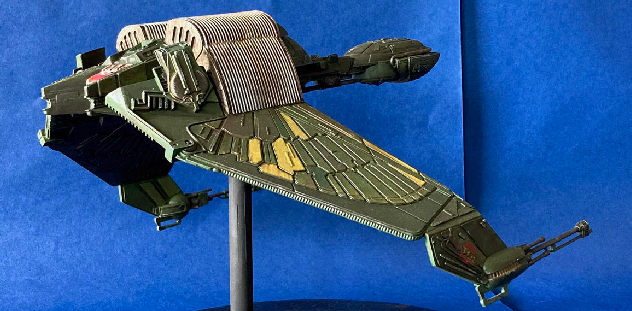
The base color of the ship was airbrushed in 1:1 ratio of Tamiya Deep Green (XF-26) and Tamiya NATO Green (XF-67). Some of the panels were then brush painted in varying shades of green to reasonably closely resemble the description in the instructions. The red wing motif on the underside of the wings of the Bird of Prey were painted in a 1:1 ratio of Tamiya Flat Red (XF-7) and Tamiya Hull Red (XF-9).
 The
decals consisted of two Klingon ‘Words’ along the lower trailing edges of
the wings and a symbol near each of the guns. All the decals came off the
sheet fine and conformed onto the plastic without a hitch. The Klingon
‘word’ decal was printed on a large rectangle of carrier film and it really
looked poor. Ultimately I decided to remove it from the model and just leave
the two Klingon Symbols.
The
decals consisted of two Klingon ‘Words’ along the lower trailing edges of
the wings and a symbol near each of the guns. All the decals came off the
sheet fine and conformed onto the plastic without a hitch. The Klingon
‘word’ decal was printed on a large rectangle of carrier film and it really
looked poor. Ultimately I decided to remove it from the model and just leave
the two Klingon Symbols.
The only two clear parts are the photon torpedo tube at the front and the exhaust at the rear. I airbrushed the photon torpedo tube in Tamiya Clear Red and then went over then opaque details in Tamiya Gun Metal.
Because the exhaust was several different colors, I decided not to airbrush but to hand brush the outside of the part in Tamiya clear Colors. I added depth by painting the inside of the clear part with Vallejo Metallic Air Steel.
Many of the ‘bare metal’ areas were hand painted in Tamiya Gun Metal (X-10) or Vallejo Metallic Air Steel (71.065) and then dulled down with Tamiya Dark Iron. At this point I really stopped looking at the instructions and just decorated the model as I wanted it to look.
My weathering process involved dry brushing most of the model with pieces of sponge to bring out the edges and corners of the metal with a few places receiving extra attention as if atmospheric abrasion or weapons strikes have penetrated through the paint of the panels.
As mentioned above, the Bird of Prey is capable of atmospheric flight as well as space flight. This meant that adding oil washes could resemble leaking fluids (flowing downwards due to the gravitational pull of some alien planets), oxidation, dirt and burns. I initially tried using Tamiya panel washes but the panel lines were so vast that I was using copious amounts of wash. Ultimately I mixed my own with cheap oil paints (mainly black, burnt senna and yellow ochre) and enamel thinners and drizzled the concoction all over the model. For the most part I used large brushes and then cotton buds to dab up some of the excess.
| CONCLUSIONS |
To me, the appeal of building this ship is the same of that of the Millennium Falcon: It is an iconic science fiction spaceship and weathering it is a lot of fun. The build is very simple and it will look good with a straight forward paint job or you can, like me, just go nuts.
| REFERENCES |
https://www.scalemates.com/kits/amt-ertl-8230-klingon-bird-prey--135350
https://www.scalemates.com/products/img/3/5/0/135350-20-instructions.pdf
2 December 2021
Copyright ModelingMadness.com. All rights reserved. No reproduction in part or in whole without express permission.
If you would like your product reviewed fairly and fairly quickly, please contact the editor or see other details in the Note to Contributors.