Testors 1/72 XR-7 Thunderdart
| KIT #: | 567 |
| PRICE: | $ Out of Production |
| DECALS: | One option |
| REVIEWER: | Shawn Payne |
| NOTES: | Model very large for 1:72 |
| HISTORY |
The Company Testors has a history
of producing “Top Secret” subjects.
Back in the mid 80’s they released a kit of the then Top Secret F-19 Stealth
fighter. Designed from rumors and
guesses they came out with a very interesting looking stealth fighter that a few
years later we all saw how far off they missed the mark.
But the kit did sell well and made news headlines; I even saw it on the
nightly news as a visual aid for the stealth stories.
Little side note here.
During this time period I was in the USAF and assigned to the 4450th
test squadron. I really liked the
kit and bought several in both scales.
 So
Testors decided to take a stab at another highly classified aircraft project
that was in the news a lot in the early 90’s.
The jet is based on the rumored technology of high altitude, high speed
ram jet capabilities. Now today
some ten or more years since the rumors were all over the news the public has
not been shown any aircraft that was believed to been flown out of Groom Lake
with these capabilities, so we don’t know this time how close Testors came to
the classified project of this mach 6+ aircraft.
So
Testors decided to take a stab at another highly classified aircraft project
that was in the news a lot in the early 90’s.
The jet is based on the rumored technology of high altitude, high speed
ram jet capabilities. Now today
some ten or more years since the rumors were all over the news the public has
not been shown any aircraft that was believed to been flown out of Groom Lake
with these capabilities, so we don’t know this time how close Testors came to
the classified project of this mach 6+ aircraft.
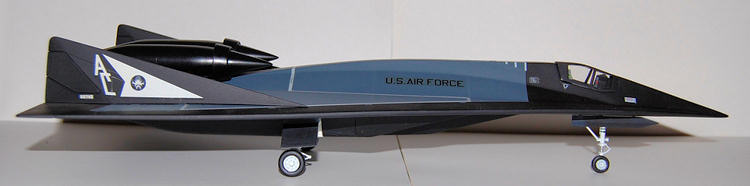
If my memory serves me I believe this model was released as just the XR-7 by itself or with a modified SR-71, the SR-75 to which it piggy backed on until the altitude and speed required to separate was achieved and the XR-7 separated and went on its way on its various classified missions. The price of the set dictated that I bought just the XR-7 alone.
| THE KIT |
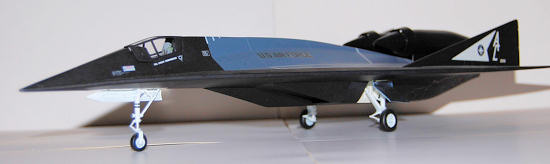
 Molded in black plastic, there are
only 45 parts to this model. The
first thing that stands out is the two halves to the fuselage, upper and bottom.
They are quite large. The
nose parts are molded separately from the two main body halves.
The shape of the body looks like a stretched version of the F-117A with
the characteristic facets slightly rounded off.
I guess Testors believed that technology has progressed since the 80’s.
The parts are fairly cleaned of seams and flash, which is what you come
to expect from Testors.
Molded in black plastic, there are
only 45 parts to this model. The
first thing that stands out is the two halves to the fuselage, upper and bottom.
They are quite large. The
nose parts are molded separately from the two main body halves.
The shape of the body looks like a stretched version of the F-117A with
the characteristic facets slightly rounded off.
I guess Testors believed that technology has progressed since the 80’s.
The parts are fairly cleaned of seams and flash, which is what you come
to expect from Testors.
There are
no weapons bays, as this aircraft was not designed to carry any ordinance.
It is just for recon missions only I guess.
The decals are well printed and the instructions show a step-by-step assembly that when followed make for an easy assembly.
| CONSTRUCTION |
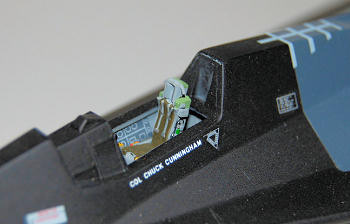
Starting
with the cockpit I painted the tub, sidewall and instrument panel Testors Model
Master Medium Gray. The Ejection
seat is a very nicely done ACES II seat.
All it required was painting to bring out the details to the seat.
Once done I glued it into place in the upper fuselage.
Next step the landing gear bays.
A shot of gloss
 white and they were glued into place in the lower
fuselage. I did not weather the
bays figuring that sense this aircraft was new and probably undergoing constant
maintenance is never had a chance to get dirty.
I added the appropriate amount of weight to the nose and glued the upper
fuselage to the lower fuselage. These
parts went together without any alignment problems.
I glued the two small parts of the nose together and looked at how it fit
to the main body. Don’t know what
happened here. But the nose
contours were larger than the body.
This took a good deal of sanding and filling to get it to conform to the lines
of the jet. I was glad that I
was dealing with flat surfaces instead of rounded contours here.
white and they were glued into place in the lower
fuselage. I did not weather the
bays figuring that sense this aircraft was new and probably undergoing constant
maintenance is never had a chance to get dirty.
I added the appropriate amount of weight to the nose and glued the upper
fuselage to the lower fuselage. These
parts went together without any alignment problems.
I glued the two small parts of the nose together and looked at how it fit
to the main body. Don’t know what
happened here. But the nose
contours were larger than the body.
This took a good deal of sanding and filling to get it to conform to the lines
of the jet. I was glad that I
was dealing with flat surfaces instead of rounded contours here.
I assembled the vertical stabilizers and the ram air pulse jets and set them aside for painting. This takes care of all of the major components to this model.
| COLORS & MARKINGS |
Being that this is of an unseen aircraft I decided to come up with a
paint scheme that I thought would look realistic for it in operational use.
After primer I airb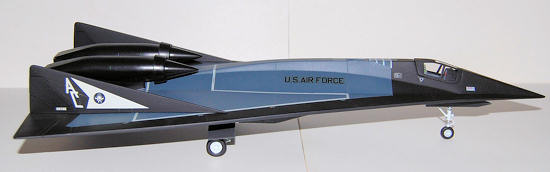 rushed the top of the jet with Testors Model Masters
Medium gray for the no step boundaries.
I masked off the boundaries with pin striping tape and then sprayed over
that with Testors Model Master Gunship Gray.
Masking off the areas that I want to stay Gunship Gray the rest of the
jet got a coat of Testors Flat Black, both top and bottom.
The ramjets and vertical stabilizers were also painted Flat Black.
rushed the top of the jet with Testors Model Masters
Medium gray for the no step boundaries.
I masked off the boundaries with pin striping tape and then sprayed over
that with Testors Model Master Gunship Gray.
Masking off the areas that I want to stay Gunship Gray the rest of the
jet got a coat of Testors Flat Black, both top and bottom.
The ramjets and vertical stabilizers were also painted Flat Black.
Once dry and the masking tape removed I glossed the jet for decal application. Now here I varied from the kit decals. I used them along with decals from my spare and half used sheets and came up with the markings I liked. The tail markings came from a 1:72 super scale A-7E set I had left over, I finished the jet with Testors Dull Coat and glued in the landing gear, and bay doors. Then on went the vertical stabilizers and the ramjets.
| CONCLUSIONS |
This makes a nice addition to my experimental and what-if aircraft. The model was easy to put together, with the exception of the nose part, and can be built by a beginner to get a good-looking jet.
December 2009
Copyright ModelingMadness.com
If you would like your product reviewed fairly and fairly quickly, please contact the editor or see other details in the Note to Contributors.