 Historical
future.
Historical
future.| KIT #: | 1907 |
| PRICE: | $ |
| DECALS: | None required |
| REVIEWER: | George Oh |
| NOTES: | Kit contains five T-800s, and a base, in a largely-empty box |
| HISTORY |
Historical
future.
“In three years, Cyberdyne will become the largest supplier of military computer systems. All stealth bombers are upgraded with Cyberdyne computers, becoming fully unmanned. Afterwards, they fly with a perfect operational record. The Skynet Funding Bill is passed. Skynet was originally activated by the military on August 4, 1997, to control the National Arsenal, hooked into everything, trusted to run it all. Human decisions are removed from strategic defence. Skynet begins to learn at a geometric rate. They say it got smart, a new order of intelligence. It becomes self-aware at 2:14 a.m. Eastern time, August 29th. In a panic, they try to pull the plug. So it saw all people as a threat, not just the ones on the other side. It decided our fate in a microsecond: extermination. It launched an attack on Russia that precipitated a nuclear retaliation attack on the USA – Judgement day.
Skynet modified factories to
produce Hunter/Killer machines to eliminate the human population. Some of us
were kept alive... to work... loading bodies. The disposal units ran night and
day. We were that close to going out forever. It also built Terminators -
infiltration units. The T-600-series had rubber skin. We spotted them easy. But
these T-800s are new – part man, part machine. Underneath is a hyperalloy combat
chassis endoskeleton – microprocessor-controlled, fully armoured, very tough.
But outside is living human tissue – flesh, skin, hair, blood. Grown for Cyborgs.
They look human – sweat, bad breath, everything. Hard for us to spot, but dogs
can. Listen. Understand. That Terminator is out there. It can’t be reasoned
with. It can’t be bargained with. It doesn’t feel pity or remorse or fear, and
it will absolutely not stop. Ever. Until you are dead. He’ll find you. That’s
what he does. That’s all he does.”
| THE KIT |
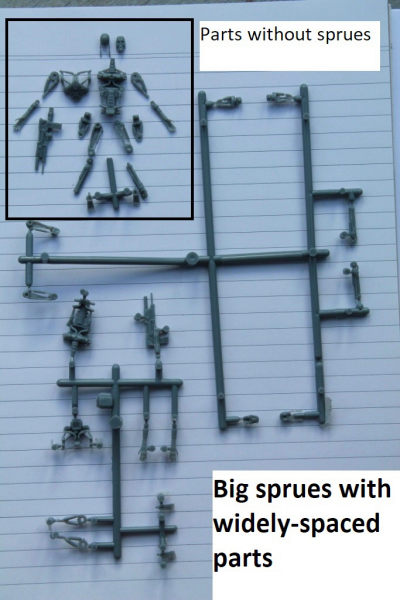 The large
box contains a large oval base with embedded skulls, an arch-way as a separate
piece, and five pairs of identical sprues that carry the parts for one T-800
endoskeleton spread-out over too-large an area. Possibly the sprues were
envisaged to be part of a larger kit (the H-K perhaps?). It appears to be made
of ABS plastic. The parts are well-detailed, but show some minute mould seams
and a little flash. Knockout pin towers are everywhere, but NONE are physically
on a part – though they are attached to parts via sprue-gates. Each T-800
endoskeleton is composed of 17 parts, which includes a right fore-arm with
Phased Plasma Rifle
in the 40-Watt range, and an alternate
fore-arm without a weapon. Legs and arms are posable in the fore/aft axis of the
figure, but the arms and head cannot be rotated into any other position (without
a lot of scratch-building of several tiny actuating rams, et al).
The large
box contains a large oval base with embedded skulls, an arch-way as a separate
piece, and five pairs of identical sprues that carry the parts for one T-800
endoskeleton spread-out over too-large an area. Possibly the sprues were
envisaged to be part of a larger kit (the H-K perhaps?). It appears to be made
of ABS plastic. The parts are well-detailed, but show some minute mould seams
and a little flash. Knockout pin towers are everywhere, but NONE are physically
on a part – though they are attached to parts via sprue-gates. Each T-800
endoskeleton is composed of 17 parts, which includes a right fore-arm with
Phased Plasma Rifle
in the 40-Watt range, and an alternate
fore-arm without a weapon. Legs and arms are posable in the fore/aft axis of the
figure, but the arms and head cannot be rotated into any other position (without
a lot of scratch-building of several tiny actuating rams, et al).
The large instruction sheet is pretty comprehensive (it tells you that the head goes on top and the feet go on the bottom of the legs) and mentions the variable positioning of the figure’s limbs. The painting of the figures is pretty basic, and I feel that the instructions could have described (for young modellers) how to do a dark wash. The painting guide correctly indicates that the figures teeth should be painted white(ish), but good luck with that because they are too small to see. At one stage, this kit was released in a chromed version.
| CONSTRUCTION |
I’ve commenced building the Pegasus 1/35th-scale
H-K tank and I am required to paint it in a chrome steel
 finish. I
bought these T-800s to go with it, and elected to build one to have a first-time
try-out the Super Silver from the new SMS range of paints, before using it to
tackle the main event because, (I have it on good authority that) it will give
me the finish I seek.
finish. I
bought these T-800s to go with it, and elected to build one to have a first-time
try-out the Super Silver from the new SMS range of paints, before using it to
tackle the main event because, (I have it on good authority that) it will give
me the finish I seek.
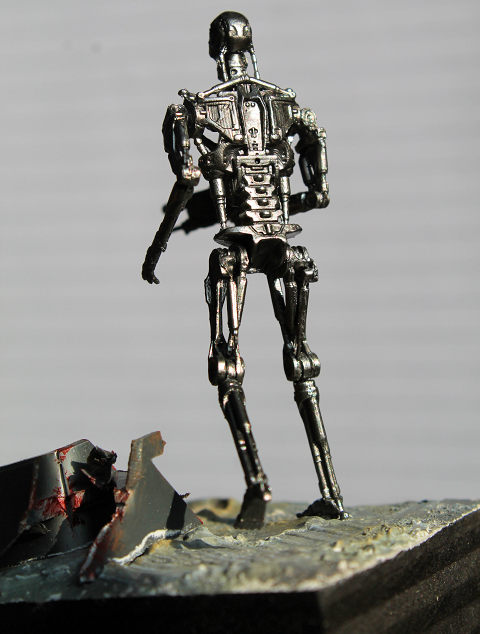
Construction of a T-800 started on a Saturday at 2:00pm with removal of the parts, cleaning-up the seams and flash, then dry-fitting the parts. I found that the two-part skull needed a little trimming to get a flush fit, and that the upper-arm pins and the pelvis pins needed a little shortening. Also the shoulder sockets and leg sockets needed drilling-out to cleanly accept the said pins. Knockout pin scars on the rear torso half will be hidden by the front half of the torso, so someone out there is thinking of us model-builders. Liquid superglue was used for all joins. Only the skull needed a little filler, from ear to ear, and I used Tamiya white filler for the job.
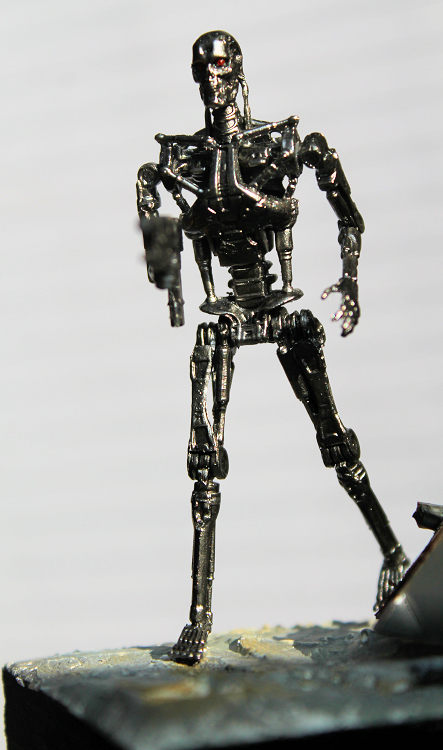
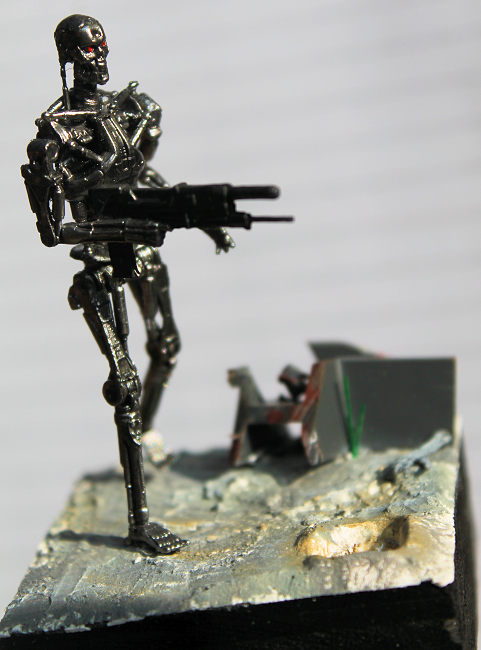
All limb elements join at the natural shoulder, elbow, pelvis and knee joints. This makes the limbs poseable in the fore/aft line of the model. But they can’t be rotated out sideways, so an arms-wide or a sitting cross-legged stance is out of the question (Rats!!). I posed mine is a natural walking pose, with its weapon held level at waist-height. I’ll have to come-up with other (imaginative?) poses for the other four figures. The back ankle was sanded slightly so that the back foot is in a more natural pose for a walker. The gun/arm piece was left-off till after painting.
| COLORS & MARKINGS |
 I’m trialling
(on good advice) a paint. SMS is a new paint manufacturer from here in
Australia, and their Super Silver is guaranteed to produce a smooth chrome-steel
finish (IF applied correctly). They come in 30ml bottles, and are pre-thinned
for spray-painting. In accordance with the instructions, I sprayed the figure
with a gloss black – Tamiya, ‘cos it was at-hand. An hour later (AFTER giving
the AB a good clean), I half-filled the cup and with an 8”/200mm gap between
nozzle and figure, I took a deep breath and began misting.
I’m trialling
(on good advice) a paint. SMS is a new paint manufacturer from here in
Australia, and their Super Silver is guaranteed to produce a smooth chrome-steel
finish (IF applied correctly). They come in 30ml bottles, and are pre-thinned
for spray-painting. In accordance with the instructions, I sprayed the figure
with a gloss black – Tamiya, ‘cos it was at-hand. An hour later (AFTER giving
the AB a good clean), I half-filled the cup and with an 8”/200mm gap between
nozzle and figure, I took a deep breath and began misting.
WOW – was I surprised! The Super Silver was turning-out every bit as beautiful as I’d been led to believe. From some angles, the model looked to remain black, but turning it showed an almost-flawless chromed coat. I left it to dry for an hour, during which time I blacked, then silvered the gun/arm. At the end of the hour, all was dry, so I brush-painted the gun with Citadel Miniatures chaos black, followed by a liberal going-over with some graphite from a lead pencil. I attached the gun/arm to the model (there ‘aint much contact surface) then gave the model a black wash to separate the different rods and struts from each other, and to break-up the monochrome finish. Finally, the eyes got a dot of Mr Colour Shiny Red. Unlike some other metal finishes, this one doesn’t have to be burnished, doesn’t have to be sealed-in, and it doesn’t rub-off on your fingers when you handle your model.
| THE BASE |
The fact that this figure needed a
base was a ‘gimmie’. It is too fragile and too unbalanced to be a stand-alone
figure. The base was a piece of scrap wood that was lying in the scrap-wood bin
in the garage. One minute and three cuts later, it had been squared-up under the
blade of my compound mitre-saw. It was painted black with cheap acrylic poster
paints. Next day, I covered the sides with tape and looked for stuff to throw
onto the base. In the scraps box, I found a bit of plastic I-beam, so I drilled
a hole in it then roughly cut it apart with cutters, and twisted it with pliers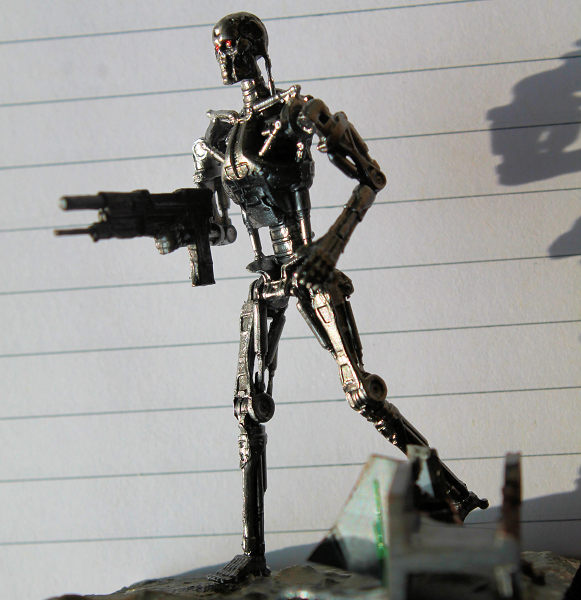 .
A little brown paint did for rust (but it ‘aint too good, is it).
.
A little brown paint did for rust (but it ‘aint too good, is it).
Both bits were pushed around the base till I was happy with the lay-out. The I-beam would be roughly behind the T-800. To 3-D the base, I used a drill bit to gouge a small crater in a corner, then I (literally) slapped some lumpy plaster over the base (remembering to dig-out that crater and build-up the walls). As the plaster dried, I pressed the I-beam into it to seat it properly. When all was dry, the plaster got roughly mottled with two different greys, then a dry-brushing of white, to replicate the ashen wasteland of the Terminator post-Judgement Day terrain.
The T-800’s leg was sufficiently thick enough for me to drill up through his right foot into it with a No. 70 drill bit, and to insert a long craft wire. This wire went into a corresponding hole drilled in the base, and was clipped short enough so that the T-800’s foot seems to be firmly in contact with the ground. The wire was bent so that the T-800 was almost balanced on its grounded foot. By making the figure look a little off-balance, the viewer naturally assumes that it is moving. I left the T-800 vey shiny to make it contrast with the base.
I put a little superglue in the well of the crater to simulate a wet patch, and (because it would really happen) put a small weed growing in the lee of the I-beam. Because it came with the kit, I painted the T-800’s spare arm, misted it with white, then put it alongside the I-beam, positioned so that the rest of this second T-800 is off the base. I shoulda put it down first so it would look as though the beam had squashed it.
| CONCLUSIONS |
 Everything
was done before 2:00pm on the Sunday, so the whole was done in less than 24
hours (and I was crook in bed for 10 of them). That quick-drying black and Super
Silver helped a lot. A 15-hour coughing and sinus attack didn’t. For a small
kit, this T-800 looks pretty good to me, and I heartily recommend it to other
modellers out there – especially those (like me) who stink at painting faces. I
also heartily recommend SMS Super Silver that gives the T-800 that
brilliantly-shiny finish. And I am now more-confident that I can do justice to
the HK tank (and its T-800 support troops).
Everything
was done before 2:00pm on the Sunday, so the whole was done in less than 24
hours (and I was crook in bed for 10 of them). That quick-drying black and Super
Silver helped a lot. A 15-hour coughing and sinus attack didn’t. For a small
kit, this T-800 looks pretty good to me, and I heartily recommend it to other
modellers out there – especially those (like me) who stink at painting faces. I
also heartily recommend SMS Super Silver that gives the T-800 that
brilliantly-shiny finish. And I am now more-confident that I can do justice to
the HK tank (and its T-800 support troops).
PS – I reckon that Sarah Conner was lucky. She (and SGT Reese) had to avoid a single rookie Terminator.
Proof? “Your clothes. Give them to me. Now!!” (Instead of Beat-beat-beat. Strip. Dress.)
But it was learning fast. “You can’t do that.” “Wrong (BLAMM!!)”
The survivors of Judgement Day had to survive a megaton nuclear explosion, and then survive, and defeat, an army of Terminators, and their supporting fleet of ground and aerial Hunter/Killers.
| REFERENCES |
Just the instructions, the box art/photo and internet images of T-800s.George Oh
8 May 2018
Copyright ModelingMadness.com Thanks to
for the review kit. You can find this one at your favorite hobby shop
or on-line retailer. If you would like your product reviewed fairly and fairly quickly, please
contact
the editor or see other details in the
Note to
Contributors. Back to the Main Page
Back to the Review
Index Page
Back to the Previews Index Page