| KIT #: | ?amc1005 |
| PRICE: | $20.00 |
| DECALS: | None |
| REVIEWER: | John Summerford |
| NOTES: |
| HISTORY |
Earth vs. the Flying Saucers (a.k.a. Invasion of the Flying Saucers and Flying Saucers from Outer Space) is a 1956 American science fiction film from Columbia Pictures and stars Hugh Marlowe and Joan Taylor.
The film's storyline was suggested by the bestselling, 1953 non-fiction book Flying Saucers from Outer Space by Maj. Donald Keyhoe. Special effects creator Ray Harryhausen used descriptions in the book for inspiration for the design of the saucers seen in the film.
| THE KIT |
 A flimsy
end-opening box holds a diorama backdrop and bag of four plastic parts. The
Saucer top piece and bottom piece come connected and result in 5-inch diameter
model. To separate them, twist clockwise. You have your choice of installing
either the Laser Ray Emitter on the underside or the Landing Tube.
A flimsy
end-opening box holds a diorama backdrop and bag of four plastic parts. The
Saucer top piece and bottom piece come connected and result in 5-inch diameter
model. To separate them, twist clockwise. You have your choice of installing
either the Laser Ray Emitter on the underside or the Landing Tube.
The instructions are printed on the backside of the box
That’s it.
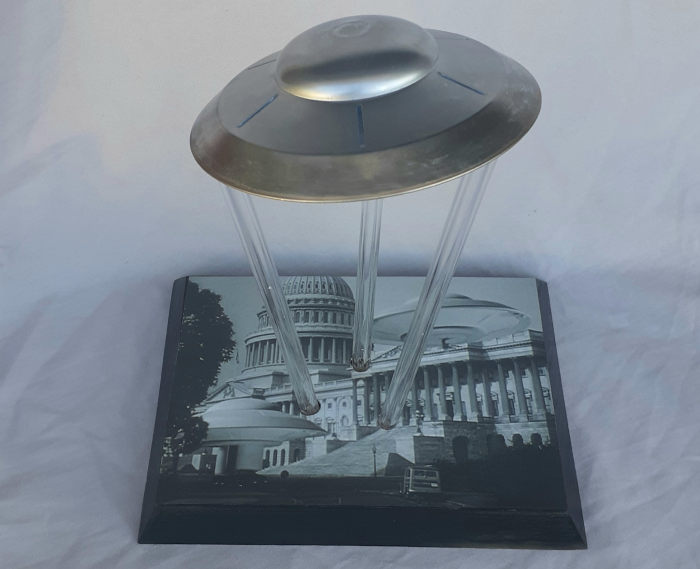
So, one is left with a blank canvas for a paint scheme and a challenge in utilizing the backdrop.
| CONSTRUCTION |
 Of course,
I made the project difficult for myself. I looked at the various bottles of
Alclad II that I have and formed an idea of how to paint the model. I also
wanted to feature the Laser Ray emitter, so that meant putting it on some kind
of stand. I have some 3/8th inch acrylic tubing left over from another project
and thought that would make for suitable legs to mount the saucer. Then I
thought it would be boring if the legs were attached straight down and the
saucer “flying” straight and level. So, what if I could tilt legs 10 degrees off
of vertical and vary the length of each leg so that the saucer was in a climbing
turn?
Of course,
I made the project difficult for myself. I looked at the various bottles of
Alclad II that I have and formed an idea of how to paint the model. I also
wanted to feature the Laser Ray emitter, so that meant putting it on some kind
of stand. I have some 3/8th inch acrylic tubing left over from another project
and thought that would make for suitable legs to mount the saucer. Then I
thought it would be boring if the legs were attached straight down and the
saucer “flying” straight and level. So, what if I could tilt legs 10 degrees off
of vertical and vary the length of each leg so that the saucer was in a climbing
turn?
For the first time in my life, I needed to use my long-forgotten high-school trigonometry lessons. (I think I needed to figure out the length of the hypotenuse to establish the length of the legs.) I do have drafting tools and rulers on hand, so on sheet of paper, I drew out a horizontal line and a perpendicular line. I created 10-degree angles on both sides of the vertical line. This gave me the center line of two legs.
Checking where the internal locks are so that I wouldn’t fit
the legs to them, I established the location of each leg on the lower saucer
piece, denoting an equilateral triangle. I measured the distance between two
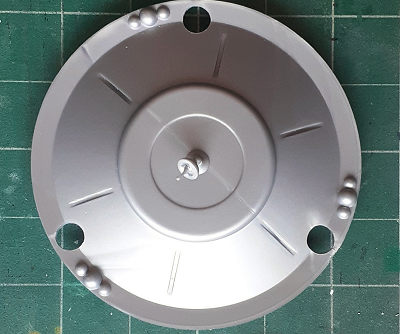 corners
and transferred it to my drawing and marked the spots. I decided to space the
legs at the base 1 ½ inches apart and marked that on the drawing where that
distance falls. That gave me the length of the medium leg. I decided to add a
half inch to one leg and subtract a half from the third and that give me the
dynamic pose. I added 5/8th inch to all of the lengths to account for the
thickness of the base.
corners
and transferred it to my drawing and marked the spots. I decided to space the
legs at the base 1 ½ inches apart and marked that on the drawing where that
distance falls. That gave me the length of the medium leg. I decided to add a
half inch to one leg and subtract a half from the third and that give me the
dynamic pose. I added 5/8th inch to all of the lengths to account for the
thickness of the base.
Going back to the lower part, I used a small drill for a pilot hole to create the mounting points for the legs. A couple of larger drill bits were used next followed by a rotary tool to get the final sized hole.
I cut the boarder off of the movie still image in the backdrop and sized the base to fit that. A paper equilateral triangle with 1 ½ inch sides cut out and placed over the photo. This identified where to drill the holes in the base.
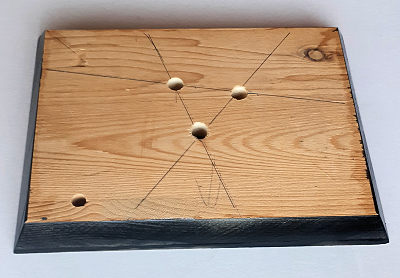 The
base was cut from some scrap wood with a 30-degree chamfer edge to echo the
legs, and also, because I could. The points of the triangle were transferred to
the base. And the holes drilled. The edge was sanded to eliminate saw marks then
given a couple coats of rattle can clear, sanded between coats. A couple of
coats of rattle can black paint gave the base a finished edge.
The
base was cut from some scrap wood with a 30-degree chamfer edge to echo the
legs, and also, because I could. The points of the triangle were transferred to
the base. And the holes drilled. The edge was sanded to eliminate saw marks then
given a couple coats of rattle can clear, sanded between coats. A couple of
coats of rattle can black paint gave the base a finished edge.
A test fit with wooden dowels revealed that everything lined up. (YYYESSS!)
The photo was glued to the base then pilot holes drilled from the underside showed where to insert the tip of a knife blade to trim the holes for the legs.
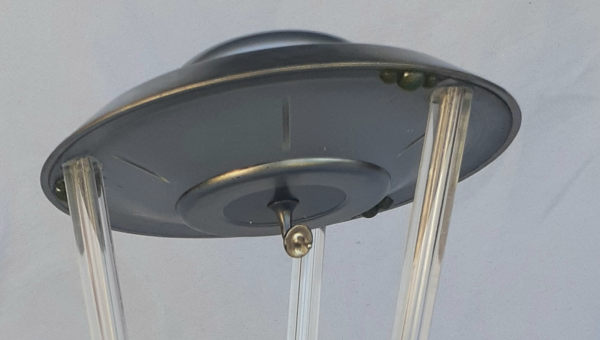
There was a sink hole on the front face of the Laser Ray Emitter, so I used my smallest grinding bit in my rotary tool to make the face concave. I didn’t match the depth of the hole out of fear of going too far. A little sanding to even the face and then the dish was flooded with Future floor wax to smooth the face.
| COLORS & MARKINGS |
Since the Laser Ray
Emitter was being showcased, the Landing Tube went to the spares box. The other
three parts were given a coat of Alclad II black base. Instead of using a single
bottle of paint on the model, multiple bottles were used for a subtle effect.
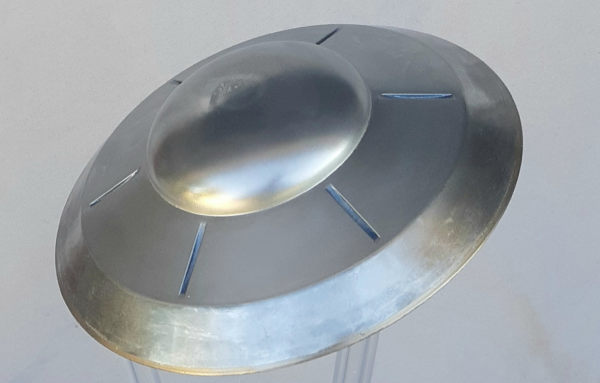
Each tone of paint was masked and painted separately. The upper pi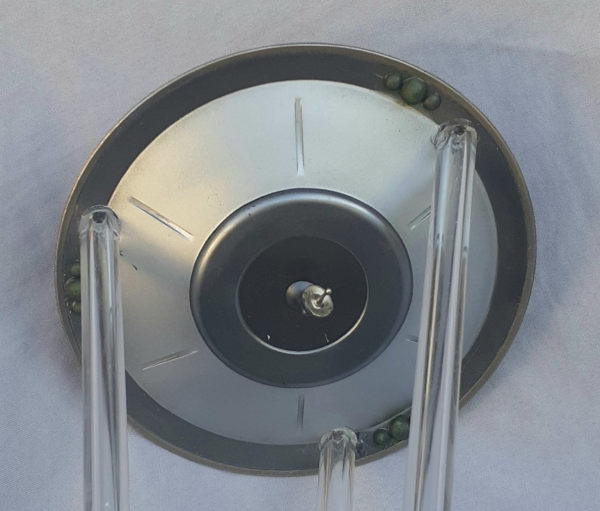 ece
was painted, in order from center dome to rim, Chrome, White Aluminum with Clear
Blue grooves, Stainless Steel and Pale Burnt Metal outer trim ring. The bottom
piece was painted, again, from center outward, Magnesium, plus the arm and back
side of the Laser Ray Emitter dish, Stainless Steel, White Aluminum, and more
Stainless Steel. The trio of bumps at the outer edge were overcoated with clear
green, to add some color. Pale Burnt Metal was also sprayed onto the face of the
Laser Ray Emitter.
ece
was painted, in order from center dome to rim, Chrome, White Aluminum with Clear
Blue grooves, Stainless Steel and Pale Burnt Metal outer trim ring. The bottom
piece was painted, again, from center outward, Magnesium, plus the arm and back
side of the Laser Ray Emitter dish, Stainless Steel, White Aluminum, and more
Stainless Steel. The trio of bumps at the outer edge were overcoated with clear
green, to add some color. Pale Burnt Metal was also sprayed onto the face of the
Laser Ray Emitter.
Masking was an exercise in cutting circles and arcs. I’ve had difficulty using circle cutters and this time I figured out to use both hands, one holding the pivot and the other holding the blade arm, I could get consistently neat cuts.
The acrylic tube legs were cut to length and pressed into the holes in the base followed by tacking the bottom piece on the legs with cyano and reinforced with epoxy. When that cured, the tips of legs where they protruded above the rim were made flush. Dabs of epoxy were swabbed into the locking points and the upper piece twisted into position. Adding the Laser Ray Emitter completed the model.
| CONCLUSIONS |
I managed to turn a 10-minute build-and-paint project into a days-long affair bringing in other skills and enjoyed every minute of it. The saucer is well molded and presents many opportunities for “what if” projects, including lighting effects, or just a change-of-pace build.
18 January 2022
Copyright ModelingMadness.com. All rights reserved. No reproduction in part or in whole without express permission.
If you would like your product reviewed fairly and fairly quickly, please contact the editor or see other details in the Note to Contributors.