| KIT #: | 6905 |
| PRICE: | AUD$15.00 |
| DECALS: | One option |
| REVIEWER: | George Oh |
| NOTES: |
| HISTORY |
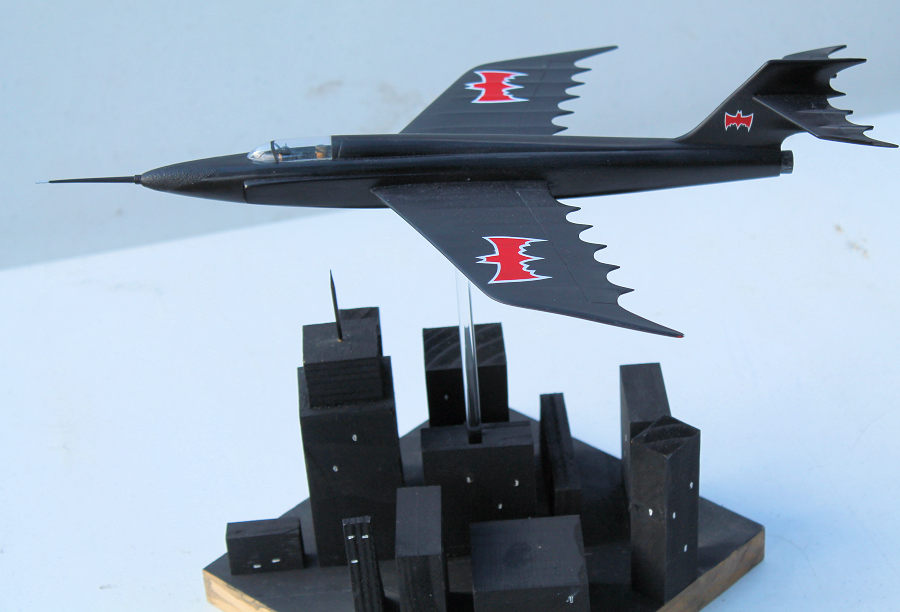
(The) Batman was dreamed-up in 1939, by writer Bill Finger, and the character was drawn by Bob Kane. Since then, he has evolved in appearance (but has not aged). As a child, young Bruce Wayne witnessed the murder of his (very) rich parents (as they walked unprotected through a seedy part of town? That's smart!!), and vowed to become a crime-fighting vigilante. His determination drove his training, his inherited wealth funded his concept and a chance encounter with a bat spawned his disguise. Lacking any superpower, he relies on physical strength & agility, detective prowess, gadgets and luck. Among his gadgets are his varied modes of aerial transport. Batman has used a bat-glider, a bat-copter, and a bat-plane (but not a bat-jet-pack, yet). These have evolved over time, always utilising the latest technology. This jet-propelled one is Batman's second bat-plane.
| THE KIT |
Scott's preview is pretty good, and I can't improve on it, so I won’t try. This kit came in a robust lid-and-tray box that housed 18 black parts, 1 clear canopy, and a 2-part clear stand. 12 parts complete the airframe. I viewed the other 7 as optional (but more on that later). I bought this kit from a second-hand kit dealer because it was cheap. I started it for a 'TV & Movies' category in a local competition, because its few parts and single colour, suggested a quick build.
| CONSTRUCTION |
 The
build had no sub-assemblies apart from the wings. Each came as an upper wing
with a lower insert. The problem was the huge underside crevasses that separated
the parts. These required multiple heavy-duty filling sessions to eliminate
them, though I left some unfilled as they delineated the control surfaces. At
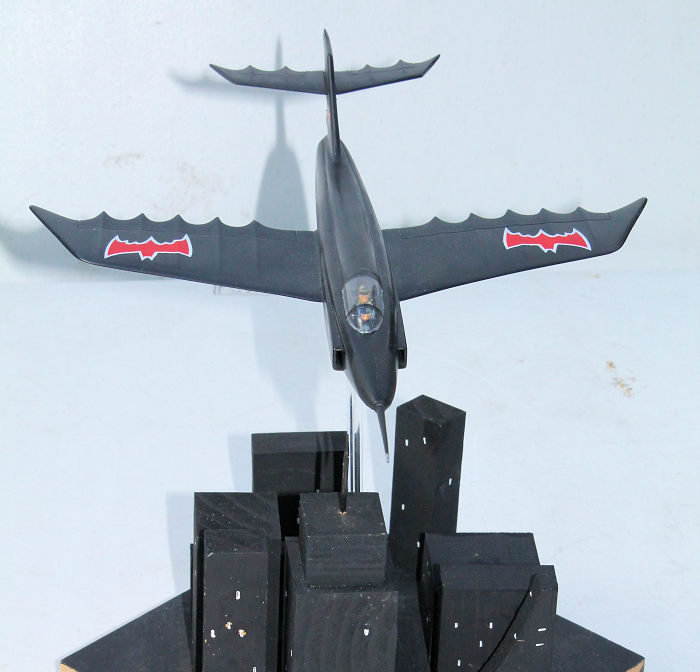
the same time, I worked-on the complex single-piece cockpit-plate part that
formed the head and shoulders of Batman and his sidekick, Robin. It needed
careful removal of lots of flash, and Batman needed more-prominent ‘ears’. The
figures suggest that this model is 1/48-scale(ish). Brush-painting them was the
trickiest part because I stink at figures, so I'm grateful that they hide their
faces. I thinned the lips of the two side intakes and added blanking plates
inside them to stop the see-through effect.
The
build had no sub-assemblies apart from the wings. Each came as an upper wing
with a lower insert. The problem was the huge underside crevasses that separated
the parts. These required multiple heavy-duty filling sessions to eliminate
them, though I left some unfilled as they delineated the control surfaces. At
the same time, I worked-on the complex single-piece cockpit-plate part that
formed the head and shoulders of Batman and his sidekick, Robin. It needed
careful removal of lots of flash, and Batman needed more-prominent ‘ears’. The
figures suggest that this model is 1/48-scale(ish). Brush-painting them was the
trickiest part because I stink at figures, so I'm grateful that they hide their
faces. I thinned the lips of the two side intakes and added blanking plates
inside them to stop the see-through effect.
The heads/cockpit piece was trapped between the fuselage halves, requiring props below it to elevate to the correct level. The fuselage was stitch-glued, then the halves of the fin had to be forced together to be glued. First the wings (which have drooping tips), then the tailplanes (ditto), were glued-in at right-angles to the fin. Now came the fatal decision. I could not ascertain why a designer of such a high-performance aircraft, would put fixed undercarriage under it (= too dragy). So, by logic, I left-off the 7 undercarriage parts, and filled-in their locating sockets, and while I was at it, I filled-in the slot in the belly for the stand – first with plastic, then with fillers. Finally, I glued-on the nose-spike and the canopy. The back-end of the canopy needed filler, then the canopy was masked (leaving a frame where there wasn’t one).
| COLORS & MARKINGS |
This was easy - several coats of SMS jet-black. The difficult bit was seeing where I had sprayed. This was easy over the grey Tamiya & Mr.Surfacer fillers, but harder on the raw plastic (hence the several coats - to be sure, to be sure!!). On the advice of a car modeller, I misted Tamiya clear blue over the black to impart a bluish hue to it.
There were only 4 decals - 2 large for the tops of the wings, and 2 small for the sides of the tail fin. They went down onto puddles of Future, then over-painted with more Future to lock them in. I squirted SMS clear gloss over it as a final coat, but it 'aint too glossy. There was a textured bat-head on the nose, which I left in a flat tone to differentiate and highlight it.
| CONSTRUCTION CONTINUES |
 For an
unknown reason, I could not find the tailpipe. In desperation, I tried to
scratch-build one by rolling a strip of textured/grooved plastic sheet into a
tube. This failed because the small diameter put too much tension on the join.
Luckily, I had to take my dog for a walk (he insisted). When he dropped his
‘bomb load’, I had to detach a ‘doggy bag’ from the roll, because I wouldn’t
leave it for someone to step-on (a mutt mine?). It was the last bag on the roll,
and I suddenly noticed that the bags had been rolled around a plastic tube that
was exactly what I needed. True, the Batplane’s tail needed widening (a bit -
with a drill bit) and the tube needed painting in a gunmetal. The down-side is
that I have to be thankful to my dog. He got an extra biscuit. But, my Bat-plane
is complete.
For an
unknown reason, I could not find the tailpipe. In desperation, I tried to
scratch-build one by rolling a strip of textured/grooved plastic sheet into a
tube. This failed because the small diameter put too much tension on the join.
Luckily, I had to take my dog for a walk (he insisted). When he dropped his
‘bomb load’, I had to detach a ‘doggy bag’ from the roll, because I wouldn’t
leave it for someone to step-on (a mutt mine?). It was the last bag on the roll,
and I suddenly noticed that the bags had been rolled around a plastic tube that
was exactly what I needed. True, the Batplane’s tail needed widening (a bit -
with a drill bit) and the tube needed painting in a gunmetal. The down-side is
that I have to be thankful to my dog. He got an extra biscuit. But, my Bat-plane
is complete.
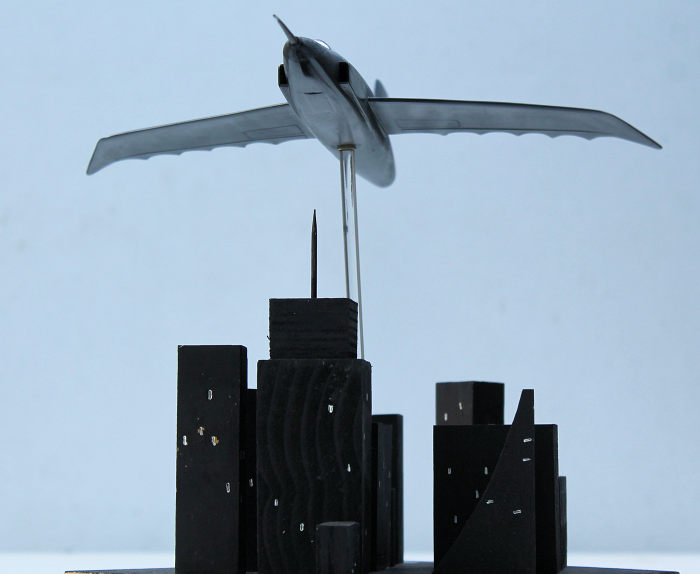
Because I chose to omit the fixed undercarriage, I just KNEW that I’d have to mount this model onto a base in an in-flight mode. The plan was to mount this model atop a clear rod, so a hole was drilled into the Centre-of-Gravity, in preparation to receive it. I found the CoG by balancing the model on an east-west rod. A length of brass tube, cut to a precise length, was inserted into the hole and anchored internally, with 5-minute epoxy cement. The other end of the rod was to be anchored into a vertical hole I drilled into a piece of wooden plank. Both ends were filed into a slight taper to make insertion that much easier. However, the size and weight of the model made the balance risky. The obvious answer was to build-up/thicken the base to better-support the lower end of the rod. And to get around the need to drill straight down into a 60mm/2.5” block of extra wood, I elected to make a block around it, out of scrap wood.
But that block looked pretty lonely all by itself. So, in a lightbulb moment, I decided to add more blocks to the base, to make it resemble a city/district seen from altitude, at night. First, I painted-on a few roads, then I positioned the (building?)blocks just off them. It all goes to show that I’m NOT an architect or a town planner. A little dot or line of white paint represents that a few lights are on (and provide some scale). Each was placed into a hole/groove on the surface of the block. I discovered that the secret to a good ‘window’ was to make a SHALLOW groove with a small screwdriver or (better yet) a small chisel. See, a deep mark may not let the paint get down into the lower reaches, and you end-up with a black window with a white frame. A touch of misted-on paint and a little dry brushing delineated the ‘buildings’.
| CONCLUSIONS |
As anticipated, this was an easy build, hindered by the mass-filler requirement, but enhanced by the low parts count. It resembles the jets drawn by us boys (who weren’t listening to the Teacher) when I was in primary school. It is a large model (for me), and a nostalgic build, but hardly a show-stopper. This does not concern me because I build models for fun - not trophies (and THAT is MY excuse for not having any!!). I’d recommend it (with reservations) to all builders. I do not believe that any modeller could make wheel wells for the undercarriage (because the wings are too thin). Others may wish to jazz-up the cockpit.
PS – Years ago, when my young son was telling me all about ‘Batman & Robin’, I feigned ignorance, and told him that I only knew of a Fatman & Puddin’, a Ratman & Goblin, a Flatman & Ribbon, and a Sadman & Sobbin’. This earned me ‘THAT look’ from my Lady.
George Oh
2 July 2026
Copyright ModelingMadness.com. All rights reserved. No reproduction in part or in whole without express permission from the editor.
If you would like your product reviewed fairly and fairly quickly, please contact the editor or see other details in the Note to Contributors.