 The
Moonraker Shuttle System was designed and built by the Moonraker Corporation
as part of NASA's Space Shuttle Program. The Shuttles were built in
California and then launched from Cape Kennedy in Florida (civilian) and
Vandenberg AFB in California (military.) The Shuttles were part of NASA's
massive space fleet built in the aftermath of the Manned Lunar Landing
Program.
The
Moonraker Shuttle System was designed and built by the Moonraker Corporation
as part of NASA's Space Shuttle Program. The Shuttles were built in
California and then launched from Cape Kennedy in Florida (civilian) and
Vandenberg AFB in California (military.) The Shuttles were part of NASA's
massive space fleet built in the aftermath of the Manned Lunar Landing
Program.
It turned out that French Billionaire industrialist Hugo Drax, the owner of the Moonraker Corporation, had other ideas and built six unauthorized Shuttles to be used in his fiendish plan to take over the world by killing the rest of humanity using space delivered nerve gas and then take over the world with his Noah's Ark of beautiful people (to be fair, it is easier to take over the world when the rest of us are dead.) He also financed and constructed a large space station that went improbably unnoticed by the world's space detection/early warning systems which are still used to track possible ICBM launches and asteroids.
The whole setup was launched from this his secret base on the Brazilian rainforest which was not detected by the vast array of spy satellites circling the globe. Meanwhile sensitive space equipment being constantly shipped to a 3rd world nation at the time not known to have a large and sophisticated aerospace program should have caught the attention of intelligence agencies around the world but somehow didn't.
It turns out the whole improbable Rube Goldberg plan blew up when Drax had to steal a shuttle back from NASA to replace one that failed during construction. The shuttle was to be loaned to the UK (for some reason) and was supposedly lost over the Canadian Arctic. This finally caught the attention of the British Government who ordered the SIS to look into the matter. The rest they say is movie history.
Despite the silly plot, Moonraker was one of the highest grossing James Bond movies ever. All this was due to the popularity of Star Wars which forced EON Productions to skip “For Your Eyes Only” and produce Moonraker instead to literally and figuratively cash in on it.
I'll admit that this was the first James Bond movie I saw in the theaters as a kid. Being a kid, I loved this movie. As the readers might have noticed, I noted some of the various moon sized battlestation plot holes that make Moonraker seem quite stupid from a technical point of view. From an entertainment point of view, Moonraker is a fun movie to watch.
| THE KIT |
Airfix originally made a 1:144 scale kit using their shuttle kit and the movie decals in 1979-80. Revell did the same thing in the US with their version of the shuttle. Info from the Scalemates model DB.
I remember the Revell version as it was part of a lousy memory of visiting my dad's friend's home in Michigan. His friends said I could go see their son's room so I went and saw the completed kit on his son's shelf. Being a nosy and stupid kid, I wanted to see inside the cargo bay and ripped the orange decal band not realizing the decal was the only thing that held the cargo bay doors in place. I panicked and pulled my hand away and ended up breaking the mast of a nearby Essex class carrier. I ran out of the room and spent the remaining part of the visit glued to my parents. Oops.
| CONSTRUCTION |
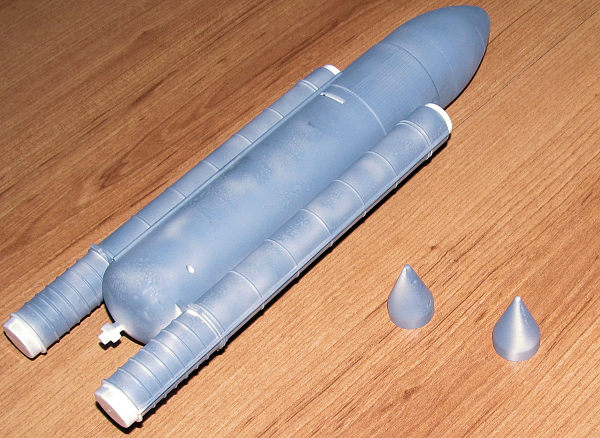
I had no illusions about this kit and expected to burn through a lot of CA glue and sandpaper. I started with the two piece fuel tank and solid rocket booster stack. I glued the two pieces together (CA glue on the visible seams and Tamiya extra thin cement on the hidden joints) and began to sand/fill. Fortunately, this proved to be easier than I thought. I also saved myself a lot of sanding/filling grief by covering up the long seams on the SRBs with some Plastruct half round strips. The many visible seams on the fuel tank were carefully sanded smooth and the ones I couldn't reach were left alone.
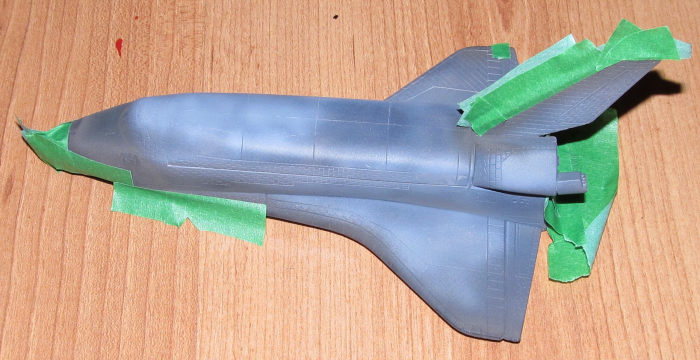 The
Shuttle was next. It needed a lot of work. I ended up filling and sanding every
seam on the shuttle. Faded memories of damaging that kid's Moonraker model
haunted me so I closed up the cargo bay and glued it closed (I wasn't going to
do that again!) The interior parts were left out. Next I gently sanded and
polished the seam, but not enough to make it invisible.
The
Shuttle was next. It needed a lot of work. I ended up filling and sanding every
seam on the shuttle. Faded memories of damaging that kid's Moonraker model
haunted me so I closed up the cargo bay and glued it closed (I wasn't going to
do that again!) The interior parts were left out. Next I gently sanded and
polished the seam, but not enough to make it invisible.
CA glue wasn't the best choice for some of the seams and gaps because of the detail so I was forced to use Apoxysculpt molding epoxy to fill those areas along the bottom of the shuttle. The smaller gaps were filled using Perfect Plastic Putty.
A lot of sand/fill and polishing seams was done to get the shuttle ready for painting. I left the mold marks on the OMS and main rocket motors to represent the coolant tubing on the outside of the real thing.
| COLORS & MARKINGS |
I primed both the shuttle and fuel tank/SRB stack using grey Stylnylrez primer. I used three coats because the grey primer's coverage isn't as good as the black version. I used grey because it would need fewer coats of white paint to cover instead of black primer. The various small bits were primed as well.
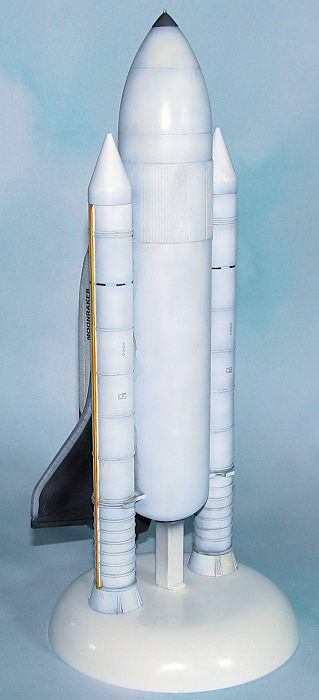
 The fuel
tank/SRB stack was painted using a spraying on a small amount of Vallejo
Offwhite and large amounts of Tamiya Flat white and gloss white paints. I
sprayed the white paint in very thin coats as I tried to emmulate Derek Eddings'
Spanish school style paint job on the original “reel” model. After the paint was
dry, I masked off various tubing and painted them yellow and orange as per the
“reel” model pics.
The fuel
tank/SRB stack was painted using a spraying on a small amount of Vallejo
Offwhite and large amounts of Tamiya Flat white and gloss white paints. I
sprayed the white paint in very thin coats as I tried to emmulate Derek Eddings'
Spanish school style paint job on the original “reel” model. After the paint was
dry, I masked off various tubing and painted them yellow and orange as per the
“reel” model pics.
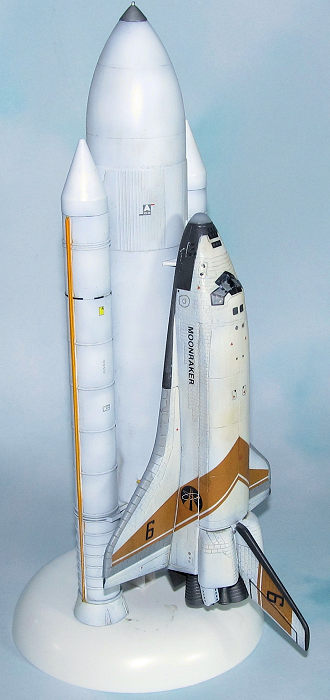
I did the same with the shuttle except I used more Vallejo offwhite for the off white color of the ceramic tiles. Once that was done, I masked off the various areas and sprayed on Tamiya XF-84 Burnt Iron (for the “black” tiles), and dark sea grey for the various leading edge tiles as per the “reel” model. The hardest part was cutting out the circle masks for the leading edge areas. When the paint was dry, I sprayed on two light coats of Vallejo Gloss Acrylic.
The Shuttle rocket nozzles were painted Vallejo dark aluminum or magnesium while the various braces were painted yellow and white.
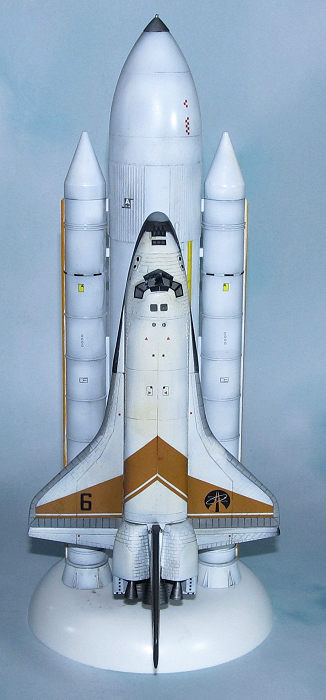 The decals
went on without too much headaches. There was a lot of go nowhere do nothing
type stencils to add. Unlike Revell, the orange/brown Moonraker band was a two
piece decal so it could allow for the cargo doors to open without shredding the
decal. Still I didn't take any chances. The decals snuggled down with Microsol
and Microset. A couple of the stubborn ones on the tail needed the more powerful
Solvaset.
The decals
went on without too much headaches. There was a lot of go nowhere do nothing
type stencils to add. Unlike Revell, the orange/brown Moonraker band was a two
piece decal so it could allow for the cargo doors to open without shredding the
decal. Still I didn't take any chances. The decals snuggled down with Microsol
and Microset. A couple of the stubborn ones on the tail needed the more powerful
Solvaset.
I used a burnt umber watercolor wash to highlight some of the details, but not too much or it would look more like toy than model. Once the wash was dry, I sprayed on the Tamiya flat clear coat to seal everything in.
The various nozzles and brackets were glued in place. The shuttle was then mounted on the fuel tank (unglued) and the complete stack was placed on the stand. Finally, I glued on the SRB nozzles (painted white) and the silver painted fuel tank nose.
| CONCLUSIONS |