
Retrokit 1/72 M577 APC
| KIT #: | RSF 070 |
| PRICE: | $50.00 |
| DECALS: | None provided |
| REVIEWER: | Ryan Grosswiler |
| NOTES: | Resin, cottage-industry style. Not to be confused with the M-113-based vehicle of the real world |
| HISTORY |
Do you remember an age where we actually looked forward to Hollywood's exciting, gutsy summer releases? Where the film industry reached deeply into their creative wells, laboring hard to dazzle and entertain us? Took risks? This particular modelling subject comes from the summer of 1986. That May, we had Ferris Bueller's Day Off, the secret fantasy of the 90 percent of us stuck in the social muck that is American high school. Then we had Top Gun, the blueprint for a man seeking to find what he really is and wants, if you're picking up what I'm throwing down. And this movie. Neither the kit's box nor instructions mention the film by name so I won't either.
"Bio-readouts are all in the green. Looks like she's alive." This statement introduces Ellen Ripley, one of the top five most memorable characters of the 1980s in American film. When we first meet her, however, she's a PTSD-ridden wreck, alternately suffering from horrid nightmares induced by the events of the first film or staring into the void in her waking hours, cigarette ashes an inch long. If you haven't seen the movie, the plot develops as follows: A squad of Marines are sent out to deal with the "issue" raised in the first film, Ripley with them as a sort of specialist advisor. A couple critical tactical errors are made going in, some big gaps in pre-action intel occur, a short-sighted decision about weapons use happens at the spur of the moment, and things afterward go really, really badly.
Ripley watches, viscerally, empathetically horrified, while the command structure breaks down and massive casualties are sustained. Then—in one of the most totally awesomely-constructed sequences in action film history—she realizes that she's the only one who can possibly retrieve the situation, forcibly seizes control of this vehicle, and (tires squealing) crashes it right into where all this hell has broken loose to extract whomever is still alive. In literary terms, she symbolically conquers the terrible thing that had her all sideways and inside-out at the beginning. In practical terms, however, that isn't the end of their problems by any stretch of the imagination.
 Here, we have a most compelling female lead, counterpointing the contemporary
John Rambo, and one that is natural to the story, isn't masculinized, and
doesn't seem contrived to make a forced social statement. She's also a great
inspiration about the moral requirement to take control where general disorder
has broken out.
Here, we have a most compelling female lead, counterpointing the contemporary
John Rambo, and one that is natural to the story, isn't masculinized, and
doesn't seem contrived to make a forced social statement. She's also a great
inspiration about the moral requirement to take control where general disorder
has broken out.
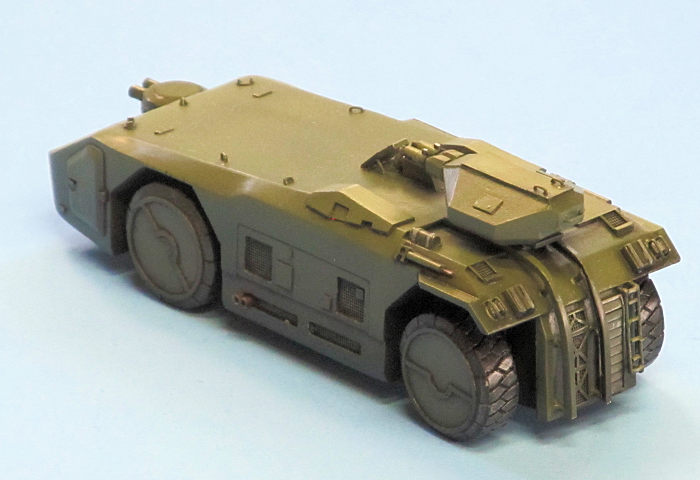
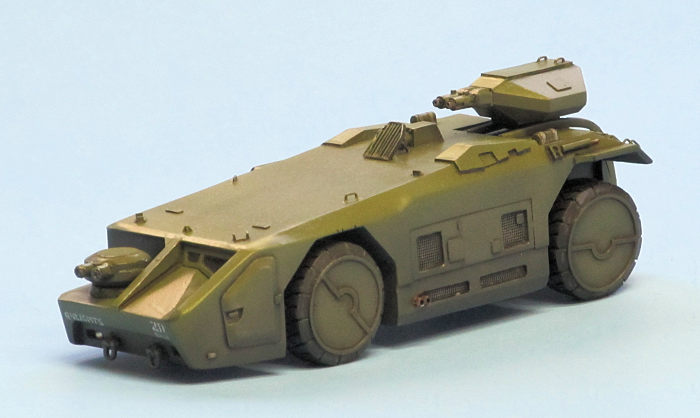
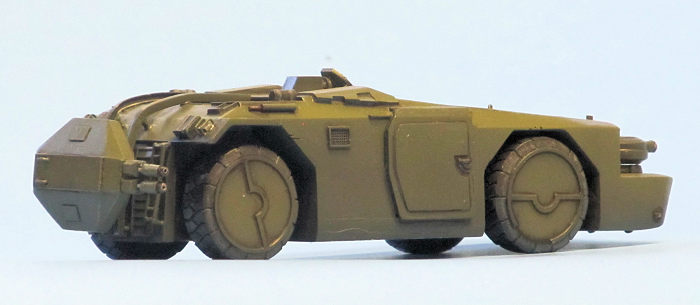
As for the M577 itself, I don't know where the designator comes from, but all the franchise fanbase sites refer to it as such. It's only referred to as "the APC" in the film, and is something like a futuristic development of the various LAV/Stryker versions with a turret, providing both armored protection for troops riding into combat and fire support once they dismount. Noticeably low ground clearance implies a vehicle specialized to urban settings.
The real thing was a modified Hunslet ATT77 airport tug. Forty tons of ballast was removed and the exterior highly altered to transform it for the movie in the space of about two weeks, but it retained full functionality as a drivable vehicle. Therefore, in a sense this subject isn't science fiction. For all the effort, it doesn't get much screen time in the movie as it shares this with a smaller remote-control model which was also created to serve the needs of a particular shot. Where it does appear it grabs your attention, however, as everyone else involved with production was doing their work and the backdrops in which it appears provide lots of atmosphere and build the required tension.
The real vehicle existed for about ten years after the film was released, according the Internet, when in the '90s a home could not be found for it and it was scrapped.
| THE KIT |
There was once a 1/35th injected kit of this vehicle which came out a couple years after the movie, along with several other subjects of the franchise from a company called Halcyon. It's now a pricey collector's item and was a difficult build if I remember the model magazine reviews of the time correctly. This one, in 1/72, is much less expensive and more practical.
 A
tough little brown cardboard box contains 19 parts in cold-cast grey resin
standard to the cottage industry since the '80s, less that decade's tan color.
The hull is one piece (with a little hollow space behind the sliding door),
along with the wheels, both turrets, rear turret trolley, and various little
do-dads. Everything has been cast in single-part molds. This is a reliable way
to reduce air bubbles in the parts, but it also means some seriously massive
pour stubs to remove, especially on the single-piece main hull part. All detail
is extensive and high resolution; general quality is excellent.
A
tough little brown cardboard box contains 19 parts in cold-cast grey resin
standard to the cottage industry since the '80s, less that decade's tan color.
The hull is one piece (with a little hollow space behind the sliding door),
along with the wheels, both turrets, rear turret trolley, and various little
do-dads. Everything has been cast in single-part molds. This is a reliable way
to reduce air bubbles in the parts, but it also means some seriously massive
pour stubs to remove, especially on the single-piece main hull part. All detail
is extensive and high resolution; general quality is excellent.
The instructions are a series of photographs pointing out where to attach the little parts to the hull casting, along with some minor assembly advice. The builder is expected to heat and bend the rear turret rails into place on the rear of the hull. Playing with the parts reveals that the forward turret is much too small; it looks silly in its alcove up at the bow, and there's no muzzle detail on its Gatling-style guns. These problems would slow down assembly later.
| CONSTRUCTION |
The first
challenge is to get rid of that massive pour stub on the main hull. After some
thought, I decided to mount the hull 90 degrees from level on a flat piece of
scrap 1/4" plywood. A little PVA glue was used for this. I then carefully set up
my band saw and ran this assembly slowly (to keep
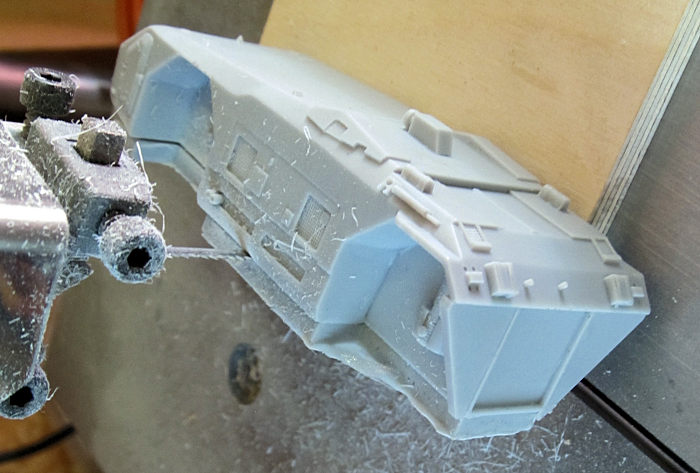 the
blade from wandering) through. The glue allowed the released hull to simply be
snapped off the plywood, and only required some minor filling and sanding
afterward underneath. The stubs on the wheels were dealt with similarly.
the
blade from wandering) through. The glue allowed the released hull to simply be
snapped off the plywood, and only required some minor filling and sanding
afterward underneath. The stubs on the wheels were dealt with similarly.
I wanted the kit's nicely-depicted driver's viewport panes to have some interest, so I painted them a very dark aqua blue and fitted a pair of clear styrene panels over them with clear epoxy, taking the time to tap out any bubbles. After curing this was masked off. The technique ended up working so well in providing contrast and depth that I'm going to try it on my next small-scale aircraft.
The next hurdle is some sort of axle system, as the weight of the completed model is far too much to butt-glue the wheels to the provided stubs in the wheel wells. The hull casting again went on its side, this time in my drill press, and four holes were drilled slightly too large; one centered in each of the axle stubs, with the holes drilled from opposite sides meeting in the middle. Next, a single hole was drilled in the center backside of each of the four wheels about halfway in. Two axles were then cut from 1/16" K&S brass rod and trimmed to length.
All these holes were then coated with J&B Weld, the axles inserted into the hull, and the wheels after that. This hull-and-wheels assembly was then rested upon a pair of 1/8" balsa strips running lengthwise under the model and left to cure overnight. The loose fit of the slightly-too-large axle holes ensured that all four wheels settled on a level plane as the resin cured. The following day, the model was sanded back and forth on some 180-grit sandpaper on the workbench for a few passes to create a correct flattened look to the tires.
 I
mentioned the forward turret and its unwelcome dwarfism. A new one had to be
created, so an old Airfix Blenheim main wheel was chucked and spun in my Dremel
tool at low speed and a flat cylindrical shape gently coaxed from it with a
sanding stick and a fine file, followed by some rim and beveling detail. Into
this was set a pair of Contrail styrene tubes for the barrel housings. Finally,
a pair of Gatling-style muzzles and a simple pedestal were created from disks
and bits of styrene. All four parts were then molded and cast in resin. These
sentences summarize what was in reality an eight-hour detour in the build.
I
mentioned the forward turret and its unwelcome dwarfism. A new one had to be
created, so an old Airfix Blenheim main wheel was chucked and spun in my Dremel
tool at low speed and a flat cylindrical shape gently coaxed from it with a
sanding stick and a fine file, followed by some rim and beveling detail. Into
this was set a pair of Contrail styrene tubes for the barrel housings. Finally,
a pair of Gatling-style muzzles and a simple pedestal were created from disks
and bits of styrene. All four parts were then molded and cast in resin. These
sentences summarize what was in reality an eight-hour detour in the build.
In the movie, the rear turret is seen to retract on a set of rails running from the hull top to the rear. Retro SF has supplied these as a pair of resin copies of Plastruct U-channel stock, along with the advice to bend them to shape over the hull using warm water. This didn't work so well for me, and I ended up picking up a couple lengths of the Plastruct items themselves and working them into shape at the required location. This proved marginally easier, but was still a tense and unpleasant step. I feel that the for the cost of the kit the manufacturer really should have supplied these rails pre-shaped.
The final complications were totally self-imposed: I made the rear turret so I could slide and rotate it to its stowed position on the rear of the vehicle, friction holding everything in place. As supplied the turret sits a little too high, so a new cart was created from brass rod and bits of styrene to lower the profile. I shortened the gun barrels by about 1/8" to better match stills from the film. Also, I took half an hour to scrape out and open up the slots of the floodlight grille up top. Finally, three locations were drilled out for MV Products lenses and some small details added here and there. Forward tow hooks are not supplied in the kit, but a quick trip to my 1/72 vehicle parts stash provided them.
| COLORS & MARKINGS |
As I was following the color scheme depicted in the movie this threatened to be a very dull model. So, following an initial coat of Tamiya grey primer straight from the can, a second color was applied consisting of X-1 Gloss Black cut 50% with Gunze Mr. Levelling Thinner. Black is a great starting point for bold shadowing and highlighting.
 I
next went full '80s modelling in laying in the finish colors. I have an
airbrush. Hear me roar! Several hues of moody grey-greens went in around the
lower hull areas, graduating to something like olive-drab about midway up, then
to a much lighter, almost yellow-green for the extreme points up on top of the
vehicle. I used my newly-acquired MRP/Mr. Paint lacquers (RLM 71, Black, White,
Yellow) for all this. What? You haven't tried this magic in a bottle?
I
next went full '80s modelling in laying in the finish colors. I have an
airbrush. Hear me roar! Several hues of moody grey-greens went in around the
lower hull areas, graduating to something like olive-drab about midway up, then
to a much lighter, almost yellow-green for the extreme points up on top of the
vehicle. I used my newly-acquired MRP/Mr. Paint lacquers (RLM 71, Black, White,
Yellow) for all this. What? You haven't tried this magic in a bottle?
No decals are included, so the "2D/SULACO" and "542/CMTS" codes up at the bow were hand-painted in a dirty white with a 0000 brush, under magnification. A little scraping with a sharpened toothpick was then used to clean it up. There are aftermarket decal sets which cover the movie vehicle and a variety of fanciful schemes but I couldn't justify that expense for just these two tiny little images.
A final semi-gloss Gunze clear coat sealed it all in, and the masks were removed to reveal that very convincing driver's viewport.
| CONCLUSIONS |
Deceptively challenging. This would be a great first resin kit for a newish modeler...would be, except for the need to create and drill out those axles and the unnecessary bending of the rear turret rails. The too-small turret up front is really a pretty big goof; not sure how the otherwise talented craftsman/woman of the master patterns managed to screw the pooch there.
The project was otherwise a fun diversion and captures the memorable appearance of the movie vehicle quite well and I'm glad to have it on my desk. Fun stuff, my first completed sci-fi model since I was a kid.
| REFERENCES |
Online photos, plus another viewing of the movie with my daughters while Mom was away.
29 May 2023
Copyright ModelingMadness.com. All rights reserved. No reproduction in part or in whole without express permission.
If you would like your product reviewed fairly and fairly quickly, please contact the editor or see other details in the Note to Contributors.