| KIT #: | 0942 |
| PRICE: | $70.00 |
| DECALS: | Twelve options |
| REVIEWER: | Dan Lee |
| NOTES: | Paragrafix PE Sheet for the Galactica added |
| HISTORY |
One of twelve Battlestars constructed by the Twelve Colonies of Man, Galactica represents the Colonial planet Caprica, and is crewed mostly by Capricans. Galactica was launched more than 500 yahren before the close of the Thousand Yahren War (and the start of the pilot film). It is believed to be the only Battlestar to survive the destruction of the Twelve Colonies, until Battlestar Pegasus is found. Galactica is commanded by Commander Adama.
In the pre-Holocaust Colonial Service, battlestars like Galactica operated as the flagships of numbered naval fleets (e.g. the Fourth Fleet), with each fleet assigned one battlestar and led by that battlestar's commander. A typical fleet comprised 600 fighting ships, and operated independently from other fleets. Since the Holocaust, Galactica is the military's sole capital ship of any kind, except briefly for the Pegasus.
Speed and armament
 Galactica is capable of lightspeed
travel, although while escorting the refugee fleet and must limit her speed to
that of the slowest ship. She has a complement of about 150 Vipers: 25 surviving
fighters from her own pre-Holocaust squadrons, 42 from the other battlestars at
the Peace Conference, and the remainder being transfers from Pegasus.Galactica
also has a complement of shuttles. Unlike similar civilian models, these
transport craft include military gear for detecting electronic emissions from
other spacecraft, and drop chutes for paratroop assaults. In addition, Galactica
has armored, tracked ground vehicles known as "landrams" and "snowrams." These
are armed with a single heavy laser cannon in an open turret on the roof, and
are landed by shuttles. Galactica carries a large number of manually aimedlaser
batteries, both for anti-aircraft defense against fighters and for engaging
other capital ships. As to purely defensive measures, Galactica is protected by
both "electronic shields" and a heavy metal double-pocket hatch shield that
covers its panoramic bridge viewport; the latter is closed in "positive shield"
state and open in "negative shield" state. However, while these might provide
limited protection, they are insufficient to guard against suicide ramming runs
by Cylon raiders or pulsar-cannon fire from Cylon base ships. Galactica also has
the ability to project a broad cone of energy, wide enough to cover much of one
hemisphere of an Earth-sized planet, that is powerful enough to destroy
ballistic missiles and their nuclear warheads.
Galactica is capable of lightspeed
travel, although while escorting the refugee fleet and must limit her speed to
that of the slowest ship. She has a complement of about 150 Vipers: 25 surviving
fighters from her own pre-Holocaust squadrons, 42 from the other battlestars at
the Peace Conference, and the remainder being transfers from Pegasus.Galactica
also has a complement of shuttles. Unlike similar civilian models, these
transport craft include military gear for detecting electronic emissions from
other spacecraft, and drop chutes for paratroop assaults. In addition, Galactica
has armored, tracked ground vehicles known as "landrams" and "snowrams." These
are armed with a single heavy laser cannon in an open turret on the roof, and
are landed by shuttles. Galactica carries a large number of manually aimedlaser
batteries, both for anti-aircraft defense against fighters and for engaging
other capital ships. As to purely defensive measures, Galactica is protected by
both "electronic shields" and a heavy metal double-pocket hatch shield that
covers its panoramic bridge viewport; the latter is closed in "positive shield"
state and open in "negative shield" state. However, while these might provide
limited protection, they are insufficient to guard against suicide ramming runs
by Cylon raiders or pulsar-cannon fire from Cylon base ships. Galactica also has
the ability to project a broad cone of energy, wide enough to cover much of one
hemisphere of an Earth-sized planet, that is powerful enough to destroy
ballistic missiles and their nuclear warheads.
Energy
A battlestar such as Galactica has two sources of energy. The engines are powered by Tylium, a highly volatile liquid fuel derived from minerals mined on a limited number of planets. The Tylium is stored in two tanks located as far inboard as possible, since the detonation of either tank is sufficient to destroy the battlestar. Other energy needs are met by energizers, which are self-contained generators roughly the size of a human adult. These are located all across Galactica. Networked to each other, they are able to supply sufficient power to meet Galactica's needs even if some of them should fail.
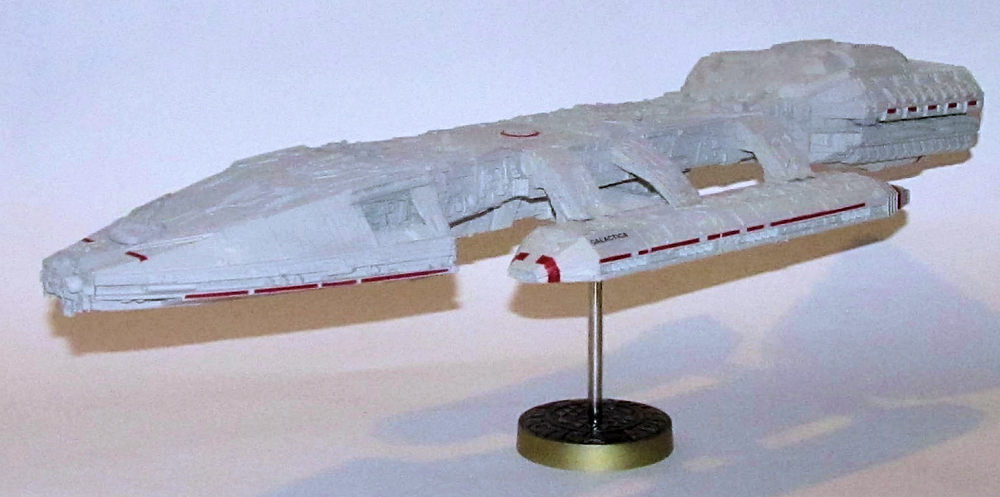
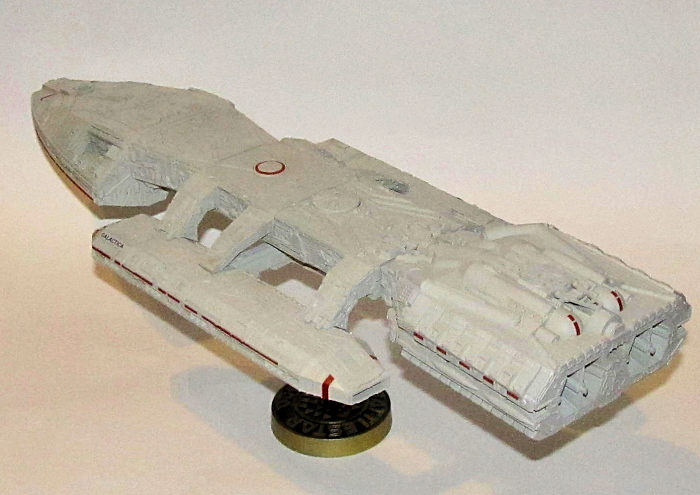
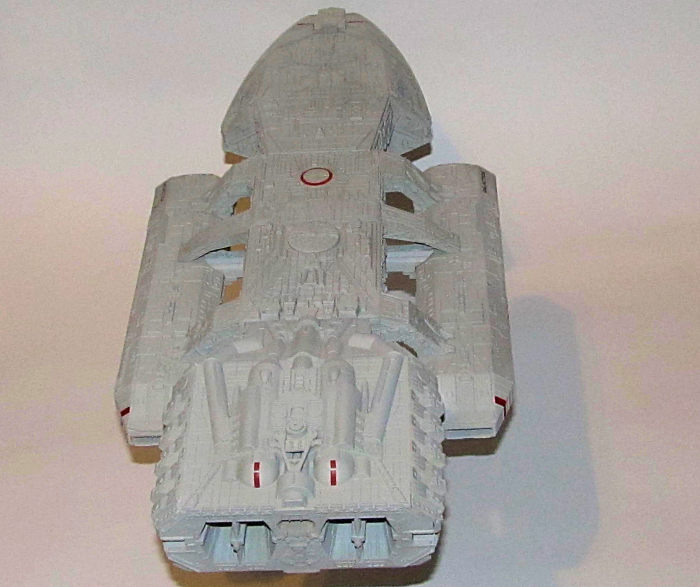
| THE KIT |
Moebius released this kit in 2014
as part of their Galactica License some 35 years after the original series was
cancelled. It contains 90 plastic pieces, a fair sized decal sheet, and a stand
with metal rod as the support. The decal sheet contains all the necessary
markings for a Battlestar as well as the name plates f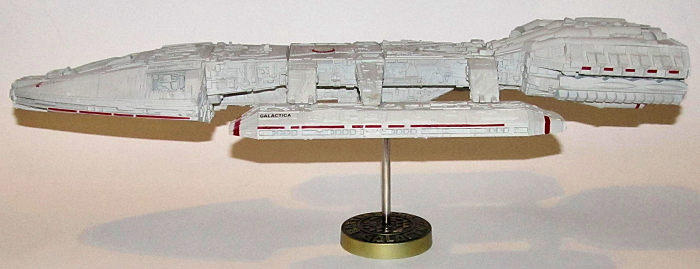 or all 12 known Battlestars including the Galactica, the Pegasus and the Pacifica (which was
destroyed in the pilot episode.)
or all 12 known Battlestars including the Galactica, the Pegasus and the Pacifica (which was
destroyed in the pilot episode.)
I used the Paragrafix PE sheet to enhance some of the flaws of the kit as per my usual way of doing things.
This was the 2nd model of the Galactica I had purchased. The first (mostly completed) model died along with the previous “new” Galactica in the Model Massacre of 2016. To say I was unhappy about that the Massacre happened was quite the understatement. Goes to show that no good deed goes unpunished.
FYI, as of March 2018 Moebius has been purchased by Pegasus Hobbies.
| CONSTRUCTION |
Based on my experience with the previous Galactica, I started with gluing together most of the port and starboard launch bays. The sidewall pieces were carefully trimmed to fit as any additional plastic would cause gaps. The PE interiors of the landing bays were added and glued in place with CA glue. I had to remove the plastic girders and replace them with PE ones as per the Paragrafix instructions. This was some fairly straight forward plastic surgery.
I then removed off certain details from the tops of the landing bays as per the Paragraix instructions and replaced them with the PE parts. The PE were held on with CA glue.
I painted the interior of the landing bays light grey and then sealed up the landing bays by adding the top pieces. I had to trim about 1/16” off the top piece mounting pegs as they were a touch bigger than they should have been or there would have been some rather noticeable gaps. These were glued in place and the landing bays were then set aside.
 The bow piece was built up
following the instructions. Again another reminder to trim all the pieces to
ensure a snug fit. The bridge part's detail was sanded off and trimmed so the PE
wraparound piece could be added. Once the minor gaps were sealed in with Vallejo
plastic putty, the bow was set aside.
The bow piece was built up
following the instructions. Again another reminder to trim all the pieces to
ensure a snug fit. The bridge part's detail was sanded off and trimmed so the PE
wraparound piece could be added. Once the minor gaps were sealed in with Vallejo
plastic putty, the bow was set aside.
Next, the midship section was built up. I had the biggest problem with gaps here on the first Galactica so I was extra careful and test fitted the parts in the attempt to eliminate/reduce the gaps especially the landing bay arms and where they connect to the landing bays. I added more PE details as per the Paragrafix instructions.
Finally I glued together the stern as per instructions but left off the engine nozzle face plate till after painting. However, I didn't have the best fit when I glued in the stern to the midships section. I had to trim off part of the stern mounting tabs to get it to fit. However, I would later find out that there was a price to pay for removing that plastic.
| COLORS & MARKINGS |
 The instructions said that the
“correct” grey used on the reel life Galactica model was painted a very light
grey. I thought about something like Tamiya XF-80 Navy Grey/Royal Light Grey
would work, but a test spray showed that this was even too dark. After actual
thought and deliberation, I went with Tamiya XF-55 Deck Tan as it was light
enough with enough tan to match what pictures I could find.
The instructions said that the
“correct” grey used on the reel life Galactica model was painted a very light
grey. I thought about something like Tamiya XF-80 Navy Grey/Royal Light Grey
would work, but a test spray showed that this was even too dark. After actual
thought and deliberation, I went with Tamiya XF-55 Deck Tan as it was light
enough with enough tan to match what pictures I could find.
I did not preshade the model and sprayed on Deck Tan. FYI, I ended up using an entire bottle of both for the model. I then realized that it was too tan. I sprayed on a thin coat of ModelMaster Acryl FS36622 Camo Grey which “greyed” out enough of the tan to get the color I wanted and ended up being most of the bottle.
Once it was dry, I masked off the many red areas on the various sub assemblies, sprayed on a thin layer of gloss coat to prevent bleed through along the many bumps and lumps. Next I sprayed on Tamiya gloss red. The reason I made my life more difficult was due to my experience with the previous model where the decals disintegrated or broke up easily. I found that touch up would be as big a pain in the rear as painting the markings hence the plan for painting most of the markings. As one might imagine, the red sections around the nose of both landing bays turned out to be quite problematic and required several touchups till it looked right because there was no easy way to locate where the masks should go except my flawed mark one eyeballs.
The clear piece was sprayed Vallejo clear blue where the main engines are located and the top middle section was painted clear red. I added the prepainted PE engine grills which were held in place with Krystal Klear glue.
T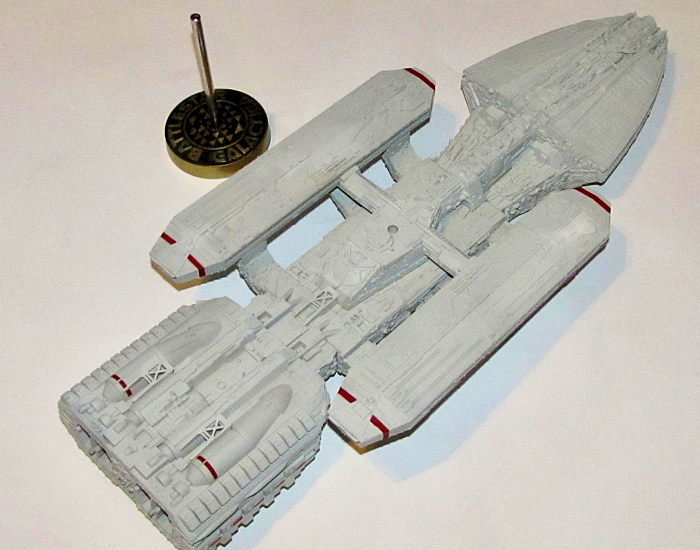 he base of the stand was painted
flat black and then the raised gold areas were very carefully dry brushed with Mig Gold Acrylic gold paint. I did it the other way around (because I was dumb)
in the previous model and that did not turn out as well.
he base of the stand was painted
flat black and then the raised gold areas were very carefully dry brushed with Mig Gold Acrylic gold paint. I did it the other way around (because I was dumb)
in the previous model and that did not turn out as well.
I did have to use the circle decal up at the top and the name plate decals. I selected the Galactica name plate decals. The decal locations were sprayed with a gloss coat and when dry, the decals were added (using Microset and Microsol.)
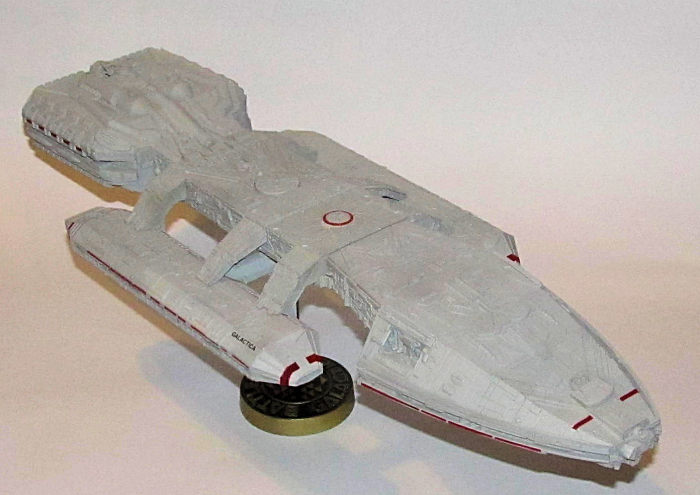
The model was not weathered due to
the scale. I just sprayed a final flat coat (again most of a bottle) over the
entire model and the painting was completed.
Once that was done, the bow of the Galactica was mated
to the main hull. I then filled in the noticeable gap between the two areas with
Valljeo plastic putty and removed the excess with damp Q-tips. The filled in
areas were sprayed with Light Camo Grey to blend everything in.
The two landing bays were glued in place and the seams between the landing bay pylons/landing bay were filled the same Vallejo plastic putty and painted Deck Tan. Next the clear plastic piece was glued into the engine face and the engine face was glued into the stern of the Galatica. Any areas that needed touch up were painted carefully with Deck Tan. Lastly the model was mounted on the painted stand and I had a completed old school Battlestar.
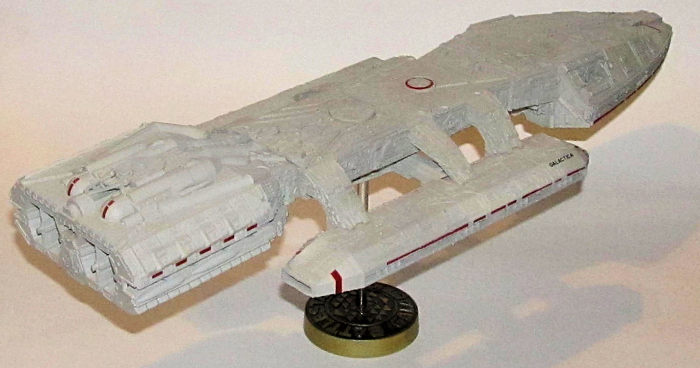
| CONCLUSIONS |
 The Moebius Classic Battlestar
Galactica is a fairly accurate and straight forward build model of the 1970s era
starship. One must make sure that all the parts are clear of sprue nubs and any
excess material to get a reasonable fit without gaps. Only thing to really watch
out for is that it does use up a lot of paint.
The Moebius Classic Battlestar
Galactica is a fairly accurate and straight forward build model of the 1970s era
starship. One must make sure that all the parts are clear of sprue nubs and any
excess material to get a reasonable fit without gaps. Only thing to really watch
out for is that it does use up a lot of paint.
For those who are wondering, the old school Galactica is actually almost 50% larger than the new Galatica which is also done in 1/4105 scale.
I am pretty happy for the most part except for the fact that the stern of the Galactica drooped thanks to gravity over the year between completion and the time I took pictures.
30 April 2018
Copyright ModelingMadness.com
If you would like your product reviewed fairly and fairly quickly, please contact the editor or see other details in the Note to Contributors.
Back to the Main Page Back to the Review Index Page Back to the Previews Index Page