Hasegawa 1/72 VF-1A/J Valkyrie
| KIT #: | 065725 |
| PRICE: | 2210 Yen |
| DECALS: | Three options |
| REVIEWER: | Dan Lee |
| NOTES: | Used decals from Hasegawa's VF-1S kit for Roy Fokker's VF-1S Skull One |
| HISTORY |
In the early 1980s, the Harmony Gold Company decided to import the classic Japanese anime Super Dimensional Fortress: Macross series over from Japan and bring it to North American TV as an action adventure series for kids 8-15. However they discovered that TV syndicators liked series to have a minimum of some 65 episodes, but Macross had only some 36 ½ hour episodes. To compensate the American producer added two separate unrelated anime series and smushed all three together into a three generational epic (to the horror of many an Anime purist) and released it as Robotech in 1984/85.
The story begins when a starship crashed on Earth in the 1990s. The ship was salvaged by the UN and the technology, known as Robotech, was shared around the world. On the eve of mankind’s first leap to the stars (the now rebuilt starship was renamed the Super Dimensional Fortress-1 or SDF-1), a fleet of several million warships, uh, manned by an alien race known as the Zentradi (a race of 50 foot tall humanoids) entered the solar system with the goal of capturing the SDF-1 for themselves. Thus began an epic three generations of war against three different alien races who wanted what the humans accidentally discovered.
 The
series caught on in North America, despite being heavily edited, for its
adult situations and loads of human on alien fighting. What made this
series a landmark for animation was that it combined excellent SF combat
sequences with good writing (except the annoying songs) and its nasty
habit of killing off important characters (villains or good guys) over
the course of the series. Unlike most action series, animated or not, it
didn’t treat death and destruction as a mere flesh wound to be forgotten
the next episode. Many of the characters suffered whether it was the
physical or mental wounds such as Post Traumatic Stress Disorder, dealt
with the philosophical issues of war and/or regret for actions done or
not done.
The
series caught on in North America, despite being heavily edited, for its
adult situations and loads of human on alien fighting. What made this
series a landmark for animation was that it combined excellent SF combat
sequences with good writing (except the annoying songs) and its nasty
habit of killing off important characters (villains or good guys) over
the course of the series. Unlike most action series, animated or not, it
didn’t treat death and destruction as a mere flesh wound to be forgotten
the next episode. Many of the characters suffered whether it was the
physical or mental wounds such as Post Traumatic Stress Disorder, dealt
with the philosophical issues of war and/or regret for actions done or
not done.
For most kids and teenagers who saw this show, it wasn’t about emotions, philosophy or trauma, concepts that were alien to many of us till much later. Macross (I will not confuse/bore people with by using Macross/Robotech and simply refer to the series as Macross to avoid confusion) was all about the mecha, namely the various fighters the humans used. The most popular are the various versions of the Valkryie--in Robotech-speak, the Veritech—Fighter.
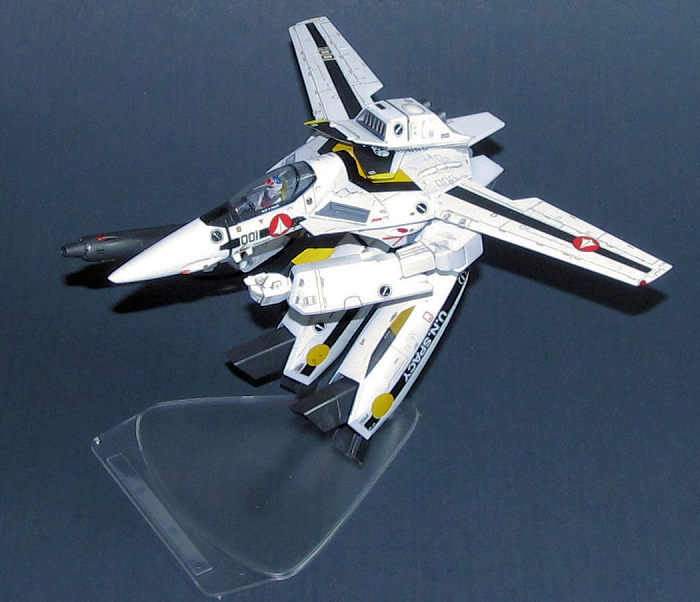
The Macross VF-1 Valkryie fighter looks a lot like a single seat F-14 that had the bonus of transforming into a humanoid shaped mechanized robot. It was armed to the teeth like its F-14 ancestor, with a huge gatling gun, nose mounted lasers and 12 homing missiles.
Many companies (including Revell-Monogram and Bandai) have produced models of the Valkryie/Veritech fighters in their various combat modes—including some that tried to do all them (not very well I might add.) From what I understand, the older ones collectively suffered the stereotypical flaws of SF models (poor fit/accuracy) while the newer ones are on the same level as this kit.
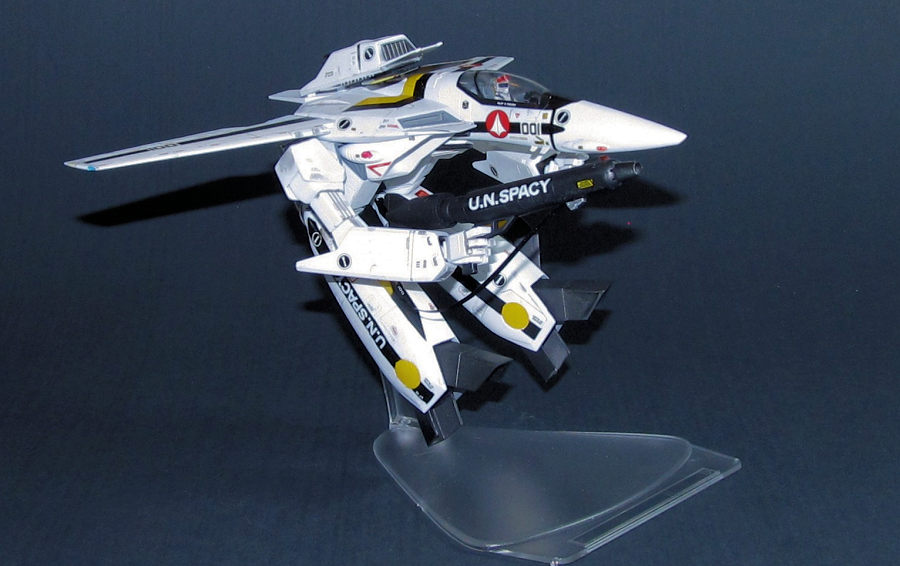
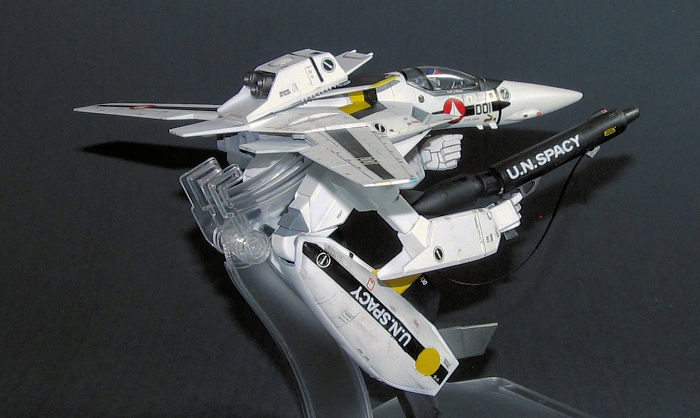
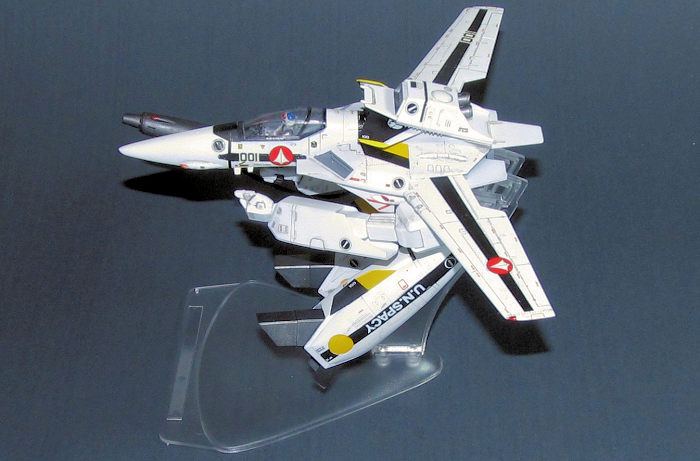
There was much joy from Macross and Robotech fans when Hasegawa began to make Macross kits the Hasegawa way. First Hasegawa came out with 1/72 kits in 2001, the Battleoid Mode (full mech mode) in 2003 and almost 11 years later they rolled out the 1/72 kits of the Gerwalk (half plane/half mech mode.)
| THE KIT |
 Hasegawa's
Gerwalk kit is considerably more complicated than the standard Flight model.
It consists of 15 different sprues (12 unique sprues + 3 duplicate ones) of
white plastic that is mostly free of flash. Two clear sprues with one for
the clear parts and the other for the stand which both are very crystal
clear. Lastly, one sprue of polycaps for the arms and legs and one vinyl
strap for the gatling gun pod/rifle.
Hasegawa's
Gerwalk kit is considerably more complicated than the standard Flight model.
It consists of 15 different sprues (12 unique sprues + 3 duplicate ones) of
white plastic that is mostly free of flash. Two clear sprues with one for
the clear parts and the other for the stand which both are very crystal
clear. Lastly, one sprue of polycaps for the arms and legs and one vinyl
strap for the gatling gun pod/rifle.
The decal sheet comes with markings for the three members of Rick Hunter's Vermillion flight and a lot of stencils. Includes whole markings for the wings and canopy. I found the canopy decals to be almost worthless and will paint the canopy frame instead of using the decals.
I took the decal sheet from a spare VF-1S kit I have so that I would use for the markings of Roy Fokker's Skull One as well as use the head parts from the kit for the correct VF-1S model head.
| CONSTRUCTION |
It all began with the wings. The interior seams were glued together using Tamiya Extra Thin Cement while the leading and trailing edges were glued together using Cyanoacrylate (CA) glue. When the CA glue was cured enough, the leading edges were gently sanded smooth using various grits of wet dry sandpaper. These parts would be painted then gloss coated then decaled (in more detail in later sections.) Once everything was dry, I added the clear parts. Beware these clear parts are tiny and I had quite the miserable time with these when I built the earlier flying mode VF-1 some 13 years (!) earlier. Fortunately I learned my lesson and sanded the edges down of each of the clear parts best I could to get them to fit. They were glued in using Tamiya Extra Thin Cement. I consider myself fortunate that I did not lose any of these parts.
 Next I
built the nose/cockpit subassembly. First thing that needed to be done was
paint the interior of the cockpit including the instrument panel (mostly to
provide something for the IP decal to stick to.) I added the decal to the
IP, doused it with Solvaset and let it dry while brush painting the few
interior details. Next I trimmed, sanded down, glued together and air
brushed the four piece pilot figure flat white. It took a very steady hand
to brush paint the various details on the pilot's uniform to match what is
shown on the anime episodes. The pilot was painted clear blue, gloss blue,
gloss red and grey. When the paint was dry, a dark grey wash was added to
the figure to pop out the small details. The rest of the nose was glued
together (exterior seams with CA glue, interior seams with Tamiya Extra Thin
Cement.) The seams sanded down with various grades of sandpaper.
Next I
built the nose/cockpit subassembly. First thing that needed to be done was
paint the interior of the cockpit including the instrument panel (mostly to
provide something for the IP decal to stick to.) I added the decal to the
IP, doused it with Solvaset and let it dry while brush painting the few
interior details. Next I trimmed, sanded down, glued together and air
brushed the four piece pilot figure flat white. It took a very steady hand
to brush paint the various details on the pilot's uniform to match what is
shown on the anime episodes. The pilot was painted clear blue, gloss blue,
gloss red and grey. When the paint was dry, a dark grey wash was added to
the figure to pop out the small details. The rest of the nose was glued
together (exterior seams with CA glue, interior seams with Tamiya Extra Thin
Cement.) The seams sanded down with various grades of sandpaper.
The fuselage was assembled in the similar way as the nose. Interior parts painted first. Glued together then the intakes masked off for exterior painting. The tail assembly was done the same way, but due to the various exposed nozzles was not glued together till after painting/decaling. The arms and gun were rather easy to assemble with filling/sanding of exposed seams.
The legs turned out to be the most difficult part of the build. First of all, they didn't fit as well as the other parts did so I had some slight gaps to deal with so I had a lot more filling/sanding to do than the rest of the kit put together. Second, there was some complex surface detail that I had to deal with while filling/sanding the seams. Finally, the assembly sequence has to followed exactly or you will have problems trying to assemble everything.
| COLORS & MARKINGS |
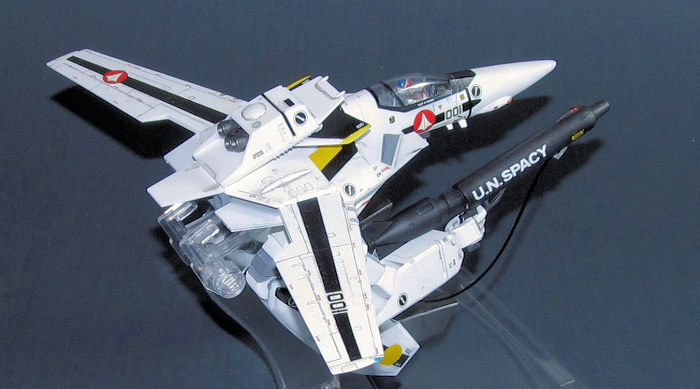
Roy Fokker's Skull One is flat white with black trim and tail with yellow ID markings on the tail and bottom fins. Hasegawa provides most of these as decals. Having experienced first hand these decals, I opted to paint most of these markings instead.
First the masked subassemblies were painted Tamiya flat white then gloss white. I masked off various exposed joints and sprayed on Tamiya Dark Sea Grey. The gun and feet/engine nozzles were primed using Badger Stynylrez black acrylic primer and then painted Vallejo Metal Colors Magnesium and Steel. I then painted the small antenna pieces Vallejo Off White to provide a slight variation in color among the mostly monotone white.
The tail piece was the most difficult to mask and paint as it needed three colors (white, black and yellow) and I had to remember the orientation of the tails in folded down position. Lastly, I painted the bottom fins black and yellow as per the instructions. This might have taken two paragraphs to write, but it took several hour long painting sessions over two months to complete due to the complexity.
 The
canopy was masked off using low tack tape, painted Dark Sea Grey for the
interior color then gloss black. No way was I going to use the supplied
decals for the canopy frames. Not only did the decal not stick to the
framework, but the decal wasn't completely opaque so it looked terrible.
Nice idea Hasegawa, but terrible execution. I ended up combining a step (the
gloss coat) as I used flat paint for the base color and then applied the
gloss equivalent. I did this because I didn't preshade anything.
The
canopy was masked off using low tack tape, painted Dark Sea Grey for the
interior color then gloss black. No way was I going to use the supplied
decals for the canopy frames. Not only did the decal not stick to the
framework, but the decal wasn't completely opaque so it looked terrible.
Nice idea Hasegawa, but terrible execution. I ended up combining a step (the
gloss coat) as I used flat paint for the base color and then applied the
gloss equivalent. I did this because I didn't preshade anything.
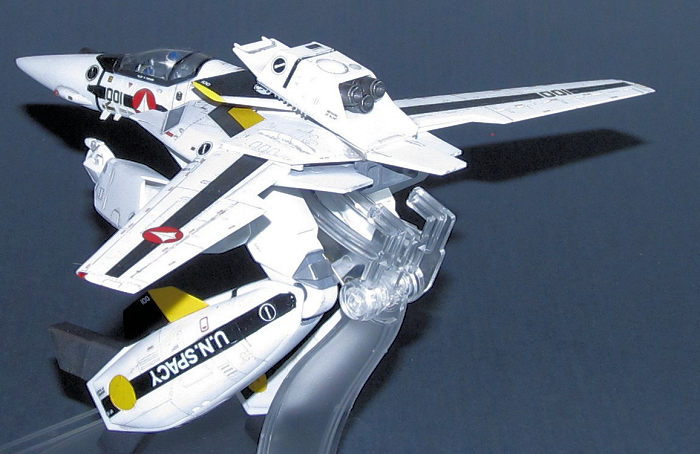
The VF-1S Valkyrie fighter is covered in stencils like a real like modern military jet. There are some 100+ decals to add not including the ones I didn't use. The wings were completed first. Next over several weeks, I added the various decals the nose, fuselage, arms, legs and weapon. I mostly used MicroSol and Microset solutions. For the stubborn ones especially the ID stripes, I used Solvaset.
One problem I discovered while using the VF-1S markings was that the legs of the Gerwalk model were of different dimensions than the legs of the standard flight model! This meant that the black leg stripes were wouldn't fit properly. I tried painting them on but I had a problem with making perfect circles to cover up the OMS thruster holes. In the end my solution involved cutting the black decal and using it at the front and back where the thruster holes are located while masking off and painting the middle with gloss black paint. Finding out the problem, masking, figuring out the solution and completing the task took almost two weeks mostly because work got in the way of my hobby. I ended up slicing up several decals because I needed to. Especially due to various folded parts.
After the model was put together, I used Tamiya Dark Grey and Black washes to pop out the details and panel lines. My only issue was that it stuck to areas were I only painted it flat colors so the underside of certain parts looks dirtier than it really should be. Finally, I sprayed everything down with a flat coat.
| FINAL CONSTRUCTION |
 The
gun required the most work as I left off the vinyl gun sling till after
painting. I had to drill a small hole at each end of the sling and insert
the plastic mounting piece into the hole. I then used a small drop of CA
glue to attach the sling to the gun.
The
gun required the most work as I left off the vinyl gun sling till after
painting. I had to drill a small hole at each end of the sling and insert
the plastic mounting piece into the hole. I then used a small drop of CA
glue to attach the sling to the gun.
The rest of the subassemblies were glued on or inserted in the various poly caps before the wash was applied. The small antennas and pre painted clear parts were glued in (due to poor handling by the builder, they had to be glued on several times and were fortunately not lost.) Once the final coat was added, the canopy masking was removed and the canopy was glued in place.
The stand was glued together (it was necessary as the weight of the model caused the arm of the stand to point downwards) and the model was fitted on the stand.
| CONCLUSIONS |
This is not a very easy kit to build. It requires a lot of thought and planning to paint and decal. Probably not for Macross/Robotech fanboys who normally don't build models or beginner modelers. However, if care and patience is used then you will have a nice model of a Anime/SF standard in the most unusual mode of its three modes of operation.
23 August 2021
Copyright ModelingMadness.com. All rights reserved. No reproduction in part or in whole without express permission.If you would like your product reviewed fairly and fairly quickly, please contact the editor or see other details in the Note to Contributors.