Hasegawa 1/48 VF-1A/J Valkyrie “Vermillion Squadron”
| KIT #: | MC 02 |
| PRICE: | $40.00 |
| DECALS: | Three options |
| REVIEWER: | Dan Lee |
| NOTES: | Hasegawa Weapons Set and Photo Etch Set |
| HISTORY |
In the early 1980s, the Harmony Gold Company decided to import the classic Japanese anime Super Dimensional Fortress: Macross series over from Japan and bring it to North American TV as an action adventure series for kids 8-15. However they discovered that TV syndicators liked series to have a minimum of some 65 episodes, but Macross had only some 36 ½ hour episodes. To compensate the American producer added two separate unrelated anime series and smushed all three together into a three generational epic (to the horror of many an Anime purist) and released it as Robotech in 1984/85.
The story begins when a starship crashed on Earth in the 1990s. The ship was salvaged by the UN and the technology, known as Robotech, was shared around the world. On the eve of mankind’s first leap to the stars (the now rebuilt starship was renamed the Super Dimensional Fortress-1 or SDF-1), a fleet of several million warships, uh, manned by an alien race known as the Zentradi (a race of 50 foot tall humanoids) entered the solar system with the goal of capturing the SDF-1 for themselves. Thus began an epic three generations of war against three different alien races who wanted what the humans accidentally discovered.
 The series caught on in North
America, despite being heavily edited, for its adult situations and loads of
human on alien fighting. What made this series a landmark for animation was that
it combined excellent SF combat sequences with good writing (except the annoying
songs) and its nasty habit of killing off important characters (villains or good
guys) over the course of the series. Unlike most action series, animated or not,
it didn’t treat death and destruction as a mere flesh wound to be forgotten the
next episode. Many of the characters suffered whether it was the physical or
mental wounds such as Post Traumatic Stress Disorder, dealt with the
philosophical issues of war and/or regret for actions done or not done.
The series caught on in North
America, despite being heavily edited, for its adult situations and loads of
human on alien fighting. What made this series a landmark for animation was that
it combined excellent SF combat sequences with good writing (except the annoying
songs) and its nasty habit of killing off important characters (villains or good
guys) over the course of the series. Unlike most action series, animated or not,
it didn’t treat death and destruction as a mere flesh wound to be forgotten the
next episode. Many of the characters suffered whether it was the physical or
mental wounds such as Post Traumatic Stress Disorder, dealt with the
philosophical issues of war and/or regret for actions done or not done.
For most kids and teenagers who saw this show, it wasn’t about emotions, philosophy or trauma, concepts that were alien to many of us till much later. Macross (I will not confuse/bore people with by using Macross/Robotech and simply refer to the series as Macross to avoid confusion) was all about the mecha, namely the various fighters the humans used. The most popular are the various versions of the Valkryie--in Robotech-speak, the Veritech—Fighter.
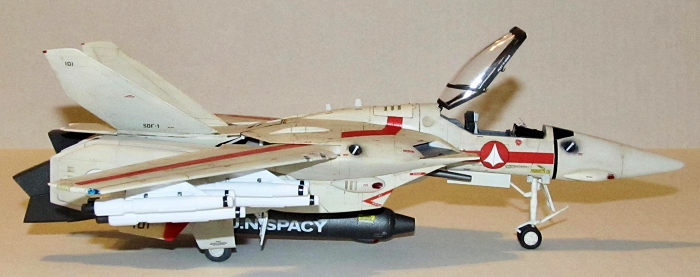
 The Macross VF-1 Valkryie fighter
looks a lot like a single seat F-14 that had the bonus of transforming into a
humanoid shaped mechanized robot. It was armed to the teeth like its F-14
ancestor, with a huge gatling gun, nose mounted lasers and 12 homing missiles.
The Macross VF-1 Valkryie fighter
looks a lot like a single seat F-14 that had the bonus of transforming into a
humanoid shaped mechanized robot. It was armed to the teeth like its F-14
ancestor, with a huge gatling gun, nose mounted lasers and 12 homing missiles.
Many companies (including Revell-Monogram and Bandai) have produced models of the Valkryie/Veritech fighters in their various combat modes—including some that tried to do all them (not very well I might add.) From what I understand, the older ones collectively suffered the stereotypical flaws of SF models (poor fit/accuracy) while the newer ones are on the same level as this kit.
There was much joy from Macross and Robotech fans when Hasegawa decided to make Macross kits the Hasegawa way. First Hasegawa came out with 1/72 kits in 2001 and almost 10 years later they rolled out the 1/48 versions.
| THE KIT |
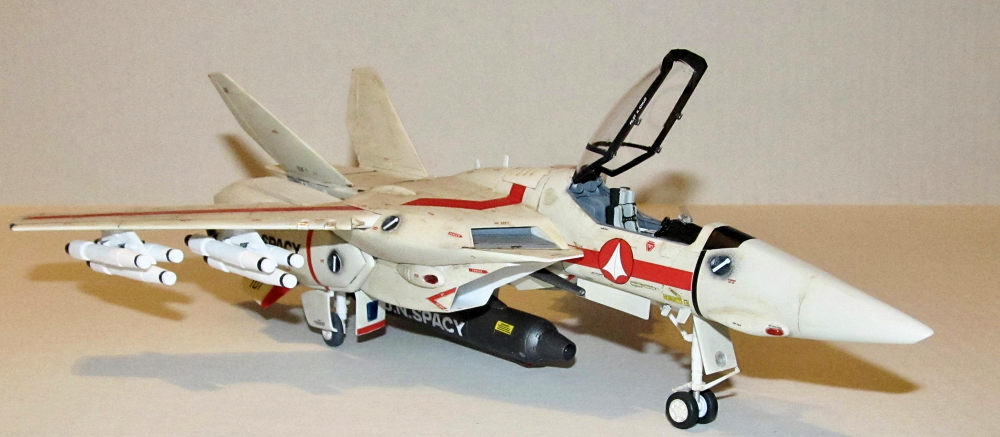
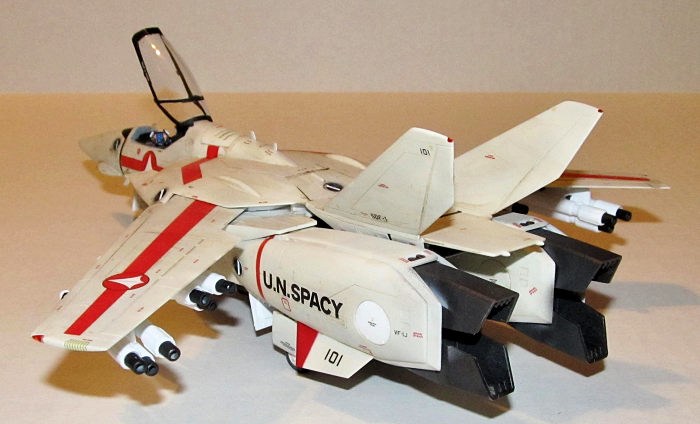
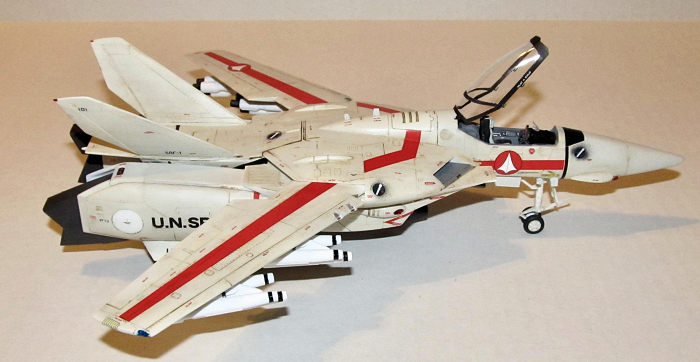
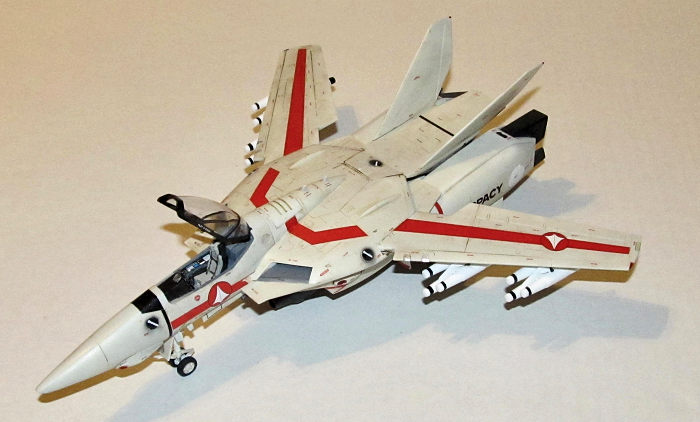
Hasegawa's 1/48 kit comes on 11 sprues, 10 sprues of white plastic and 1 sprue of clear plastic (and none of them wing mounted external weapons as per usual from Hasegawa.) A sprue contains the fuselage parts as well as the cockpit tub; B sprue has the wings, landing gear doors and main gun; C sprue has the legs/engine pods; D contains the intakes and tail; E and J are the parts for the two styles of mech head piece; G is the sprue for the pilot figure; 2 X K contain the wheels, engine nozzles/feet and any other piece that you need two of; M is the cockpit interior sprue and N is the clear sprue.
 The molding and detail is superb
(as usual from Hasegawa) with crisp recessed panel lines and some minor rivet
detail. There was no flash on my copy of this kit. However, I wasn't happy about
the white plastic as I have found that white plastic doesn't always make things
easier to paint as I have had to spray more than a few times with darker colors
to keep the white from showing through.
The molding and detail is superb
(as usual from Hasegawa) with crisp recessed panel lines and some minor rivet
detail. There was no flash on my copy of this kit. However, I wasn't happy about
the white plastic as I have found that white plastic doesn't always make things
easier to paint as I have had to spray more than a few times with darker colors
to keep the white from showing through.
The kit comes with two different styles of canopies. One is similar to the F-16 canopy with bulged sides while the other is a more traditional canopy. The F-16 buldged canopy is more accurate, but it also contains a mold seam running right down the middle while the traditional rounded canopy does not have a mold seam.
I also purchased a Hasegawa Macross weapons set (sigh) and Hasegawa's internal/external details PE set which has more details and options depending on what you want to do with this model. The weapons set has dark blue and white plastic parts as well as decals. The PE set contains pre painted internal cockpit parts and seat belts with unpainted metal parts for the external parts.
| CONSTRUCTION |
It all began with the intakes. Hasegawa provides really nice one piece shallow intake tubes for their Macross kits. I sprayed on flat white and glued the intake tube into the two piece intake. I didn't even worry about filling/sanding as the seam looked like a panel line so I left it alone.
Next up was the fuselage. The VF-1 kit has working swing wings as Haseagawa set up an easy to build swing wing mechanism. I added PE parts for the wing mechanism which later popped off and I didn't bother to replace because there was no easy way to add them back. I also added PE parts to the upper intakes then painted them (Tamiya Neutral Grey) I glued the top and bottom sections of the fuselage using CA glue for the seams and Tamiya extra thin cement for the interior posts (this was to eliminate the dreaded phantom seam because I believed I could get this one finished in three or so weeks, not the three or so months it actually took.) I sanded the seams with sandpaper of increasingly finer grit to remove the scratches.
 The wings were next. I first
drilled out the holes where the triple missile pylons were supposed to be
located then installed the posts which weren't glued in so they could rotate
(sort of.) Hasegawa's two piece wing was a top piece that contained the leading
and trailing edges and the bottom piece was basically the central panel (to
allow the builder to add wing weaponry if one so desired like myself.)
The wings were next. I first
drilled out the holes where the triple missile pylons were supposed to be
located then installed the posts which weren't glued in so they could rotate
(sort of.) Hasegawa's two piece wing was a top piece that contained the leading
and trailing edges and the bottom piece was basically the central panel (to
allow the builder to add wing weaponry if one so desired like myself.)
I built the tail portion. I glued only the body portions and twin rudders in while leaving off the front and rear rockets. I did this to reduce the amount of masking I would need as I remembered the headaches I had with masking the odd shapes that contained rocket nozzles when I built the 1/72 version.
At last I started on the cockpit. The console was painted gloss black and when the paint was dry, I added the decal to the console. I used a drop of Solvaset to get to snuggle into the detail. Meanwhile the cockpit tub/nose wheel well was painted flat white (nose wheel gear well) and Xtracryix Dark Gull Grey (cockpit). The details of the side panels was cleaned off with a knife and the PE consoles were glued in over the now flat areas. Some more PE was added the rear of the cockpit as per instructions and painted dark gull grey. I sprayed the interior of the fuselage nose parts dark gull grey. Once I lined up all the cockpit parts, I ran a thin bead of CA glue around the nose and put them together. When the glue was dry, I sanded away the seams and then polished away the scratches.
 I built the main gun using CA glue.
I attached the other parts with Tamiya extra thin cement. It didn't take a lot
of effort to sand down the seams and polish them.
I built the main gun using CA glue.
I attached the other parts with Tamiya extra thin cement. It didn't take a lot
of effort to sand down the seams and polish them.
Next, I worked on the engine pods. This was just as complicated as the 1/72 versions I built as you needed to pre-paint a lot of parts before assembly. The feet/engine nozzles were painted a mix of Tamiya Metallic Grey and Gunmetal while the exhaust tube was painted flat white and the rear engine facing painted gunmetal. The wheel wells were painted flat white. Once everything was inserted into the engine pods, they were glued together with CA glue (same as the nose.) The engine pods have internal detail that can be seen if you leave the doors open, but I prefer to close up the service hatches and left the internal detail alone.
Lastly, I assembled the missiles from the separate weapons set. I glued any visible seams using CA glue and invisible ones with Tamiya extra thin cement. As per usual, sanding and polishing the missiles was tedious as there were 12 of them and four triple rack pylons to do.
| COLORS & MARKINGS |
The various subassemblies were masked off and pre shaded using a couple of different shades of grey due in part to the fact that the base color was going to be a really pale grey FS36622. I used Model Masters Acrylic FS36622 (Camo Grey) as it seemed to be the only version of the color I had access too. I was kind of glad that I had preshaded the model as the paint didn't want to stick to the model where there was no paint as I had issues with paint lifting off when I removed the masking. This required some sanding and retouches. I also had overspray on some of the masked areas (the engine nozzle/feet) and needed to retouch them. The painting took longer than I hoped as I had retouch/repair several times.
Meanwhile the small parts were
painted as well. The landing gear and the interior of landing gear doors were
painted flat white while the exterior of the doors pa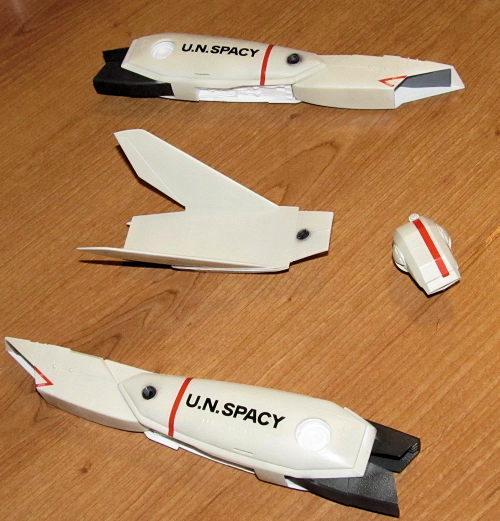 inted FS36622. The wheels
were sprayed flat white and masked off as the tires were painted RLM66. The main
gun was painted gunmetal.
inted FS36622. The wheels
were sprayed flat white and masked off as the tires were painted RLM66. The main
gun was painted gunmetal.
There are various nozzles located around the VF-1 that look like they are OMS nozzles for use in space as conventional flying surfaces won't work. I dropped the air pressure on the compressor down to 10psi and sprayed the nozzles very carefully with flat black. I didn't mind the overspray as it would give it a slightly weathered look. I ended up having to repaint a couple of areas with FS36622 as I sprayed too much black.
Finally, the canopies were masked and painted flat black in three coats as it the first two coats of paint were slightly translucent and needed better coverage. The missiles and launcher rack were painted flat white with each missile having a painted black band and gunmetal nozzles.
Once things were dry and done to my satisfaction, the model was clear coated with Tamiya Clear Gloss in preparation for the decals.
I added the numerous stencils and markings over a couple of weeks as I split some of my spare time to look for a better job. The decals were easier to put on the model than actually painting said model. I know the VF-1 was based partially on the F-14, but did they have to base the numerous stencils on it as well?
I picked the markings of Hikaru Ichijyo (Macross) aka Rick Hunter (Robotech) just like the 1/72 model I had built some 10 years earlier. These are the newer Hasegawa decals that don't need a lot of Solvaset to get them to curve into the detail (I used Microsol and Microset instead.) No real issues except dealing with the number of “No Step” decals to be added to the model.
When the decals were cured and dry I wiped down the model before weathering. I used my two part burnt sienna and one part black watercolor wash mixed in with a drop of dish soap to break up the surface tension. When it was dry I wiped away the excess with Q-Tips. I just wanted the VF-1 to look like it had seen some busy hard combat, but not look beaten up. Next up I painted certain areas as per instructions using a brush including various lights and small parts. Once the paint was dry I sprayed on a couple of thin coats of Tamiya Flat Clear to seal in everything.
| FINAL CONSTRUCTION |
All the sub assemblies were glued
together including the wings. Next the arms and main gun were glued on the
underside. The weathered landing gear was assembled and glued in place. Next up
the various landing g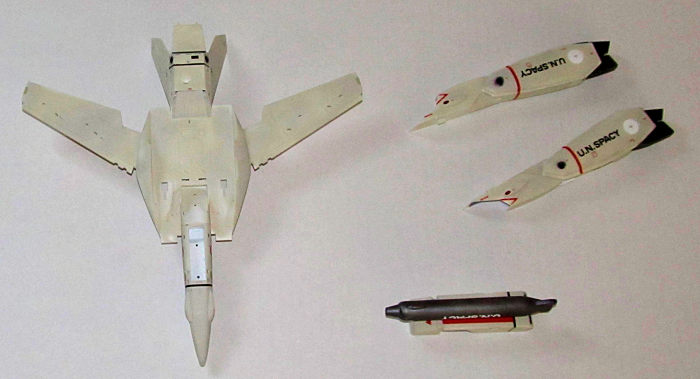 ear doors were added. The painted wingtip and landing light
covers were glued in using white glue (in 1/48 scale these parts were much
easier to add than the 1/72 versions.)
ear doors were added. The painted wingtip and landing light
covers were glued in using white glue (in 1/48 scale these parts were much
easier to add than the 1/72 versions.)
I added the various (prepainted flat white) PE pieces to the OMS nozzles and secured them with a tiny drop of CA glue. The PE seat restraints were glued (with CA glue) into the painted ejection seat and the seat was glued into the cockpit using Tamiya Extra Thin Cement. The missiles and pylons were glued in place on the VF-1's under wing posts with a dab of CA glue and free to rotate when the wings swing forward or back.
Finally I added the various PE locks and canopy support to the canopy using white glue. When it was dry, the canopy secured into the VF-1 with a drop of non fogging CA glue to both the canopy and the PE canopy supports.
| CONCLUSIONS |
The Valkyrie took a lot longer than I had hoped due to the rather complicated layout. I thought the 1/72 version was good (despite being rather fiddly due to its small scale) but the 1/48 version is actually a better overall model (and better result.) I find the Hasegawa Macross fighter kits to be a fun build of a iconic SF vehicle. If you are a fan of Macross then you will enjoy building these kits.
Dan Lee
30 October 2018
Copyright ModelingMadness.com
If you would like your product reviewed fairly and fairly quickly, please contact the editor or see other details in the Note to Contributors.
Back to the Main Page Back to the Review Index Page Back to the Previews Index Page