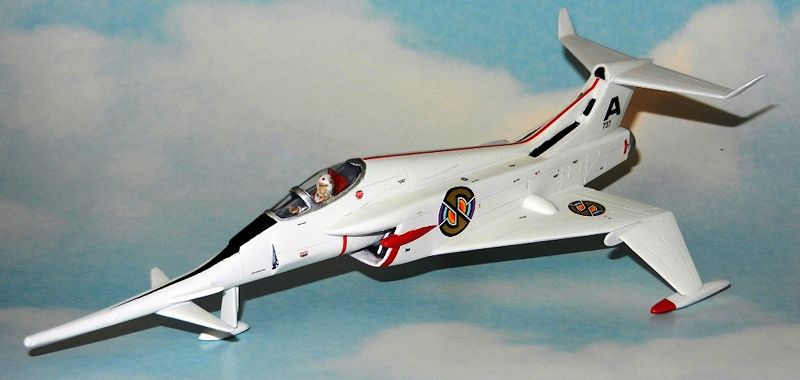
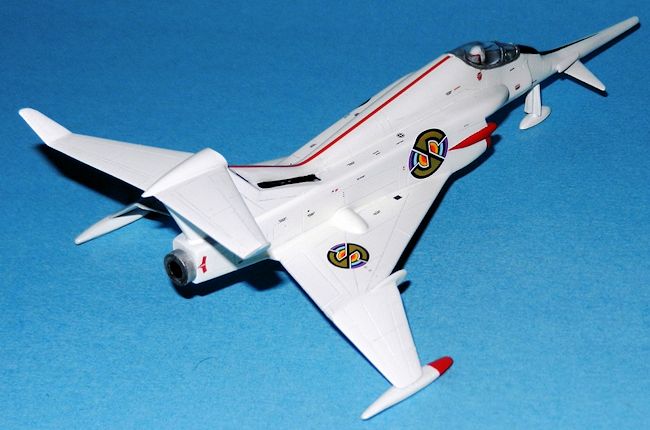
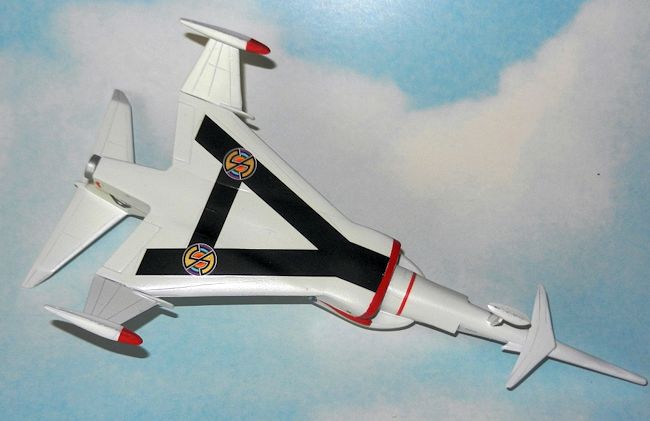
Airfix 1/72 Angel Interceptor
| KIT #: | A02026 |
| PRICE: | $12.98 SRP |
| DECALS: | One option |
| REVIEWER: | Pablo Calcaterra |
| NOTES: | Re-issue |
| HISTORY |
Captain Scarlet and the Mysterons:
This was a TV show I grew up with and I loved it. It was the first
Supermarionation project by Jerry and Sylvia Anderson after the success of their
series of marionettes like SuperCar, Fireball XL-5, Joe 90, Thunderbirds. The
next logical step for the Andersons to perfect their shows after Captain Scarlet
was to use real actors! And thus they followed with UFO first and then Space
1999 (another couple of shows I followed every week). Returning to Captain
Scarlet there were lots of special effects, action, combats and powerful planes
and cars. All the right condiments for kids.
 For
those who have not seen this British show here there is a brief description:
When in 2068 the human mission to Mars led by Captain Black from Spectrum
organization they found the planet inhabited. Though the Mysterons (or Martians)
were peaceful their attempt to look in detail to the humans was misinterpreted
by Black as an hostile act and he proceeded to blast away the Mysteron city…only
to see it reconstructed as by magic in front of his very eyes. This unprovoked
attacked prompted the Mysterons to seek revenge by destroying the human
organization. To achieve this they would infiltrate the human society and
defenses by killing specific key people and then replacing them with copies
under Mysteron control…which were reconstructed with the same swiftness as they
had reconstructed their own city in Mars. Captain Black becomes the key Mysteron
agent.
For
those who have not seen this British show here there is a brief description:
When in 2068 the human mission to Mars led by Captain Black from Spectrum
organization they found the planet inhabited. Though the Mysterons (or Martians)
were peaceful their attempt to look in detail to the humans was misinterpreted
by Black as an hostile act and he proceeded to blast away the Mysteron city…only
to see it reconstructed as by magic in front of his very eyes. This unprovoked
attacked prompted the Mysterons to seek revenge by destroying the human
organization. To achieve this they would infiltrate the human society and
defenses by killing specific key people and then replacing them with copies
under Mysteron control…which were reconstructed with the same swiftness as they
had reconstructed their own city in Mars. Captain Black becomes the key Mysteron
agent.
Their first attack on Planet Earth targeted Captain Scarlet whose
Mysteron replica was eventually killed and resurrected by Spectrum, thus now
becoming indestructible and a key asset for planet Earth. Each one of the
members of Spectrum were identified by a colour (from Colonel White to
Lieutenant Green and with different Captains like Blue (Scarlet’s team mate),
Brown, Ochre, etc).
Besides their special vehicles and planes for Captains Scarlet and Blue
there was also Cloud Base. This was a floating plane carrier from where Colonel
White directed the fight against the different Mysterons schemes. Cloud Base was
also home for the Angels interceptors, piloted by 5 different female fighter
pilots: Harmony, Rhapsody, Symphony, Melody and Destiny. They would take off and
land from this “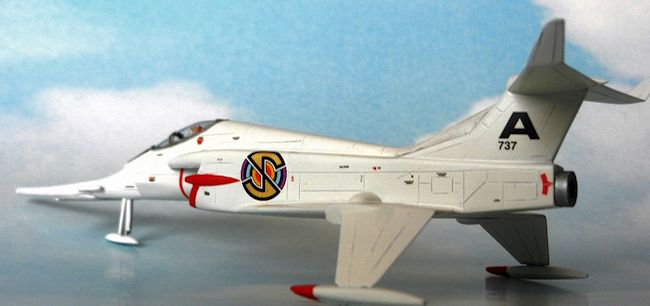 plane
carrier”. For them to access their fighters they would strap themselves to their
seats that then would be elevated to the open undersides of the planes thus the
bottom of the seat becoming the bottom of the plane…and then take off!
plane
carrier”. For them to access their fighters they would strap themselves to their
seats that then would be elevated to the open undersides of the planes thus the
bottom of the seat becoming the bottom of the plane…and then take off!
I have always wanted to have a kit that would represent another key
series from my childhood (the first being my
Speed Racer Mach 5 kit. Captain Scarlet lasted only one
season (1967/68) but for me it was fantastic.
| THE KIT |
This Airfix kit was issued probably 30 years ago and has just been re
issued a couple of years ago by Hornby. Originally the kit was a snap kit so
there are large guides to attach the parts together and the gaps are horrendous.
Typical of several generations ago the panel lines are all raised. The decal
sheet is great with excellent density, register and colours (i.e. golden
Spectrum logos). There is a pilot supplied…but it is not a girl!
| CONSTRUCTION |
There were two things to deal with first: converting the male pilot into
one of the Angels and re-scribing all the panel lines. So let’s talk about the
Angel first:
First step was to model the Angel “boobies” using Tamiya putty. Not too
marked but evident enough. After this modification was done the following part
was to add the communication indicators placed on the shoulders. For this I used
little strips of round plastic. Then I started to paint the Angel. First the
face using ModelMaster Acryl Skin colour. Then all the uniform, helmet, boots in
white. The different golden bands (boots, wrists, belt, neck) were painted in
Gold (Humbrol). The helmet of the Angels has clear sides thru which the hair of
the pilot can be seen. Having decided to build Destiny this clear part was
 represented
by painting her hair on the helmet and her long hair coming out under the helmet
and running over her shoulders. The clear section was given a coat of Future (to
replicate the Plexiglas) and a red dot followed in the middle of the forehead
area of the helmet as there is a Spectrum roundel/logo painted there. The last
details were the very narrow black sunglasses and the red crossed seatbelts made
with masking tape painted with ModelMaster Acryl Red. With this the Angel was
ready.
represented
by painting her hair on the helmet and her long hair coming out under the helmet
and running over her shoulders. The clear section was given a coat of Future (to
replicate the Plexiglas) and a red dot followed in the middle of the forehead
area of the helmet as there is a Spectrum roundel/logo painted there. The last
details were the very narrow black sunglasses and the red crossed seatbelts made
with masking tape painted with ModelMaster Acryl Red. With this the Angel was
ready.
The seat is not correct in terms of shape. It lacks the tall headrest
present in the Angel Interceptor. This was scratch built (forming a U with
strips of plastic and rounding the internal edges using Putty and sandpaper) and
painted in red with the rest of the seat being given a hand of aluminum.
Using DYNO tape all the raised panel lines were rescribed (some of these
are already fading away in the kit due to the age of the mold).
There is a decal for the instrument panel which proved to be too large
for the plastic piece to which it needs to be attached. So once it was glued I
trimmed the excess of decal. The rockets located inside the nose beside the
cockpit were painted in white with a black background. The large air intake
received a coat of black with silver drybrushing highlighting the grid.
With these internal parts ready (pilot and seat, rockets, instrument
panel and air intake) and all panel lines rescribed I was finally able to close
the fuselage halves. Being a snap kit the gaps are, as mentioned above,
horrible. There was a need of large amounts of putty to erase these gaps.
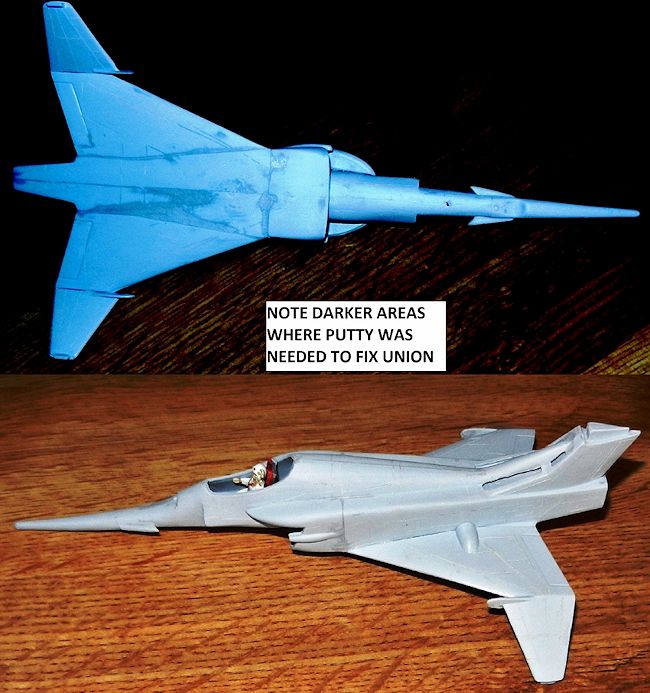 But
worse was to come…the gaps of the wings to fuselage attachment were not
gaps…they were trenches! After cutting the inserts and guides, opening up the
slots and lots of careful dryfitting and alignment I succeeded in achieving
something decent but far from perfect. To correct this I had to use copious
amounts of Tamiya Putty (i.e. wing to fuselage underside union, air intake to
fuselage) and spent several days sanding and filling with putty. The top union
of wings/fuselage was not bad and with white acrylic base and a damp cloth I was
able to fix it with no problem.
But
worse was to come…the gaps of the wings to fuselage attachment were not
gaps…they were trenches! After cutting the inserts and guides, opening up the
slots and lots of careful dryfitting and alignment I succeeded in achieving
something decent but far from perfect. To correct this I had to use copious
amounts of Tamiya Putty (i.e. wing to fuselage underside union, air intake to
fuselage) and spent several days sanding and filling with putty. The top union
of wings/fuselage was not bad and with white acrylic base and a damp cloth I was
able to fix it with no problem.
The next area was the nose tip which was attached and having a couple of
winglets that had a large gap and also required putty and sanding. With this end
finished I moved to the tail area and attached the horizontal surfaces….I should
buy shares of Tamiya Putty…more sanding and filling… I attached the nose landing
skid.
After giving the kit a nice wash with mild detergent and checking for
errors in the sanding (as the putty also had now to be rescribed to replace the
panel lines lost in the process) I attached the canopy that went on with little
fuss (just a little bit of sanding) and finally(!) I was able to proceed with
the painting of the Interceptor.
| COLORS & MARKINGS |
The rocket launchers, the canopy and the air intakes were carefully
masked with Tamiya tape. The canopy frames were painted in black and masked. To
check for imperfections and give the kit a nice base I painted the kit with
light grey. No defects worth mentioning were found so I was able to move to the
main colour: ModelMaster Acryl gloss white. The border of the air intake and the
tip of the landing skids were masked and painted in gloss red. The antiglare
area in front of the windshield was painted in black and now the kit
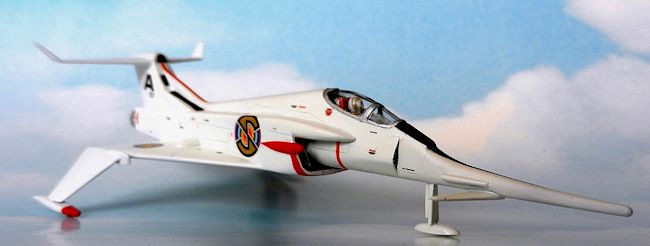 was ready
for the decals. The canopy frames were painted in black and then silver. The air
intakes in the tail area were painted with a brush using black paint.
was ready
for the decals. The canopy frames were painted in black and then silver. The air
intakes in the tail area were painted with a brush using black paint.
As mentioned above these are very well printed and there was no saving
in quality of inks by Airfix. They are beautiful. I first started with the
stencils. Plenty of them! I was not aware that the Interceptors had so many! I
finalized with the very large black A under the wings and the 6 fantastic
Spectrum roundels.
Once the decals were dry I sealed them with a light coat of Future. The
exhaust was painted in aluminum with the internal part receiving black paint.
Fit was not good at all with the plug being too large and requiring a
considerable amount of trimming. With this the Angel Interceptor was finished.
| CONCLUSIONS |
A nice small kit that represents the Angel Interceptor very well. Being a toy or snap kit it requires lots of work to properly bring it to life. But after several weeks I prevailed and now my Captain Scarlet’s Angel Interceptor is sitting in my display shelves alongside the other great icon from my childhood: Speed Racer’s Mach 5.
Pablo
Calcaterra August 2014 If you would like your product reviewed fairly and fairly quickly, please contact the editor or see other details in the
Note to
Contributors.