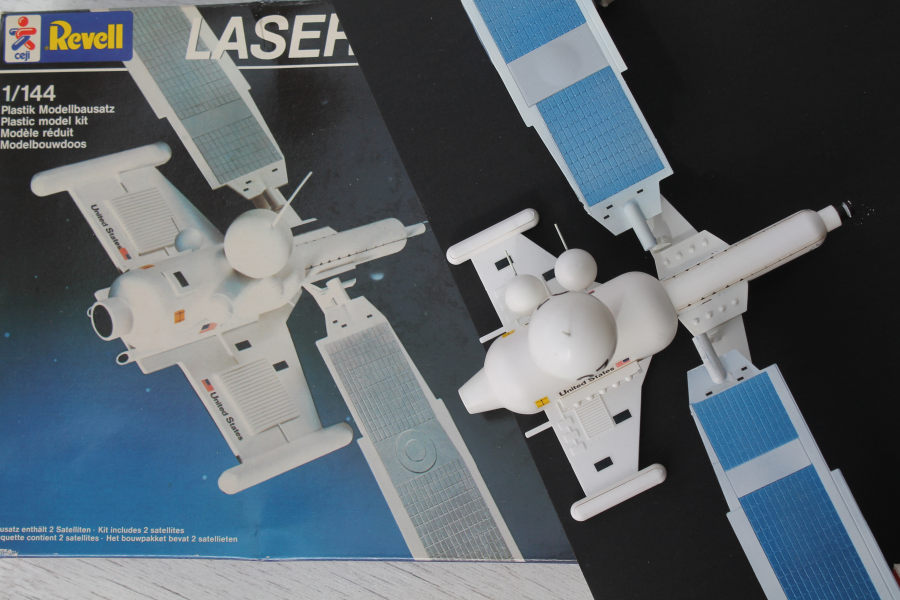
Revell 1/144 Laser Battle Stations
| KIT #: | 4534 |
| PRICE: | $20-00 (a long long time ago, in a model shop far far away) |
| DECALS: | Two identical but yellowed options |
| REVIEWER: | George Oh |
| NOTES: | Reinforcement of some attachment points required (IMHO) |

| HISTORY |
 In 1983,
the then President of the United States of America, Ronald Reagan, proposed
that a system be created to defend the United States from missile attacks
(because most would be nuclear-tipped, and therefore very destructive to
life and property). Thus was born the Strategic Defence Initiative (SDI) as
an Organisation within the Department of Defence, to oversee the development
of the system (nicknamed ‘Star Wars’ after a recently-popular movie).
Concepts included space-based, kamikaze-style and shotgun-like satellites,
lasers, particle beams and missiles, both ground, airborne and the required
aiming & guidance systems and Command & Control structures. But the obvious
conclusion was that at least a decade of research was required to know
whether such a system was even possible, and the required technologies were
decades away from readiness. So, instead of taking a first step along that
path, the SDIO was closed, and no actual progress was ever made – possibly
because the fruits of such R&D wouldn’t have been within his presidency (or
his lifetime). Now, 40-years later, those decades have passed, and been
wasted, because the first step (on that journey of 1,000 miles) was never
taken. Despite the axing of the concept, today we have laser-cut items.
Actually, some progress WAS made, but in a different direction. In 1984, Revell released several kits of fictitious space-borne hardware of what might have been, in the form of a Space Operation Centre, a pair of power satellites and a pair of Laser Battle Stations.
| THE KIT |
 This pair of
Laser Battle Stations come in a lid-&-tray box that holds 3 white and 2 black
sprues for a total of 44 parts. There are parts that assemble into two
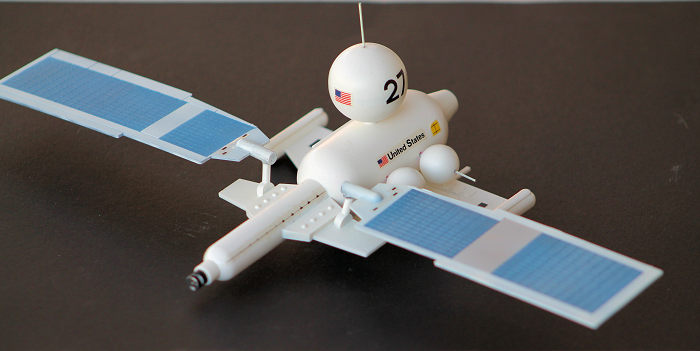
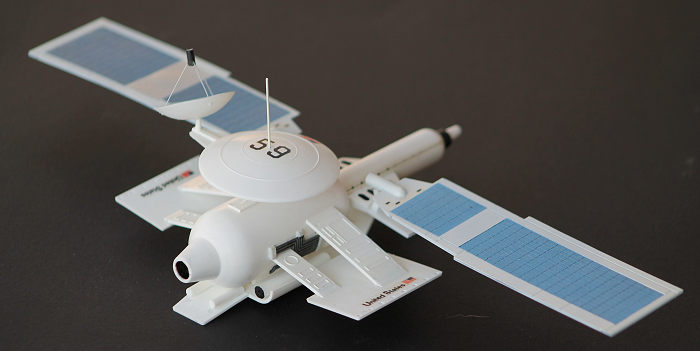
satellites – one with a large sphere on its back (= No. 27) and the other with a
dish on its spine (= No. 59). The instructions indicate that the modeller is to
stretch some sprue to form some detail parts. The fit of the parts is quite
good, but the attachment points are quite a mixed bunch. Some small parts have
large attachment pins. Some large parts (those spheres and dishes) have attach
onto/via small pins - so pinning/reinforcement of them is in order. Most detail
is of the raised kind, with the detail on one side of the solar panels well
engraved, and the other side almost non-existent. One glaring omission is any
form of stand to support them. The instructions come on an A3 sheet that is
divided into 4 sides – 3 have assembly sequences and the 4th has the usual
routine safety details. The decal sheet is small (@ 4x5” with 20+ individual
markings for each satellite).
I can’t recall when or why I bought this kit, but both the decal carrier film and the price tag, have yellowed. In response to an on-line Modelling site’s proposal for a 10-day quick-build of a Revell subject, I extracted this from deep within my stash so that I can present something unusual to the website. I started it 4 weeks in advance of the start date, by placing the decals into a plastic bag and taping it onto a West-facing window so that the sun’s UV radiation might bleach the carrier film back to clear. The Build started at midnight, as Thursday 17 Oct became Friday 18. I cheated by soaking the plastic parts in hot soapy water, then scrubbing them (with a toothbrush), before rinsing them in clean hot water (on Thu afternoon) and then letting them drip-dry overnight. But my prior preparation got me nowhere because I couldn’t start clipping-off parts till midnight on Friday.
| CONSTRUCTION |
The project started when I assembled both *cores (*remember – as far as I know, most of these components have no official names, so I’m making them up) at the same time, because I built both in parallel (Speed build, you know). Alignment was quite good, but liquid filler was still needed, followed by a wet-sanding. Each was attached to its *pallet and the *stub wings attached to the *barrel of the *core, and the joins or sockets were filled and smoothed. In fact, I attached as much as I could (just like building a AFV/tank) because almost everything was to be painted white. I left-off the *dishes and the *solar panels to ease painting.
 In a
deviation from the instructions, I declined to use stretched sprue and instead,
used thin rigid wires and superglue, in order to substitute inbuilt fragility
for strong positive attachments. On 59, the wire penetrates down through the
large dish and into its mount. On No. 27, the wire follows along the axis of the
large sphere, and was bent then superglued to the underside of the *core’s roof.
And the horizontal ones of the small spheres pass completely through them and
the *core, to be anchored into the panel on the other side.
As a side note, a photograph of the completed models was used as the boxart, but there are differences between the photos and the models. It appears that the photographed models were the prototype/concept models, or the builder of had (at least) two complete kits and indulged in some poetic licence by mixing-& matching, and by adding some scratch-built items and markings. So I did, too. No. 27 has a pair of small spheres on one side of the *core, and a panel on the other, whereas the boxart photo has pairs on both sides. The photos show a double disk in top of two of the solar panels, but on the models, they are hinted-at by a slight mound.
| COLORS & MARKINGS |
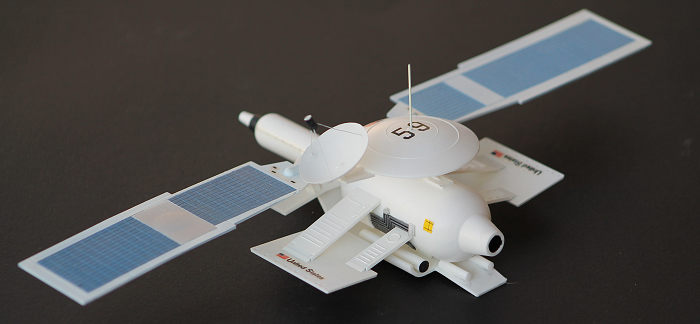 All
sub-assemblies, parts and the black solar panels were sprayed with SMS insignia
white. After drying time, the solar panels were masked and the panels were
sprayed with Hobby Color H88 metallic blue (instead of aluminium, ‘cos I wanted
the colour. Besides, the ones on my roof are a dark blue/black). Each upper
surface had a non-engraved area that was painted SMS aluminium – for a contrast.
Note – I coulda’ scribed more solar panels on them, but, Shoot!!, it was a speed
build.
There are no decaling directions, and the instructions don’t even direct you to the boxart (which I did). The decals were overcoated with Liquid decal film (just in case) and performed well - at first. Once they were in place, both whole subassemblies were overcoated in a clear gloss to lock them in – not 100% successful. The (pair of) numbers for each satellite were only a tiny 3mm tall, so I scrounged larger random numbers (27 & 59) from my decal dungeon. They were put in prominent places and suggest that there is a large quantity of equivalent satellites in orbit (as per the initial concept). There are no decals on the undersides.
| FINAL CONSTRUCTION |
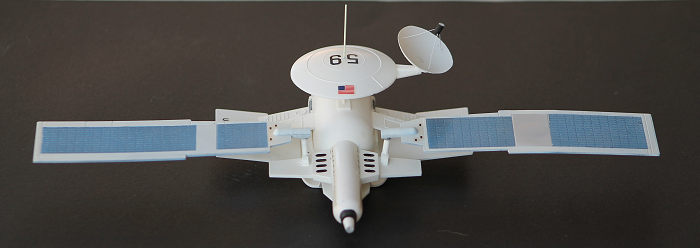 The last-few
stray parts were attached, and small areas were brush-painted as per the
instructions. There was a smaller dish attached to 59’s larger dish but their
orientations looked upside-down. So, for a difference, I scratch-built a tripod
over the smaller one so that it looks more familiar, and attached it in-place,
though at an angle.
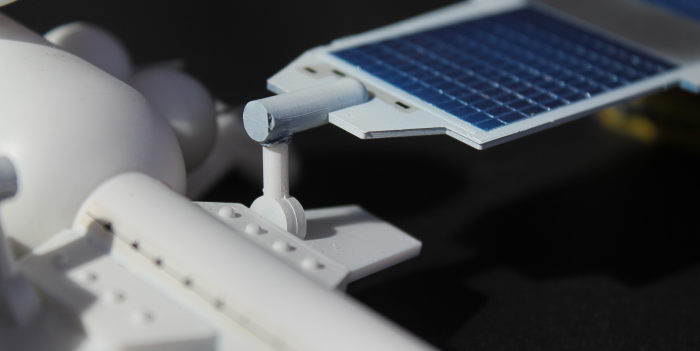
Now came the part I was dreading – attaching the solar panels. Each long solar panel has a peg (tipped with a socket on its underside) at its inner end, which attaches over a vertical post had been glued onto the *sub-wings. There will be a LOT of (moments of) force on those joints. This probably doesn’t matter in a Zero-G environment, but down here on 1-G Earth it is potentially problematic. I liberally doused the socket with liquid cement then, pushed them over their posts. Supporting the ends so that the panels are horizontal (in two planes – left/right and fore/aft), I placed a weight (a 10ml paint bottle) near each join to force them together, and allowed them to dry overnight. Next morning, I reinforced the joins with some superglue and gave it another day to dry. It ‘aint pretty, but as long as it holds for the photos……..…. This ended the build, and I made it with a day to spare.
| CONCLUSIONS |
Unusual and fictitious subjects are a background staple of model-producing companies (Testors F.19, Italeri MiG.37 FERRET, 1946 Luftwaffe models, to name but a few). They allow we modellers to ‘indulge our imaginations’ with a trip outside of the box (pardon the pun). OK – these two seem to be refugees from the original ‘Flash Gordon’ or ‘Buck Rodgers’ comic-book or movie.
In reality, these things would be just as dangerous as the missiles they are targeting - if they missed their shot and hit the Earth beyond. If their reach could be limited, it would be the equivalent of a (very long) light-sabre. Thinking outside of the box (or atmosphere, in this case), they should also be able to be turned toward targets approaching Earth – just in case!!! So too, should the missiles (see the series/movies ‘Stargate’, ‘UFO’, ‘Deep Impact’, ‘Armageddon’ etc). Unfortunately, most humans are too self-centred to think globally. ALL major projects that required new technologies and years to complete (the Pyramids of Giza, America’s Transcontinental railroad, China’s 3-gorges Dam, Suez & Panama Canals – to name but a few) would have been still-born but for the fact that those who championed them had the courage to take that first step.
This build was hindered by the minimal contact to mount the large solar panels (DO NOT pick-up the model by the Solar Panels), the soft detailing, the need to improvise a stand, and the decals not holding-on very well. But it was enhanced by the terrific fit of the parts and the simple paint scheme. I would recommend it to even novice builders. And more 10-day quick builds? I reckon that I only succeeded in this build because of the simplicity of the kit and the paint scheme.
28 November 2024
Copyright ModelingMadness.com. All rights reserved. No reproduction in part or in whole without express permission from the editor.
If you would like your product reviewed fairly and fairly quickly, please contact the editor or see other details in the Note to Contributors.