Geobrand 1/48 Vanguard Rocket
|
KIT #: |
1202 |
|
PRICE: |
$2.50 in 1958
|
|
DECALS: |
One option |
|
REVIEWER: |
Christopher Campbell |
|
NOTES: |
An awesome blast from the past! |
It should be no secret to anyone that on October
4, 1957 the Soviet Union stunned the world by placing the first artificial
satellite, Sputnik I in orbit. In the United States this caused something of
a panic and a desperate acceleration of extant programs to put something in
orbit as quickly as possible. To be fair, despite what has often been a
public impression to the contrary, there were already three U.S. projects to
potentially launch a satellite already in the works, dating back as far as
1955. The shock of Sputnik merely kicked these
 The
army had been working on what would ultimately be the very successful
Explorer I. The Navy had their hand in two programs. One was the NOTS-EV-1
Pilot program, design to launch a satellite from an aircraft (A Douglas F4D
Skyray in practice) or potentially be fired as an anti-satellite weapon.
While tests of this system never went orbital, in 1958, one may have at
least skipped along the top of the atmosphere for a time, as a weak signal
was detected in New Zealand, quite a long way from China Lake.
The
army had been working on what would ultimately be the very successful
Explorer I. The Navy had their hand in two programs. One was the NOTS-EV-1
Pilot program, design to launch a satellite from an aircraft (A Douglas F4D
Skyray in practice) or potentially be fired as an anti-satellite weapon.
While tests of this system never went orbital, in 1958, one may have at
least skipped along the top of the atmosphere for a time, as a weak signal
was detected in New Zealand, quite a long way from China Lake.
The other was the Vanguard program, which
initially suffered one of the most dramatic televised launch failures in
history when the engine failed after two seconds and the launch stack
collapsed in a spectacular explosion on Dec. 6, 1957. Ironically, the
satellite payload itself was virtually undamaged aside from some essentially
cosmetic wear and tear and began to transmit. The somewhat battered relic
resides in the National Air and Space Museum.
The second launch attempt on Feb. 5, 1958 fare
only a little better. The launch appeared to be perfect at the start.
However, at fifty-five seconds into the launch, the booster broke up in only
slightly less spectacular fashion, though this time at night, but also
televised. Explorer I had already stolen any thunder that the Vanguard might
have captured at this point, though, having been launched successfully four
days earlier with an actual scientific package on board that would
ultimately discover the Van Allen radiation belts. Vanguard, by contrast,
was in essence and American Sputnik, only sending a simple radio telemetry
signal that allowed it to be tracked in orbit.
Finally, on Mar. 17, 1958, a Vanguard was finally
launched successfully and an essentially perfect launch. The satellite
entered the highest orbit yet achieved at 2,466 miles where it remains
today. Its orbital insertion was so perfect that it was initially estimated
that it could remain in orbit for two millennia or longer. However, this was
before there was an understanding of the effects of solar wind and
micrometeoroid impacts that would ultimately degrade its orbit. Still, it is
expected to remain where it is for at least another two centuries.
Despite being overshadowed by Explorer I and the
Sputniks, Vanguard provided some important scientific data. Being the first
satellite equipped with solar cells in six small boxes on the exterior, it
continued to operate for six years after its onboard batteries had been
exhausted. It provided important data about atmospheric density and the fact
that the true shape of the Earth, being somewhat flattened at the South
polar region. Even once it went silent in 1964, it continued to be tracked
even today, as previously noted providing data on solar wind and long-term
orbital degradation. It is the oldest manmade object in orbit.
The Vanguard program was transferred to NASA in
1958 and there were two more successful launches. Unfortunately, there were
also six more launch failures, for a total of eight. Still, rocket and
satellite launches had a sharp learning curve in those days. There were
plenty of failures on both sides in those days and would be for a number of
years. While largely overshadowed and forgotten other programs, Vanguard’s
astounding longevity speaks volumes compared to the other satellites of the
day.
Practically as soon as the first Vanguard crashed into
a smoldering pile of junk at Cape Canaveral, an almost forgotten company called
Geobra went to work on a very ambitious model of the booster complete with
interior details and satellite. Geobra would only produce a handful of kits
before rebranding themselves as Playmobile and concentrating on actual toys.
However, what they produced at the time was quite impressive and it hit the
shelves in 1958.
This particular kit was one of three in stock in the
toy and model department at Kellog’s Western Auto store in Florence, Alabama in
1958. My uncle, Richard Cobb, who today has one of the most impressive and
extensive collections of Spitfires in myriad variants and paint schemes, was
around ten years old at the time and bought one of them for what was then a very
expensive $2.50. (Hawk 1/72 kits were fifty cents and most Airfix and Revell
kits less than a dollar)
His teacher had brought a black and white television
into the classroom where he had seen the quite memorably unsuccessful launch. It
went without saying that he wanted the model. My uncle built it with the hull
carefully hinged with Scotch tape so that he could swing it open to display the
internal components. He took it to school one day and gave a class lecture on
the Vanguard and rocketry. Ultimately, though, what became of that one is what
became of most models young boys buy: built, played with, eventually broken,
discarded, and largely forgotten.
 Flash
forward nearly forty years more or less and that same Western Auto store was
having a going out of business sale. My uncle no longer lived in Florence at
this point, but happened to be there one day and stopped by out of curiosity. A
friend of his was the manager and he asked him there was any old stock around.
They went to the attic and one of the Geobra Vanguard kits was there along with
a number of bagged small scale monogram missiles with the header tags still
marked fifty cents.
Flash
forward nearly forty years more or less and that same Western Auto store was
having a going out of business sale. My uncle no longer lived in Florence at
this point, but happened to be there one day and stopped by out of curiosity. A
friend of his was the manager and he asked him there was any old stock around.
They went to the attic and one of the Geobra Vanguard kits was there along with
a number of bagged small scale monogram missiles with the header tags still
marked fifty cents.
This was by then, and still is one of the rarest kits
out there. In nearly fifty years of modeling, this is the only one and the only
Geobra kit that I have ever beheld in person. Needless to say, he bought it and
everything for a total of $5.00. Like many of us do if we can when we reach a
certain age, he was buying his childhood back. (My wife still does not quite
comprehend my collection of C.B. Colby, Erik Bergaust, and Roy A. Gallant books
like those that I used to check out of the library, though recognizes that it
has some sort of significance for me.)
Sometime around 2007 or so, I was visiting him at his
home in Tuscaloosa and he gifted it to me with the specific provision that
rarity aside, I build it. While I mainly build aircraft models, I have always
loved rockets, missiles, and real spacecraft. This was before Mach2 had released
their Vanguard kit any other kits of this booster were equally long out of
production, so that was a no-brainer.
The kit has been noted in various sources as being
both 1/48 and 1/50 scale. I did not try and scale it out for exact scale, so I
will simply say, yes. For its day, it was an amazingly advanced kit, with a full
set of internal components and was originally designed so that the stages could
be removed individually as well as removing half of the hull to display it in
all of its glory. It was molded in silvery plastic that had aged remarkably
well, overall.
There was a decal sheet that was long rendered
useless, having grown very dry and cracked. This was irrelevant, though, as the
U.S. Navy markings and the futuristic shield insignia are utterly spurious. The
actual booster carried no such markings.
It came with a very nicely detailed, multipage
instruction sheet with instructions principally in German, though with some
parts in multilingual translation. Full parts for the rocket, internal tankage,
fuel lines, electronic components, rocket engines, and a somewhat offscale
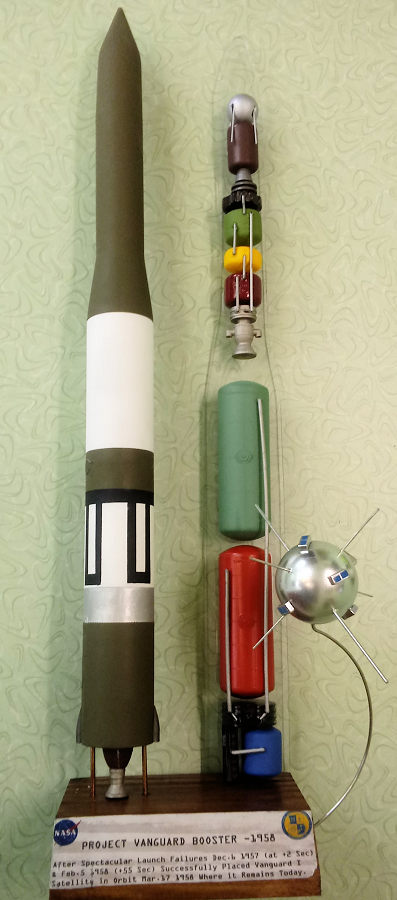
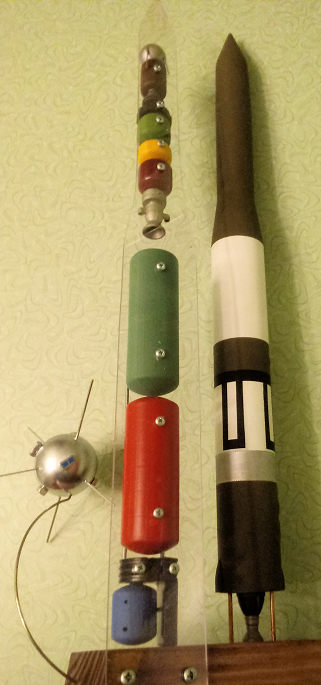
satellite and ground crew are included along with a stylized display stand
designed to display the rocket at an oddly canted angle.
A year after this kit was initially released, the
molds were either acquired or copied (Most likely acquired) by Plamer Plastics
who re-released it. Renewal then acquired and released the kit in 1960. What
happened to it after that is something of a mystery, as it does not seem have
seen the light of day since this last release. Scalemates has listed both of
these releases as being 1/48. However, they also note the Geobra V-2 (also with
detailed interior) as 1/50. Your guess is a good as mine. Ultimately, I call it
close enough.
For the era in which this kit was released, it is a
phenomenal model. If Atlantis or Round 2 or some other company has these molds
today, it would be great to see it released again. Based on my experience with
Mach 2 kits, including some of their rockets, I would say that despite its age,
in many ways it is probably the superior kit.
It was not until 2019 that I actually got around to
starting it, though. Thus begins the story of the build.
My uncle had wanted me to build this up as I had my
Glencoe 1/6 Explorer I satellite, with the full interior built and detailed and
able to be displayed if one opened the front half of the rocket hull sections.
Alas, this was not to be.
I soon discovered that over the long years of storage
in what was probably less than ideal conditions (Just look at the box!) the
rocket parts had warped slightly. It was still quite buildable, but a model that
could be taken apart in its stages and the internal tanks and plumbing shown off
was now off the table so far as any practicality could be taken into
consideration. I wanted to build it so that it looked like it would all primed
and ready to launch or explode.
However, when talking about it to my Uncle Richard, he
suggested a couple of ways to build up and show off the tanks and plumbing.
Eventually I came up with my own variation based on his suggestions. However,
first I needed to finish the rocket.
Most of the parts went together with little trouble.
While some plastic becomes quite brittle with age, this was much less brittle
than I was expecting and I virtually no problems with parts cracking or
breaking. There was some filling needed, mainly due to the mild warpage of some
of the parts. This was accomplished using gap filling CA glue. The fit of all
parts was quite positive and there were nice alignment points for assembling the
stages, as these had been designed to be detachable and then “lock” back in
place. It sounds toy like, and it is to a degree. It was also quite ambitious
for the level of model making back in 1958.
 I used the
as attachment points and filled and sanded the tabs that were not there on the
real rocket. The build was going very quickly and I had the kit mostly assembled
and sanded and nearly ready to paint in just a couple of three hour sessions,
part of which was spent on other models while glue set and dried. (One of these
was the 1/30 Ogonek Soyuz model that I reviewed previously.)
I used the
as attachment points and filled and sanded the tabs that were not there on the
real rocket. The build was going very quickly and I had the kit mostly assembled
and sanded and nearly ready to paint in just a couple of three hour sessions,
part of which was spent on other models while glue set and dried. (One of these
was the 1/30 Ogonek Soyuz model that I reviewed previously.)
Painting was mostly simple. While the kit originally
provided decals for the black stripe pattern, as noted, these were now quite
useless. This, I painted the section where these would be first in Tamiya Flat
Black. Once it was dry, I masked off the stripe pattern and painted the white
sections in Tamiya Flat White. With that done and dried, the wit areas were
masked off and the remainder painted in Testors Model Master Olive Drab.
Once this was complete and everything unmasked, I
assembled the engine bell and painted it in Testors Model Master Anodonic Grey.
I was about to install this when I realized that it was going to be rather top
heavy and needed some weight in the bottom. I solved this by pouring in some #10
birdshot until the bottom of the rocket was about and inch deep in it inside.
Then I poured in a hefty dollop of Elmer’s School Glue and glued the engine bell
in place with CA glue, sitting it upright so that the glue would settle and hold
the shot in place. It worked perfectly, though I did have to leave it sitting
for about a day for it to dry and cure fully inside.
Once this was done, I drybushed some of the surface
details with more Anodonic Grey. Then a sealed it in Testors rattle can Dullcote.
The rocket was done, but that was the easy part.
I puzzled over a number of ideas on how I was going to
display it. I toyed with the idea of scrathbuilding a launch gantry and pad. I
even did some work on this, but it was going to be a longer haul project than I
wanted to engage in at that moment. I was also more interested in figuring out
how to display the innards of the beast.
Uncle Richard had suggested drawing a silhouette on a
painted piece of wood and mounting the tanks, pipes and so on to it. That
ultimately evolved into using outlining the rocket on a piece of Lexan sheet and
cutting out the silhouette upon which I would mount these parts.
I wanted to have fun with this part, and I did. I
assembled all of the tanks and other parts, which again went together with only
some simple filling and sanding. I then decided that I would paint the tanks in
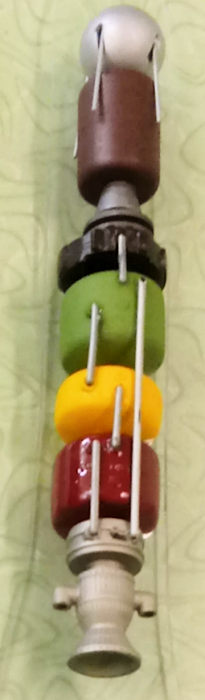
a similar manner to how they were often illustrated in books of the day on
rockets and missiles. The fuel was in some shade of red. Oxidizers were in blue
or green. The helium tank used to purge lines and tanks was painted yellow.
Other components were painted in black and highlighted in Anodonic Grey, while
the pipes were painted in Testors Steel. The satellite was painted in Testors
Aluminum.
Once all of the components thoroughly dry, I glued
them up in their correct positions as their own individual stage assemblies. Now
came the very tricky part, attaching them to the Lexan rocket silhouette. I
thought of a number of ways to do this, ultimately settling on small Phillips
head screws.
I marked off where these should be with small x’s on
the Lexan and drilled them out. Then I held the subassemblies in place and
marked the spot where each one would need to go. Then I drilled out each hole
using a bit clamped in a pinvise. Fingers crossed, I very carefully and
gradually screwed them all in place and it worked perfectly on the first
attempt.
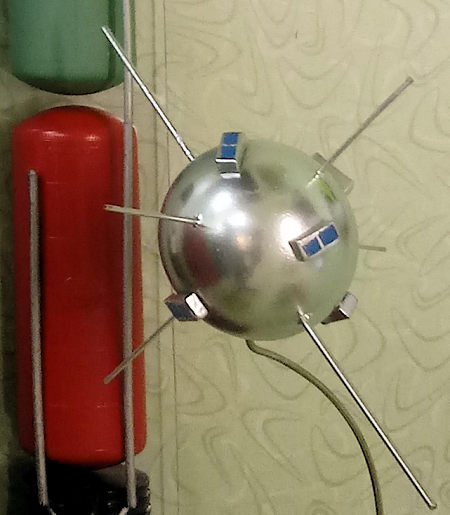
I then built a base out of a large chunk of yellow
pine, stained and varnished it. While this was drying, I decided to add a little
something and made what is approximately a 1/7 scale Vanguard satellite using a
ping pong ball that I drilled out and fitted with antenna made from brass tube.
The six solar cell banks were made from some plastic bits from the spares box.
The areas representing the solar cells were painted in Testors Gloss Blue. Once
that was thoroughly dry, I masked off the twelve individual panels and painted
the whole thing in Rust-Oleum Metallic Finish Chrome.
 Once my base
had dried, I made a decal from the front on my computer printer with details on
the Vanguard and a NASA Vector emblem as well as the Naval Test Center emblem.
This curled slightly at one corner. I had made two, suspecting that I might have
a problem with it. I was inclined to be satisfied with what I had. I was less
than confident that another attempt was going to go quite this well, as the thin
film was inclined to roll and curl on a piece this large.
Once my base
had dried, I made a decal from the front on my computer printer with details on
the Vanguard and a NASA Vector emblem as well as the Naval Test Center emblem.
This curled slightly at one corner. I had made two, suspecting that I might have
a problem with it. I was inclined to be satisfied with what I had. I was less
than confident that another attempt was going to go quite this well, as the thin
film was inclined to roll and curl on a piece this large.
When cutting out and sanding the Lexan piece to shape,
I had drilled and countersunk two holes at the bottom so that I could mount it
to the back of the base and detach it easily so that I could carry it to shows
and display it. A hole was drilled in the side of the base for a curved wire
stand (also removable) that would allow me to hang the 1/7 Vanguard a jaunty
angle across the front. Finally, two pieces of 2mm bronze brazing rod was cut
into 1” sections and placed in two holes on the left side of the base. These fit
into two holes drilled into the bottom of the rocket on either side of the
engine bell and would allow me to remove the rocket from the base as needed for
“travel” as it were.
This was a surprising easy build overall. I has
expected brittle plastic that would shatter if I breathed on it too hard. I was
also anticipating fit problems, of which there were very little. I suspect that
as a new kit in the late 1950’s that it practically fit together like a dream.
It actually was an easier build than the Mach2 Thor IRBM that I built a few
years back that had fraction of the parts, but was molded in plastic that
managed to be both soft and brittle at the same time, cracking in three places
that were not seams before I ever got around to painting it.
Given its rarity and that there are now other options
currently available, I would not generally recommend building one of these gems.
Still, it was a LOT of fun to take a walk back in time and build it. I am glad
that my uncle found this and gifted it to me with this proviso. He and I were
both happy to see it built up. (To paraphrase the voice of the late Leonard
Nimoy emanating from a Mego Mr. Spock action figure encouraging Sheldon from Big
Bang Theory to play with a rare, vintage Star Trek transporter toy: “It was
meant to be built.”) While it may not win any awards, it is definitely an
attention getting piece. It now occupies a place of honor next to my Glencoe
Jupiter C and Explorer I models in the Cold War-Space Age themed room in my
house known as the Atomic Lounge.
I would not recommend building a collectors piece in
the box. However, if you are fortunate enough to encounter an old build up that
can be reworked or somebody selling one in a Ziplock and you love things from
the dawn of the Space Age as I do, give it try. I think you will find it
rewarding.
Wikipedia:
https://en.wikipedia.org/wiki/Vanguard_(rocket)
Wikipedia:
https://en.wikipedia.org/wiki/Vanguard_TV-3
Wikipedia:
https://en.wikipedia.org/wiki/Vanguard_1
http://www.astronautix.com/v/vanguard.html
Project Vanguard: The
Story of Project Vanguard as Told by Its Head of Propulsion by Kurt R. Stehling,
Doubleday Books, 1961
Christopher Campbell
6 May 2022Copyright ModelingMadness.com.
All rights reserved. No reproduction in part or in whole without express
permission.
If you would like your product reviewed fairly and
fairly quickly, please
contact
the editor or see other details in the
Note to
Contributors.
Back to the Main Page
Back to the Review
Index Page
Back to the Previews Index Page