| KIT #: | 44.98 |
| PRICE: | Originally $20-30.00, now collector's prices |
| DECALS: | None |
| REVIEWER: | Christopher Campbell |
| NOTES: | Use the force, trust your feelings |
| HISTORY |
The Soviet Union hit the ground running in the Space Race first with Sputnik in 1957 and then with the first manned space launch of Yuri Gagarin in the Vostok spacecraft in 1961. The United States often seemed to be playing catch up in the early days, as they set duration records, launched the first woman in space, conducted the first spacewalk, and launched the first spacecraft with a three person crew.
All of this was building towards the development of what was to be their workhorse spacecraft, and in many ways, that to the world, the Soyuz capsule. Work began with a design proposal in 1960 that by 1963 had condensed into a design for what was essentially the same spacecraft that is still in service today, ferrying crews to the International Space Station.
The Soyuz featured a somewhat revolutionary design of a
service module, command/reentry module, and a forward orbital module with a (for
what it is) a somewhat spacious working area and docking ring with
 airlock.
While the Apollo spacecraft was just a revolutionary and exceptionally designed,
it did not have this last dedicated module, and to date only derivative designs
of the Soyuz and the Space Shuttle have featured special crew work areas.
airlock.
While the Apollo spacecraft was just a revolutionary and exceptionally designed,
it did not have this last dedicated module, and to date only derivative designs
of the Soyuz and the Space Shuttle have featured special crew work areas.
Soyuz made an unmanned test flight in 1966 followed by a manned flight crewed by veteran cosmonaut Vladimir Komarov in April of 1967. This flight was destined to be nothing short of a disaster. Much like the Apollo I spacecraft which was revealed to have numerous flaws that resulted in the deaths of astronauts Gus Grissom, Ed White, and Roger Chaffee in a now infamous ground test capsule fire, the first manned Soyuz proved to be quite severely imperfect as well.
There is still something of a veil of secrecy about this first mission, as one can find multiple accounts of what exactly happened. Some sources indicate that it suffered only a parachute failure. Other sources indicate that once in space, the capsule was crippled by solar panels that failed to deploy completely, resulting in minimal electrical power and forcing Komarov to shut down all but the most essential systems. His radio communications were limited by a critical lack of power and ultimately the decision was made to bring the spacecraft down early.
Reentry was normal and the spacecraft was on target for its landing site. However, when the parachute deployed it either failed to open or the parachute cords became tangled, resulting in the capsule coming in like a manned meteor. Komarov was killed on impact. A full state funeral was held for him with his mutilated remains being rather vulgarly displayed in an open coffin, presumably to honor his sacrifice.
Just like Apollo, the Soyuz went under the microscope as it were to analyze what had gone wrong. There were numerous improvements to the design, including the incorporation of redundant parachutes to insure that such a recurrence was a virtual impossibility.
 The result was a spacecraft that has been the backbone of the
Soviet and now Russian space programs for fifty years and counting. It has been
utilized in both two and three seat variants, though the latter has now been
discarded for safety after the programs only other fatalities in 1971 when the
Soyuz 11 capsule depressurized during reentry.
The result was a spacecraft that has been the backbone of the
Soviet and now Russian space programs for fifty years and counting. It has been
utilized in both two and three seat variants, though the latter has now been
discarded for safety after the programs only other fatalities in 1971 when the
Soyuz 11 capsule depressurized during reentry.
In this three seat configuration, there was not room for three cosmonauts to wear bulky pressure suits. When a pressure equalization valve failed during reentry, the atmosphere was vented at over 500,000 feet altitude. The crew, who were in simple flight suits, was asphyxiated, possibly before they even became aware of what was happening. After this, all Soyuz spacecraft would fly with a two seat configuration and all cosmonauts would return in full pressure suits to avoid any subsequent accidents of this type.
The spacecraft has since flown with a nearly spotless record. There have been three launch failures. In two cases, booster failure resulted in the escape tower rocket having to be employed to pull the capsule away so that the parachutes could be deployed, once in 1975 and again in 2018. The worst injury incurred in either of these incidents was a dislocated shoulder to one of the cosmonauts in the first incident. There was also a launchpad fire that resulted in the destruction of the booster when the escape tower was also employed and the crew again made a safe egress in 1983.
Soyuz capsule have been through four generations of design and multiple sub-variations of each. It has also been developed into the Progress unmanned cargo vessel, the Zond lunar spacecraft, that successfully orbited the moon umanned in 1969, has served as a lifeboat for the Mir Space Station and the current International Space Station, and was clearly the basis for current Chinese Shenzhou spacecraft. At present it is the only manned spacecraft ferrying crews to the International Space Station from all participating countries. With a design upgrade in 2016, it shows no signs of being retired anytime soon.
| THE KIT |
 Released by the obscure Soviet model company Ogonek sometime
in the 1970’s, this kit represents a first generation Soyuz spacecraft, with
docking collar and airlock. It was issued in a very soft box with dark blue box
with a color drawing of the Soyuz craft on the top and a Cyrillic writing on the
box ends. The instructions show an exploded view of the model spacecraft with
each part numbered and illustrated on one side. The other has a brief, dated
overview of the Soyuz in Russian and each numbered part listed and the Russian
description and number of each part given. There is no instruction as to what
order the parts are to be assembled in, so it could be very easy to make a
mistake and complicate the assembly, even for an experienced modeler.
Released by the obscure Soviet model company Ogonek sometime
in the 1970’s, this kit represents a first generation Soyuz spacecraft, with
docking collar and airlock. It was issued in a very soft box with dark blue box
with a color drawing of the Soyuz craft on the top and a Cyrillic writing on the
box ends. The instructions show an exploded view of the model spacecraft with
each part numbered and illustrated on one side. The other has a brief, dated
overview of the Soyuz in Russian and each numbered part listed and the Russian
description and number of each part given. There is no instruction as to what
order the parts are to be assembled in, so it could be very easy to make a
mistake and complicate the assembly, even for an experienced modeler.
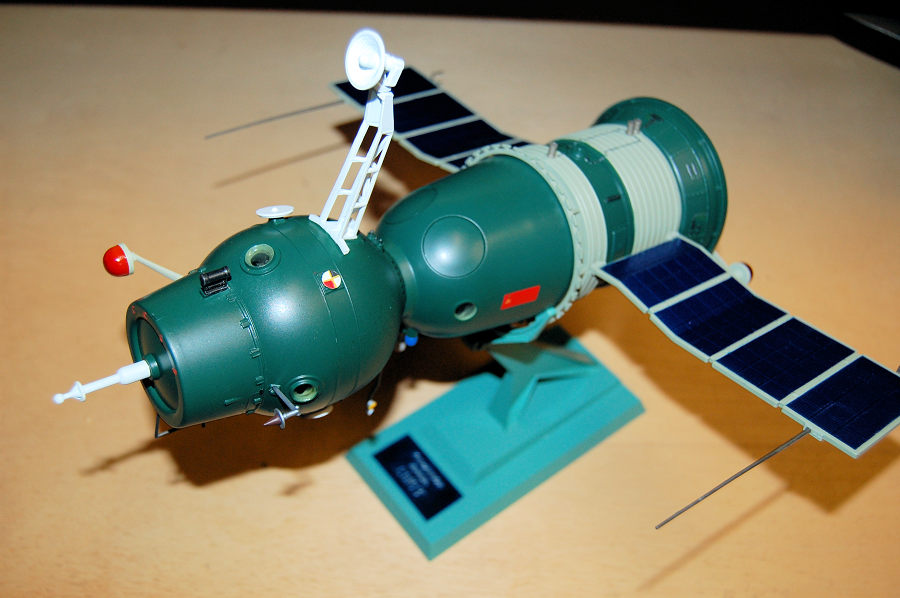
The parts are nicely molded in soft grey plastic with a minimum of flash and mold marks and what panel lines that exist raised and well done. The only mold marks of any consequence are some disc shaped ones on the bottoms of the solar panels. Overall, it is a very nice looking kit, if a bit oddly presented and in mediocre packaging. In 1/30 scale it builds up into a model around the size of a 1/32 Spitfire, so it is visually impressive. It comes with a display stand that attaches quite securely to the model and makes it very stable if a little weight is added to the base.
| CONSTRUCTION |
In the case of this build, painting steps will be included with the build steps, as almost every part of the model was painted before final assembly due to the odd nature of the construction. As noted, there are no real assembly instructions. One needs some intuitive knowledge of model building and plain old gut instinct to build this one. If one wants to build it into a later Soyuz variant, it would no doubt be possible, but this would require some considerable modifications and scratchbuilding. As I say, without any order of assembly, this model requires some experience to know what order to build things in. I joke about trust your feelings, use the force, but it is largely applicable here.
I first came by one of these kits from a Polish penpal whom I exchanged model kits with around 1990. I eventually traded it to someone for something and did not see another one for over a decade when I spotted one at my home IPMS show in Huntsville in 2006 or 2007. I bought it immediately for $40 and was pleased to find that it also came with a bagged 1/25 Veb Vostok spacecraft as well. Still, it sat in the stash for more than a decade. (We all know how that can be.) In the winter of 2019, I brought it out and went to work on it in earnest.
 While in an aircraft, one usually begins with the cockpit or
engines. I chose to start this one with the solar panels. This would be a
challenge, as I wanted to try and get something to look as much like a real
solar panel as I could. This would not be easy. Additionally, there are some
circular mold marks on the underside of the solar panels and removing them
without destroying the nice raised detail that represent the solar grid would be
almost impossible or leave it looking worse. I decided that there was really no
fixing this and left it alone. As with almost all of the parts, I found that the
only real cleanup necessary was with some scraping with an X-Acto blade and a
light buffing with some 0000 steel wool.
While in an aircraft, one usually begins with the cockpit or
engines. I chose to start this one with the solar panels. This would be a
challenge, as I wanted to try and get something to look as much like a real
solar panel as I could. This would not be easy. Additionally, there are some
circular mold marks on the underside of the solar panels and removing them
without destroying the nice raised detail that represent the solar grid would be
almost impossible or leave it looking worse. I decided that there was really no
fixing this and left it alone. As with almost all of the parts, I found that the
only real cleanup necessary was with some scraping with an X-Acto blade and a
light buffing with some 0000 steel wool.
Before I get into the painting details on this, I will also note that if you expect to use Soviet or Russian paint colors on one of these models, don’t. None of the photos that I found in books or on the internet showed anything even remotely close to standard Soviet military colors. In fact, the closest thing that I found to most of them was Tamiya W.W.II Japanese paint colors.
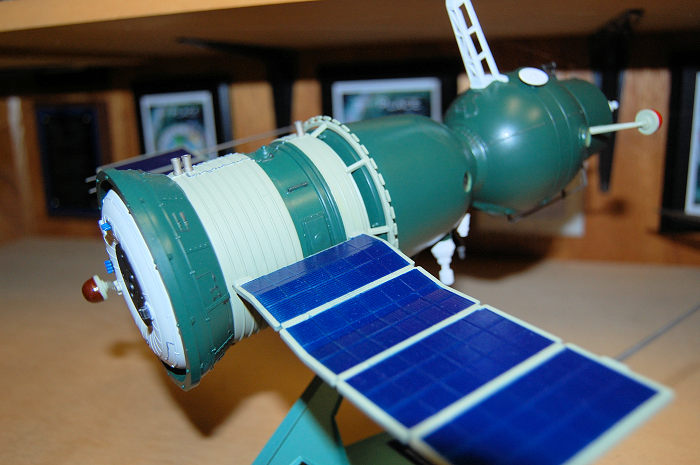
Once the minimal cleanup was done, I decided upon a course that might produce a reasonable looking solar array and went to it. I first sprayed the panels with Tamiya Metallic Blue. Once this was dry, I gave them several coats of Tamiya Clear Blue. When this was dry, I gave them a coat of Future (now Pledge with Future Shine, or just Pledge, depending on how old your bottle is.) I had hoped that this would produce the glossiness that I desired, but once it had dried, I was still unsatisfied. Finally, after I decided that it had cured for long enough, I gave it several coats of Testors rattle can Gloss and got the results I was hoping for. This was set aside to cure and I began construction of the re-entry module.
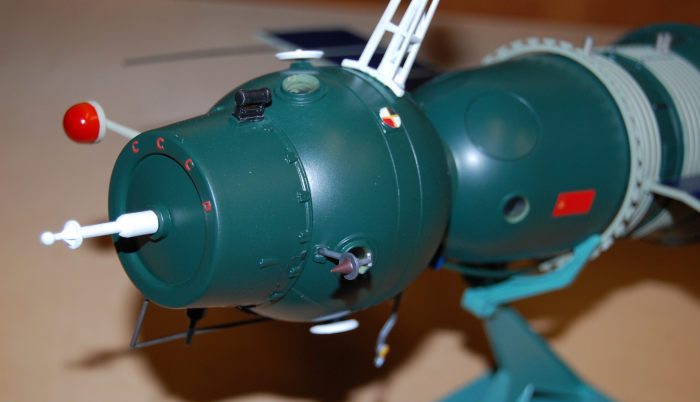
This is the only part of the kit that has any interior to speak of and there is not much of that. It does have two very large clear discs that one can view the cosmonaut figures through. However, these are, in reality, the parachute housing covers and not real windows, which are in actuality small portholes in the sides of the capsule. I wanted mine to look real, so these would be painted as the real spacecraft. I went ahead and painted the interior of the spacecraft in a color that generally matched the photos of the interior that I found on the internet. In this case I used Tamiya IJN cockpit green and painted the instrument panel in Testors square bottle Flat Grey, which despite being a somewhat amateurish paint by some standards, matches a lot of colors. I painted the faces of the gauges white with accents picked out by dry brushing black and using some red for highlights. The 3D globe found on old Soviet Spacecraft instruments panels was painted in Humbrol Matt Blue #89 and the latitude and longitude lines accented by dry brushing in silver.
The seats were painted in the same Testors Flat Grey with the headrests in Testors Flat Back. The Cosmonaut fugures themselves had their space suits painted in Tamiya Flat White with the stripes seen on most painted in Testors Cobalt Blue and small Soviet flags painted on the shoulder of their suits in Flat Red. Their faces were painted and detailed in the appropriate flesht ones and I gave one of them black hair and a mustache and the other one more sandy blonde. Since their heads are covered in helmets, the only clue to this is their eyebrows. Then everything was glued it place and the module glued together. Unfortunately, virtually none of this will be visible through the tiny portholes. Still, the parts fit together well with a minimum of filling and sanding.
 I then began to assemble the service module. The kit is made
to attach the solar array during this assembly, but I recommend not doing this.
To avoid doing this, I modified the tabs on the solar panels so that they could
be inserted after assembly. The module itself went together with few problems.
There are numerous raised ribs that required a small amount of filling with CA
glue at the seam, but overall went together and cleaned quite easily, with much
less work than I would have expected. As a note, I used CA glue throughout the
build, mostly the medium type for its filling quality and hold strength with
some thin used to fill some small imperfections or attach small parts.
I then began to assemble the service module. The kit is made
to attach the solar array during this assembly, but I recommend not doing this.
To avoid doing this, I modified the tabs on the solar panels so that they could
be inserted after assembly. The module itself went together with few problems.
There are numerous raised ribs that required a small amount of filling with CA
glue at the seam, but overall went together and cleaned quite easily, with much
less work than I would have expected. As a note, I used CA glue throughout the
build, mostly the medium type for its filling quality and hold strength with
some thin used to fill some small imperfections or attach small parts.
At this point I painted the service module in two colors. The green that seemed to most closely match early Soyuz photos was Tamiya Dark Green 2. The grey green in the ribbed section was painted in Tamiya Japanese Army Grey, which again, seemed to be the best match. At this point, I masked off the solar panels in Tamiya yellow tape and painted the framing of the solar array in the same Japanese Army Grey. The reentry module section was also painted in Tamiya Dark Green 2 and set aside to dry.
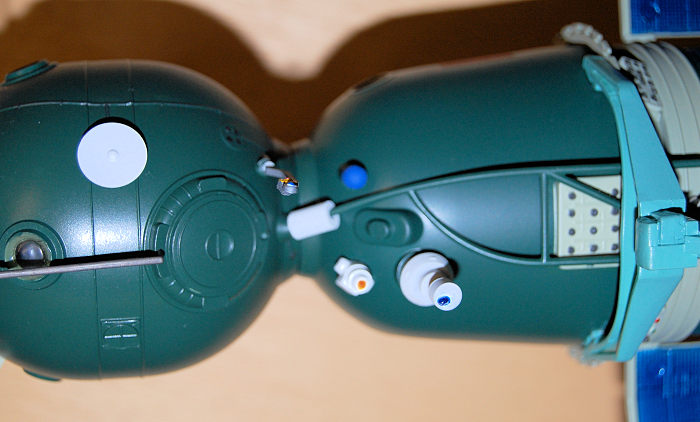
The only part that required any flash cleanup of any note was the ring between the Service and Reentry modules. This required a lot of careful scraping with a #11 X-Acto knife to cleanup mold lines and some flash. Once done, I painted it in the same Japanese Army Grey and sat it aside, turning my attention to the Orbital Module.
This was also a quite easy assembly. I painted it in the same interior green, though; again, virtually nothing can be seen through the portholes. The assembly was simple and the filling required minimal. The docking collar was attached and again, everything was painted in Tamiya Dark Green #2.
Lastly, I turned my attention to the aft Service Module ring with its thruster section. The aftermost portion, part #1 was painted in Tamiya Flat white and the flanged ring was painted in the same Tamiya Dark Green 2. The thruster nozzles were painted flat black and some details were picked out in Testors Cobalt Blue and Testors Graphite Black Metallic. These two parts were then glued together and fit perfectly.
Now with all of the subassemblies completed and painted I set
about fitting them together. I had only the slightest problem with service and
reentry module alignment. Everything else fit flawlessly. It should be noted,
t hat throughout this build, I had rather judiciously test-fitted everything at
almost every stage multiple times. However, there were rarely any fit problems
of any note. This sounds rather amazing for a Soviet kit of this era, but it is
true.
hat throughout this build, I had rather judiciously test-fitted everything at
almost every stage multiple times. However, there were rarely any fit problems
of any note. This sounds rather amazing for a Soviet kit of this era, but it is
true.
The modifications that I had previously made to the solar array allowed me to simply slip it into place and secure it with a drop of medium CA glue with a minimum of fuss. This is really the only change that I would suggest making to the intended assembly. It will unquestionably make things easier.
Now I had the basic assembly and painting complete. I gave it a coat of Testors rattle can Semi-Gloss clear coat and set it aside to dry. While this was curing, I turned my attention to the kit stand. This is a simple, stand that holds the model quite securely and displays it at a nice angle. It only requires a minimum of work to assemble, but needs a little cleanup.
The base itself was fine, but the supports need some cleanup scrapes with an X-Acto and a little polishing with 0000 steel wool to make it presentable. I glued a flat 1 oz. fishing weight into the base with 5 minute epoxy, since I wanted to make certain that it was stable. Once this was done, I glued it together and sprayed it with Testors Model Master Soviet Interior Blue-Green. Naturally, once could paint it any color, but I thought that this made a nice choice and added splash to an otherwise somewhat drab spacecraft.
The stand has a nameplate in Cyrillic, which I masked off and painted with Tamiya Metallic Blue. After this had dried thoroughly, I unmasked it and dry brushed the lettering in silver. Then this was also given a coat of Testors Semi Gloss Clear Coat.
Now comes the only really tricky part of the assembly. Examining the model, I decided that it would be best to attach it to the stand now rather than after the myriad of tiny fiddly parts had been added to the exterior. There are numerous antennas, sensors, periscopes, docking probes and so on. These would be far too easy to break after assembling, so I decided to fit the spacecraft to the stand first.
This turned out to be the wise choice. Getting this stand to lock into place required a little more brute force than I generally like to use on models. However, once you have it locked into place. The model is very secure. It will rock slightly fore and aft on the stand, but it is unquestionably locked in solidly, and I question if it could ever be removed without seriously damaging the model. Had I tried to do this after completing the kit, I would have unquestionably damaged and broken off some of the smaller parts.
At this point I began to paint and add all of the small detail parts. The maneuvering thrusters were solid pieces, so I glued them out with a pin vise and a small bit, flaring them slightly. Then I painted them in Tetsors Model Master Titanium and glued them into place.
 Flack black was used to accent some external wiring conduits
with both direct brushing with a fine brush and by dry brushing. The numerous
sensors and probes were painted in Testors Graphite or Tamiya Flat White, along
with other colors passed on numerous photos that I looked at on the Internet. In
truth, there are so many variations on this spacecraft, even in this early
version, I defy anyone to prove that almost anything you have reasonably done in
the finish to be inaccurate unless you are depicted a very specific spacecraft.
Flack black was used to accent some external wiring conduits
with both direct brushing with a fine brush and by dry brushing. The numerous
sensors and probes were painted in Testors Graphite or Tamiya Flat White, along
with other colors passed on numerous photos that I looked at on the Internet. In
truth, there are so many variations on this spacecraft, even in this early
version, I defy anyone to prove that almost anything you have reasonably done in
the finish to be inaccurate unless you are depicted a very specific spacecraft.
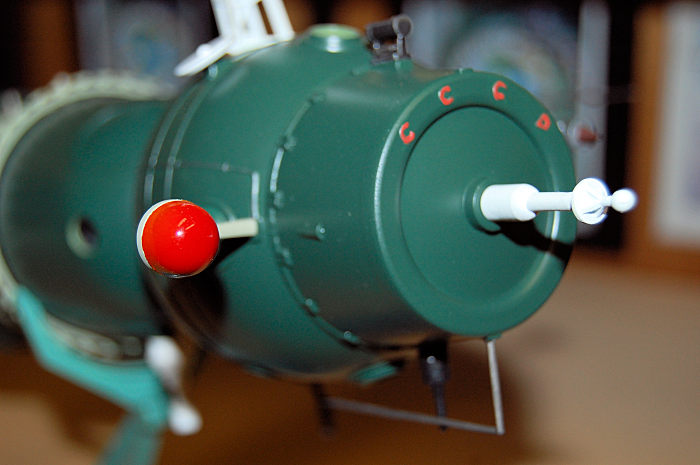
There is a raised CCCP emblem on the docking ring that I carefully painted in Soviet Marker Red. Then I applied a generic red panel decal cut to the general shape of a Soviet flag on the reentry module. To this I added a small star from another decal sheet and painted a hammer and sickle with a fine brush, since I had no Soviet flag decal.
One of the external bits is clearly a periscope which was painted Tamiya Flat White and given a blob of Tamiya Clear Blue in the appropriate location for a lens. The docking probe was also give Flat White paint and various other bits were, again, painted based on photos. A few of these smaller pieces were tricky to attach, but not exceptionally so. Overall, it was nothing that would deter or stump any experience modeler. Finally the rather large antenna array was given some cleanup and attached after being painted in the same Tamiya Flat White.
Finally, satisfied that I was essentially finished I gave it another coat of Testors rattle can Semi Gloss Clear Coat which was followed with a light spray, with care taken not to hit the solar array, of Testors rattle can Matt (Flat). Lastly, I filled all of the portholes in the Orbital and Reentry modules with Micro Kristal Clear. With that it was done and I had the only 1/30 Ogonek Soyuz that I had ever beheld with my own eyes, and I was quite pleased to have it in my collection.
| CONCLUSIONS |
This is by no means a bad kit. I spent between twenty and twenty-five hours on it. It actually goes together quite well. It is a pity that this kit is not currently available or a revised version of it. In its old, Soviet era release, as I built it, I would recommend it only for experienced modelers, mainly due to the lack of and detailed assembly instructions. However, with a proper set of instructions, any modeler of moderate skill should be able to produce a very satisfactory and display worthy model of an earlier Soyuz spacecraft. I had intended this to be one of my show pieces for upcoming model shows prior to the current Coronavirus Crisis. When shows resume, hopefully soon, it still will be.
Unfortunately, the molds for this kit do not seem to have seen the light of day since the Soviet Union collapsed. This is quite unfortunate; as I would say that this is the best Soviet indigenously produced kit that I have ever seen. It is not without its faults, but they are minimal. With a proper instruction sheet it would make a wonderful rerelease and I would recommend it for any modeler with a modicum of experience who wanted a large, eye catching Soyuz capsule for their collection. Likewise, it could be retooled to produce a later Soyuz version, should some manufacturer be so inclined.
Now, if I can summon the courage, I will tackle the Veb Vostok. A look at this one tells me that it will be more of a challenge, though far from unbuildable. And what spacecraft modeler does not want a Vostok in their collection, especially one this big? After all, this is where it all began.
| REFERENCES |
https://www.scalemates.com/search.php?fkSECTION%5B%5D=All&q=ogonek+soyuz*
https://en.wikipedia.org/wiki/Soyuz_(spacecraft)
https://en.wikipedia.org/wiki/Soyuz_1
https://en.wikipedia.org/wiki/Soyuz_11
The Encyclopedia of Soviet Spacecraft by Douglas Hart, 1987 Exeter Books, ISBN # 0-671-08932-3
The Pictorial History of World Spacecraft by Bill Yenne, 1988 Bison Books, ISBN # 0-7917-0188-3
The History of Manned Space Flight by David Baker, Ph.D., 1981 New Cavendish Books, ISBN #0-517-54377X
23 August 2020
Copyright ModelingMadness.com If you would like your product reviewed fairly and fairly quickly, please
contact
the editor or see other details in the
Note to
Contributors. Back to the Main Page
Back to the Review
Index Page
Back to the Previews Index Page