| KIT #: | 1833 |
| PRICE: | $? |
| DECALS: | options |
| REVIEWER: | Mark Hiott |
| NOTES: |
Very old molds, lots of flash |
| HISTORY |
Project
Mercury was the first spaceflight program of the
There were a
total of 20 unmanned test flights and 6 manned flights. All the manned flights
carried names that included the number "7" to show that the seven Mercury worked
as a team. The manned flight were:
May 5th, 1961:
MR-3, Alan Shepard in "Freedom 7", Redstone/Mecury
 July
21st, 1961 MR-4, Gus Grissom in "Libertybell 7", Redstone/Mercury
July
21st, 1961 MR-4, Gus Grissom in "Libertybell 7", Redstone/Mercury
(MA-5 carried a chimp named Enos to 2 orbits on November 29th, 1961)
As part of
Project Mercury, mission MA-6 was the successful attempt by NASA to place an
astronaut into orbit. The MA-6 mission made three orbits of the Earth, piloted
by astronaut John Glenn, who became the first American to orbit the Earth.
Gordon Cooper was the first American to spend over a day in space. He was also the last American Astronaut to go into space alone.
| THE KIT |
I'm
not sure when this kit was first produced, but the instructions are copyrighted
in 1962! My kit is of a much later release "All is GO!" boxing I picked up at a
swap meet around 2005.
 When
opening the box, the first thing that grabs you is the amount of flash on the
parts. The molds are obviously well used and EVERY part has flash. The molds
seams are prominent on all the parts and a lot of cleanup will be required. The
kit is molded in the silver plastic that we are all familiar with in Revell
kits. Given the fact that the molds are approaching 50 years old, the amount of
detail is amazing. The kit includes railings, stairs, water and fuel lines... it
really must have been a sight to see on the shelves of the LHS in the 60's!
When
opening the box, the first thing that grabs you is the amount of flash on the
parts. The molds are obviously well used and EVERY part has flash. The molds
seams are prominent on all the parts and a lot of cleanup will be required. The
kit is molded in the silver plastic that we are all familiar with in Revell
kits. Given the fact that the molds are approaching 50 years old, the amount of
detail is amazing. The kit includes railings, stairs, water and fuel lines... it
really must have been a sight to see on the shelves of the LHS in the 60's!
Decals are included for not only the Atlas booster, but also for all the ground
equipment and the launch base. The decals are thick and have large borders so
some trimming will be needed. Markings are included for John Glenn's Friendship
7.
The
instructions are well done and include color call-outs but do not give any paint
numbers. Some of the placement arrows are rather vague and looking at later
steps will help in determining exactly how (and where) some parts fit.
| CONSTRUCTION |
With
the amount of parts to be assembled, pay close attention to what goes where. The
instructions would have you build the Atlas first, but I left that for last and
built the base first. The basic base is made up of 9 parts and I painted them as
an assembly. It's a bit hard to do, but otherwise you would have a lot of seams
to take care of later. Several sections of railings are attached to the base in
step 8, but I left them off until after painting. The rest of the parts can be
painted and then attached to the base. You will still have a few seams to fix,
but with a lot of the parts overlaying each other, there is no other way. The
kit goes together like a
 60's
kit... a lot of test fitting and trimming will be needed in order to get the
parts to fit. All of the rails have large mold lines that will need to be
removed. The rails are the most trouble when it comes to fitting properly.
60's
kit... a lot of test fitting and trimming will be needed in order to get the
parts to fit. All of the rails have large mold lines that will need to be
removed. The rails are the most trouble when it comes to fitting properly.
I
assembled the main base section, then painted it. I then attached all the
various pipes and assorted parts, finishing it before I moved on to the next
section. Next up was the small garage section and the roadbed. I attached the
garage to the bottom of the roadbed and painted them as a whole. This section
was then attached to the main section. Take care here as to minimize damage to
the paint already on the model. After the base was dry, I added all the piping
and such that was left.
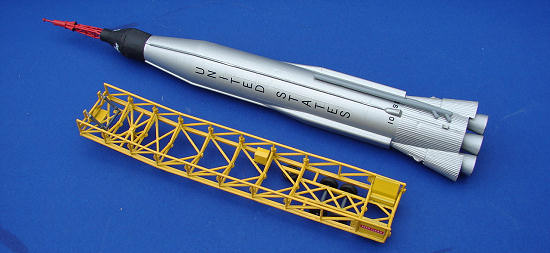
Next
I assembled the trailer for the Atlas booster and fixed all the seams. Again,
this was painted as an assembly. The Atlas booster didn't fit together to well
and I had large steps where the halves joined together.
 Take
care when assembling the booster trailer (step 6), the booster elevator assembly
(step 13) and the trailer elevator frame (step14). Some of the parts are very
small and break easily. (ask me how I know) According to the instructions, these
3 sections are suppose to fit together and allow you to elevate the booster to
launch position. I couldn't get them to fit together, so I ended up leaving the
booster trailer loose.
Take
care when assembling the booster trailer (step 6), the booster elevator assembly
(step 13) and the trailer elevator frame (step14). Some of the parts are very
small and break easily. (ask me how I know) According to the instructions, these
3 sections are suppose to fit together and allow you to elevate the booster to
launch position. I couldn't get them to fit together, so I ended up leaving the
booster trailer loose.
The
final step was to install all the rails and equipment on the roadbed. Tables,
lights, booster supports, barrels, water nozzles, fire extinguishers.... there
is a LOT of stuff the install! Again, there are the ever present mold seams to
take care of.
I
didn't use the ramp section or the trucks that come in the kit.
| COLORS & MARKINGS |
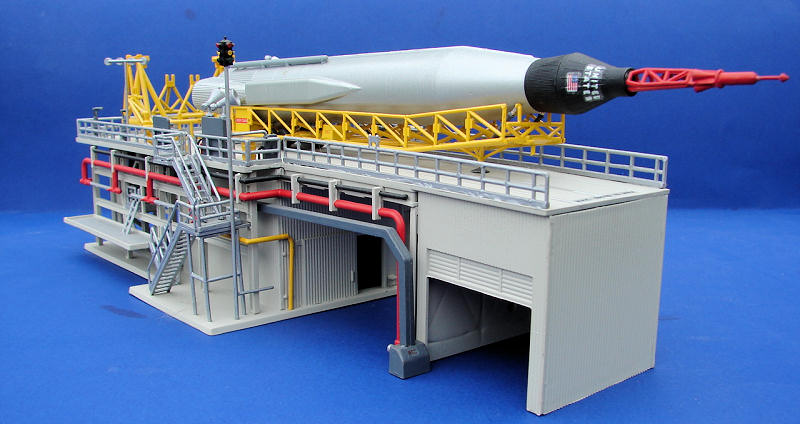
 Painting
is pretty straight forward and, for the most part, I followed the call-outs in
the instructions. The base was painted MM light gray with the various lines and
such flat red, flat yellow and flat
black. The booster trailer and elevator sections were painted gloss yellow. I
used MM aluminum on the Atlas and painted the fuel vent light gray. The Mercury
capsule was painted flat black with a red escape tower.
Painting
is pretty straight forward and, for the most part, I followed the call-outs in
the instructions. The base was painted MM light gray with the various lines and
such flat red, flat yellow and flat
black. The booster trailer and elevator sections were painted gloss yellow. I
used MM aluminum on the Atlas and painted the fuel vent light gray. The Mercury
capsule was painted flat black with a red escape tower.
The
decals are installed as you build the kit. Pay close attention to the various
steps, as they show which decals need to be installed. Some of the decals are
off register, but close trimming will make it less noticeable. I was surprised
that most of the decals went down with minimum of fuss.
| CONCLUSIONS |
A
real eye-opener when people see it. A rough kit that harkens back to the days of
our youth when we built kits in a weekend and played with them to death by the
next weekend.
This
is a kit every space nut should have in his collection. I wasn't sure how
accurate it was until I did some research, but Revell got it right... even down
to the traffic light!
| REFERENCES |
 Photos
off the net and from some friends
Photos
off the net and from some friends
Wikipedia for the history
September 2010
If you would like your product reviewed fairly and quickly, please contact me or see other details in the Note to Contributors.