Bandai 1/72 Millennium Falcon (Perfect Grade)
| KIT #: | 2375614 |
| PRICE: | $400.00 |
| DECALS: | None |
| REVIEWER: | Donald Zhou |
| NOTES: | Advantages: Well detailed, lighting kit included, It is “Perfect Grade” but….. Disadvantages: Not completely perfect. Where is R2D2? Instruction book WAAAYYY too small, Lighting kit does not extend to the headlights in the mandibles, and can only be built as Episode IV MF. Later Sequel version not included. |
| HISTORY |
Star Wars is probably the most profitable and the most popular Sci-Fi film franchise ever! Now, Star Wars is not just a great sci-fi film, but it is also very widely known for its eclectic collection of vehicles, some of which had entered sci-fi stardom. Vehicles like the X-Wing, TIE fighter, and the Star Destroyer (Imperial Star Destroyer. Colloquially known throughout the War verse as an Imp Star D). But one of the most widely known ship has to be the Corellian Engineering YT-1300 Stock Cargo Freighter….Off the thousands produced, the most famous one has to be Han Solo’s Millennium Falcon.
Supposedly won off of one Lando Calrissian on a game of Sabbac, the Falcon, dilapidated, old, and worn, “That’s the biggest hunk of junk I’ve ever seen” and look on the outside as if it has seen better days, is also the “fastest hunk of junk in the galaxy”! Solo had upgraded her throughout the years with impressive, and sometimes outright illegal military style upgrades. Her weapons are practically stolen from imperial stock, up and including her double quad laser cannon turrets and her concussion missiles, which Lando will eventually use to blow up the reactor on Death Star II. Her shielding and armor are far more powerful than practically any “stock freighter” in existence and can resist several blast from the powerful turbolasers on an Imperial Star Destroyer. However, her most unique and most powerful weapon is her hyperdrive. The most powerful and fastest in the entire galaxy, the Falcon’s hyperdrive had gotten Captain Solo out of one dangerous situation after the other. Capable of .5 beyond lightspeed, it is at least 4x faster than any standard Imperial hyperdrive allowed on a ship of this size and maybe even faster! However, the biggest fault of the entire ship is all these clashing and conflicting systems require three droid brains to pull everything together and even then, constant maintenance needs to be pulled, especially on the temperamental hyperdrive, as Solo found out to his dismay in Empire Strikes Back. Despite all of this, with two Death Stars kills ALONE, excluding many other secret and not so secret missions for the Rebellion/New Republic, the Millennium Falcon has become a symbol of hope for the Republic and the people who flew and crew her, became heroes of the Republic.
| THE KIT |
 HOOO BOOYYYY am I in the dog house!
Yeah, couldn’t resist! Despite the price tag, when I found out a seller on
Amazon was giving this away at a “cheap” tag of $320, I jumped…Without even
asking SWMBO for permission and………..Yeah, “HELLO SOFA!!!!! WE’LL BE KEEPING EACH
OTHER COMPANY FOR THE NEXT TWO WEEKS!!!!” Well, the other reason is, as with any
Bandai Perfect Grade stuff, this is limited production run….And being the Star
fans (both Trek and Wars. Sigh, so glad they don’t make too many Transformers
models…Or else I will be in even more hot water!) that I am, I had to get
it….But is it indeed “Perfect Grade”.
HOOO BOOYYYY am I in the dog house!
Yeah, couldn’t resist! Despite the price tag, when I found out a seller on
Amazon was giving this away at a “cheap” tag of $320, I jumped…Without even
asking SWMBO for permission and………..Yeah, “HELLO SOFA!!!!! WE’LL BE KEEPING EACH
OTHER COMPANY FOR THE NEXT TWO WEEKS!!!!” Well, the other reason is, as with any
Bandai Perfect Grade stuff, this is limited production run….And being the Star
fans (both Trek and Wars. Sigh, so glad they don’t make too many Transformers
models…Or else I will be in even more hot water!) that I am, I had to get
it….But is it indeed “Perfect Grade”.
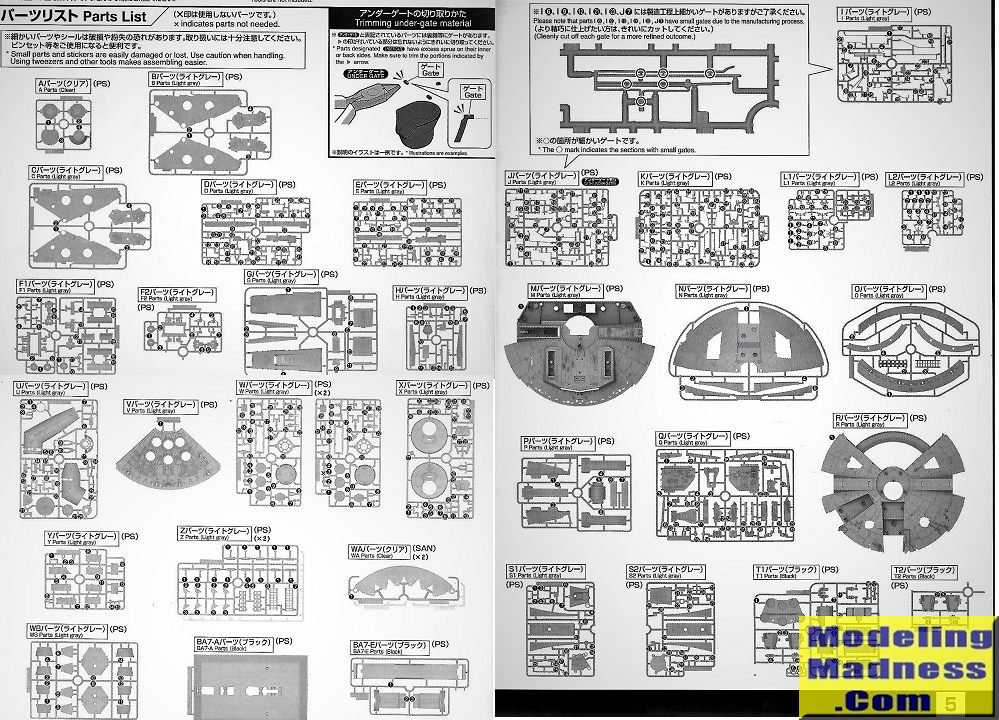
The short answer, as you are about to find out, is yes! The details on this thing is AMAZING! Yes, sigh, HOOOO LORDY LORD!!! Here we go with another model that contains over 1000 parts, looks like almost 2000 this time and all of them goes into the model itself with a lighting kit included that lights up the cockpit, engine and gear bays and even the battle damage spot on the top and bottom hull, including the turbolaser battle scar on the bottom are included. Six figures of Han Solo, his first mate Chewbacca, along with Princess Leia, Luke Skywalker, Obi-Wan Kenobi and C-3P0 are included….And right here you can tell a mistake…..Where is R2D2? C-3P0 without R2 is like a smore without the marshmallows! And also, if you look at the outfit Skywalker, Leia are wearing, you will notice this ship is Episode IV only. In fact, the rectangular radar dish for the sequels is missing so this ship can only be built as the “New Hope” version. You can’t build the Empire Strikes back since Leia’s hair is the (in)famous “honey bun bun” hair…..And Lando and crew are missing for “Return of the Jedi” (I guess you can build an Empire version if you are good enough to heavily modify Leia’s hair style and outfit).
The second mistake is the instructions. There is nothing wrong with it…The book is just simply too small….If you look at Tamiya or Trumpeter’s instruction on a kit this big, the book is at least twice as big, printed on at least A4 size paper with exploded out diagrams so you can see what’s what. On this one, with the book this small, trying to see everything is kind of haphazard. This is why all the steps contains a diagram where everything is already assembled…But even then you’ll have a hard time seeing what is what. Everything can be solved easily if the instruction book is a little bigger.
Construction begin with a test of the lighting kit. Again, here is another small mistake. Notice there is no LED harness that go to the mandible headlights. MF has four headlights on both mandible “jaws”. This is not denoted in the kit which is disappointing.
This step is just a test to see if all lighting units are working. Unplug them when done.
True construction begin with the cockpit…Which is black…Why? Much prefer it if it’s in grey so I don’t have to apply a primer coat. Everything should snap like any other Bandai kit but I’ll use cement except the figures so I can switch them around…Sigh, poor R2…..The rest concern the details on the outside cockpit tube. Some photo-etch and a lot of small parts so becareful.
The next two steps deals with the left and right mandibles, and the maintenance holes on each. Again, a lot of small parts an electrical connection lines so be extra careful snapping them off and don’t feed the carpet monster! After these are done, set them aside for later
The instructions now deals with the aft bottom plate. The main assembly is the sublight ion engine outlet. A lot of clear parts plus the exhaust grill are assembled. Might need to take the model and spray a coat of light grey onto the grill and weather them before the clear parts goes on as there is no way to tape the clear part off of the grill since it is so complex. Also, be ultra-careful with the LED engine light set here.
Two maintenance trenches are next. Followed by the boarding ramp. Again, a string of LED light goes in here followed by the two side escape pods.
Various side details are added on at this point, followed by the two mandible jaws. Then the engine LED, cockpit LED, and ramp LED light are connected to the main electrical box, where it is set onto the bottom rear hull, just in front of the engine grill. Be sure to check your LED wires at this point so they don’t get hung up or worse, gets squeezed by all the parts now on the kit!
The assembly now move to the top round hull, with various maintenance trenches, and details on there. The forward concussion missile clamp is also assembled. Followed by the cockpit tube. Again, check the wiring and make sure they don’t get hung up on something. The boarding ramp is now finished and installed.
The next part are the two quad laser turrets. Careful assembly will endure they move afterwards followed by various outside details.
Be REALLY REALLY careful with the next part. The exhaust deflectors and their hydraulic linkages and their details are next. There are A LOOOOOOOOT of them so don’t be ham fisted and feed the carpet monster! Also, be noted there are a bunch of decals that go BELOW these things so maybe a good idea to take it to the paint shop and then decal them first before assembly.
 Some final outside details are now
added next. Be sure all LED wires are on correctly and operable and then set the
battery box inside its housing.
Some final outside details are now
added next. Be sure all LED wires are on correctly and operable and then set the
battery box inside its housing.
The last outside details is the landing gears and the radar set…Might want to leave the radar until much later after all the final outside details are done, and there are a lot of them left.
The final details is the rear reactor exhaust ports rear plate. This is separate since the LED battery box is below and thus, snap tight. Again, several decals goes on here so you might want to paint and decal them first before adding the exhaust deflector plates and the details.
The ship is almost finished. The only choice left is whether to use the nice display stand to depict it in flight or on its landing pads with the boarding ramp extended.
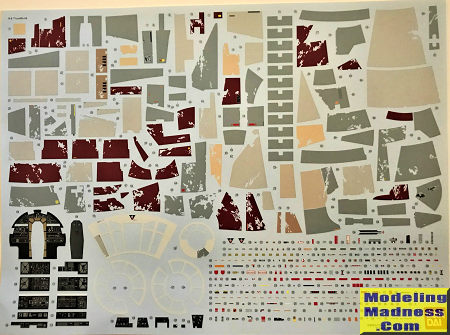
The last few pages deals with the coloring and decals. A sample of a painted and weathered ship is also provided to give you a good idea of what the ship supposed to look like.
| CONCLUSIONS |
And that is that. Is it worth the almost $400 that the kit ask for? Well yes, this kit is so detailed, it will keep you busy for years to come, what with the lighting kit included, despite the fault of the mandible head lights. Heard the news that Bandai is actually dumbing the price of this kit down by taking out the lighting unit, and sacrificing some details….And then what? The price will probably be around $250……If you can get this kit at around $320, the price I found, it is entirely worth it for the extra details and the lighting kit alone! Those worth more than the $100 savings that you can get if you wait for the “Not so Perfect Grade” of the kit when that comes out, unless it is the sequel kit though…..That may be something else entirely!
April 2018
Copyright ModelingMadness.com
If you would like your product reviewed fairly and fairly quickly, please contact the editor or see other details in the Note to Contributors.
Back to the Main Page Back to the Review Index Page Back to the Previews Index Page