Bandai SHADO Interceptor
| KIT #: | ? |
| PRICE: | $19.00 |
| DECALS: | One complete set plus options |
| REVIEWER: | George Oh |
| NOTES: | Bomb can be made to launch |
| HISTORY |
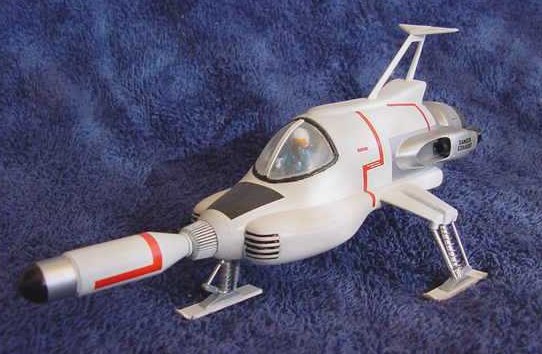
Gerry Anderson made several TV series in the 1960’s, some of which can be seen on pay-TV or on DVD. To the uneducated “Thunderbirds” is his most famous. His fans know all of his other series. My favourite was “UFO”. In this series Earth is under attack from humanoids in squat roughly-egg-shaped spinning UFO’s who come to kidnap people to harvest their organs. Earth’s secret layered defence network, known as SHADO, is based on a detector satellite, space fighters based on the moon, jet fighters launched from underwater, and tracked (armoured?) vehicles. All of the vehicles are available in various media, in various scales, and each with varying degrees of complexity. This model is of the moon-based fighter. It is armed with a single nose-mounted atomic missile. Why atomic? Apparently something to do with the lack of concussion/a shock-wave in the vacume of space.
| THE KIT |
 I think that I may have trampled a baby to secure this kit when I saw it at
a model Swap n’ Sell, because I like the TV series. It is the only model
of an Interceptor that I have seen (though I’d bet that there is a resin or
vinyl one). The kit comes in 32 crisp parts moulded in hard brittle white
plastic with one fair not-all-that-clear clear piece, a steel pin and a
spring. The metal bits and 6 of the plastic parts are for launching the
nose-mounted missile. There is also a 5-piece stand. I dumped both.
External detail is raised, wide, and easily sanded-off. From the size of
the pilot, I estimate that the model is 1/60th-sacle. The body is split
horizontally and has construction seems in weird places.
I think that I may have trampled a baby to secure this kit when I saw it at
a model Swap n’ Sell, because I like the TV series. It is the only model
of an Interceptor that I have seen (though I’d bet that there is a resin or
vinyl one). The kit comes in 32 crisp parts moulded in hard brittle white
plastic with one fair not-all-that-clear clear piece, a steel pin and a
spring. The metal bits and 6 of the plastic parts are for launching the
nose-mounted missile. There is also a 5-piece stand. I dumped both.
External detail is raised, wide, and easily sanded-off. From the size of
the pilot, I estimate that the model is 1/60th-sacle. The body is split
horizontally and has construction seems in weird places.
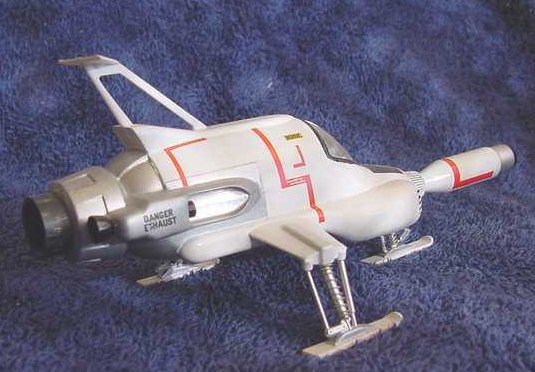
The decal sheet provides all of the red stripe markings (red tape on the studio model) and stencilling. It also provided lots that I didn’t use – they proclaimed dumb things like producer producer, asphyxiation, stop maturation, maturation noteless stop. For the rest, it would build into an Interceptor, after a bit of work. The instructions were all in Japanese(?) but judicious use of arrows ensures the modeller knows exactly where each part is to go. The language made the painting instructions pretty useless (to me) but by looking at the painting diagrams, the TV series and the box-top, I could figure-out the colours.
| CONSTRUCTION |
To my mind, there were four areas that needed attention – cockpit, missile & stand holes, legs and engines. I worked on all of these at the same time.
The cockpit needed a major rebuild. It consisted of an L-shaped plate (making the floor and back wall) into which the pilot was embedded up to his waist. I had to scratch-build a cockpit (and I stink without a script). From a co-modeller, I scrounged a 1/48-scale jet pilot. He had the required bone-dome and visor in the down position, as per the pilots in the TV series. Great – I don’t have to paint a face. The rest of him was painted as per the series – bright blue. The cockpit was built around him. The kit piece was my guide for cutting-out the back wall from plastic card.. The position of the floor was determined by the height of the pilot. His seat was the launch mechanism turned upsidedown. It was given a back (I shoulda’ padded it). The rest of the cockpit was an instrument panel, control stick, side consoles and a throttle quadrant thrown together from bits of plastic and detailed with more bits and instrument decals. How did I miss the sights!!
 The new cockpit was glued into the body’s top half, then the bottom half
was attached. Side sponsons and winglets followed. All needed lots of
Tamiya putty and careful cleaning-up because of the contours. There was a
construction seam deep inside the engine sponsons that were hard to get to
and they still ‘aint perfect – no competition winner here. The canopy was
attached and it, too needed lots of filler. This was difficult because
there was a frame on the edge of the canopy that attached to a second
semi-circular frame on the edge of the fuselage.
The new cockpit was glued into the body’s top half, then the bottom half
was attached. Side sponsons and winglets followed. All needed lots of
Tamiya putty and careful cleaning-up because of the contours. There was a
construction seam deep inside the engine sponsons that were hard to get to
and they still ‘aint perfect – no competition winner here. The canopy was
attached and it, too needed lots of filler. This was difficult because
there was a frame on the edge of the canopy that attached to a second
semi-circular frame on the edge of the fuselage.
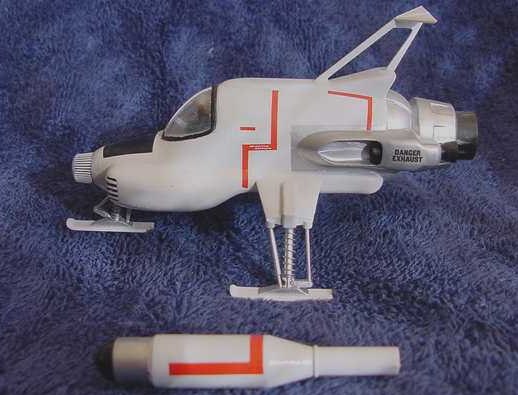
I didn’t want the missile launch system or the stand. So the holes in the nose & belly were plugged with scrap plastic (the plug was then cut & sanded flush with the surface) and filled with Tamiya putty and Mr. Surfacer 500. I had to position a large peg horizontally, under the cockpit, to hold the missile, and the missile kept its long rear shaft. This shaft slides over my added peg. The missile is merely socketed into the nose-ring of the model because it is a snug fit, and it sitting on the peg helps a lot.
The legs were moulded slightly off-centre and had springs(?) moulded on them. After lots of gentle scraping (new No. 11 blades) and sanding (flex-i-file) later, and they were reasonably round. The moulded springs were sacrificed, so I replaced them with wire, which looks better anyway. The centre strut on the nose leg broke – luckily for me. I replaced it with two bits of brass tube. Before supergluing it in place, I slipped the spring over it – easy.
The engine(s?) has 2 small intakes, 2 small exhausts and 1 large exhaust, all to be painted black. The edges of the small bits had to be thinned for realism. You could see forward through the large exhaust to the back of my cockpit backplate. To plug it, I scratch-built a turbine (just blades around a cone), stuck it on one end of a short tube, then glued the other end to the inside face of the large exhaust. The edge of the large exhaust was not thinned.
| COLORS & MARKINGS |
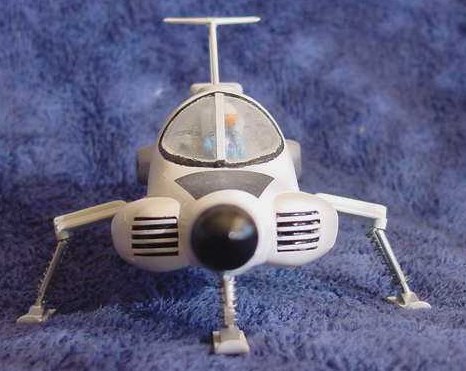 The nose ring and the two cheek grills were painted black, then the
recesses were masked with Maskol, and the pieces glued in place. I masked
the canopy with insulation tape and sprayed the model Tamiya gloss white –
about 4 times. Masking-off the areas to be sprayed silver was really
fiddly because of the tight space in the area above the winglets. But I
persisted and finally sprayed it with an automotive Chrome silver from a
cheap-shop spraycan. I cheated with the missile by spraying the silver
first – easier to mask the silver band with tape – then I did the white
body followed by the black nose.
The nose ring and the two cheek grills were painted black, then the
recesses were masked with Maskol, and the pieces glued in place. I masked
the canopy with insulation tape and sprayed the model Tamiya gloss white –
about 4 times. Masking-off the areas to be sprayed silver was really
fiddly because of the tight space in the area above the winglets. But I
persisted and finally sprayed it with an automotive Chrome silver from a
cheap-shop spraycan. I cheated with the missile by spraying the silver
first – easier to mask the silver band with tape – then I did the white
body followed by the black nose.
I brush-painted the black frame around the canopy. Now came the unmasking - and the touching-up of the paint job.
This is when I applied the markings. They went onto the glossy surfaces beautifully (considering the age of the decals). None of the dumb stencilling was applied. I didn’t even try to paint the black anti-dazzle pattern – I used a piece of decal sheet. The last pieces to be attached were the tailfin/antenna(?), the 5 engine bits and the leg/ski assemblies, and she was done. There were gaps where the tailfin /antenna(?) attached to the spine. These were filled with PVA (white) wood glue. I had to support the model on stacks of coins in order to get the sit of the undercarriage right, while the glue dried.
| CONCLUSIONS |
I’d like to place the Interceptor on a base that depicts it rising from its underground hanger to its launch position in a lunar crater. But with the missile, the Interceptor is quite long (and not correspondingly wide), so such a base would be pretty big for a relatively small model. I’ll shelve that idea for now.
This is the only available model of the Interceptor that I have seen, and while it is basic, it is a relatively easy build if you want an expendable toy. If you want a model, I can only recommend it to a builder with good basic modelling skills because of the difficult seams. I was told that this is a rare kit and that I shouldn’t have built it. Well, I don’t know about that. I built it because I wanted a SHADO UFO Interceptor, and now I have one. I just don’t have a UFO for it to blast………...not yet anyway.
September 2004
If you would like your product reviewed fairly and fairly quickly, please contact the editor or see other details in the Note to Contributors.