Revell 1/40 Nike
Hercules
| KIT #: | 00011 |
| PRICE: | $23.95 MRSP |
| DECALS: | One option |
| REVIEWER: | Dan Lee |
| NOTES: |
Reissue of
Revell 1958 Nike Hercules Kit, only 5000 units produced |
| HISTORY |
 The Nike
Hercules MIM-14 was an upgrade to the Nike
The Nike
Hercules MIM-14 was an upgrade to the Nike
Some 25000 were built
and used by various NATO countries (nuclear and conventional), Japan and
Nike Hercules is
roughly equivalent in performance to the USSR SA-5 Gammon
Nike Hercules Specs
(From Wikipedia)
Length 41 ft (12.53
m) overall 26 ft, 10 in (8.18 m) second stage
Diameter 31.5 in
(0.80 m) booster 21 in (0.53 m) second stage
Fin span 11 ft, 6
in (3.50 m) booster 6 ft 2 in (1.88 m) second stage
 Weight 1065
lbs (4850 kg) at launch 5500 lbs (2505 kg) second stage
Weight 1065
lbs (4850 kg) at launch 5500 lbs (2505 kg) second stage
Max speed Mach 3.65
(ca. 2750 mph or 4,470 km/h)
Range 90 miles (140
km)
Ceiling 150,000 ft
(45,700 m)
Warhead
conventional T-45 HE warhead weighing 1106 lb (500 kg) and containing 600 lb
(272 kg) of HBX-6 M17 blast-fragmentation
Warhead nuclear initially W7 (2.5 or 28 KT) and later W31 nuclear 2 kt (M-97) or 20 kt (M-22)
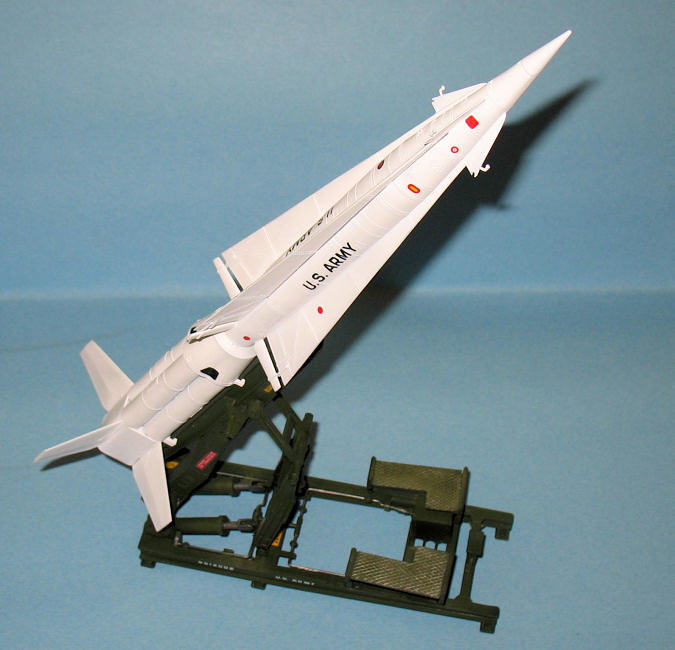
| THE KIT |
It is the old
Revell 1/40 scale model that was introduced in 1958 and re-released every 15 or
so years since the early 80s. This
time it has been re-released by Revell AG/Germany.
The kit consists of
60 parts in dark green plastic (including three figures if you want to make a
diorama) and shows its 50+ year age as it is full of flash, surface
imperfections and sink marks in the parts.
The missile is covered with lots of more than obvious rivets to show
detail while the actual missile has a pretty featureless surface.
The model is
essentially two kits. One is the
actual Nike Hercules
| CONSTRUCTION |
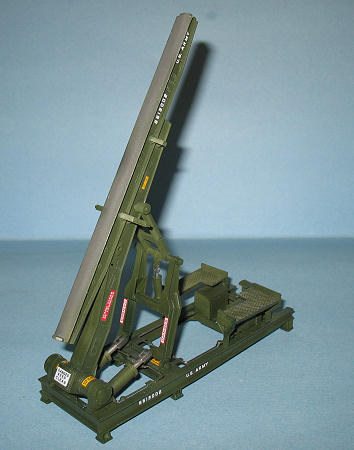
The launcher is
pretty straight forward to assemble when you follow the instructions, but you
need to deal with a lot of sink marks, flash, ejection pin marks and surface
imperfections. That was the most
tedious aspect of the launcher as it required multiple applications of CA glue
and sanding especially the sink marks on the launch rail.
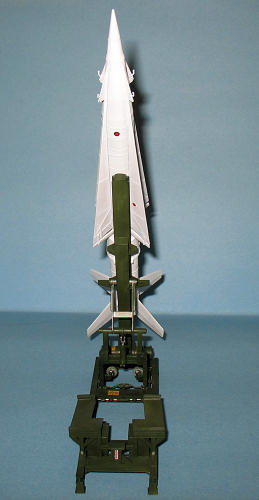
The launcher was glued in a posed upright position.
One thing I noticed
about the kit was that the mating edges of many of the parts needed to be sanded
down to ensure a decent fit.
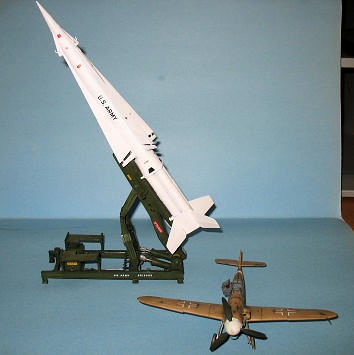
The missile, on the
other hand, proved to be a lot more work.
I followed the
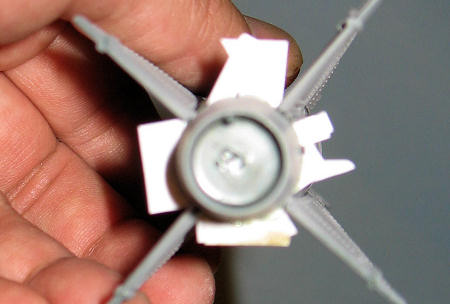 instructions
and built both stages separately.
The booster stage was straight forward except that the four engine tubes
required a lot of sanding and filling due to the gaps.
Some of the gaps that needed to be dealt with included the edges of the
fins and the mating collar. I discovered that the missile’s engine nozzle did
not line up exactly with the booster mating collar causing the missile to be
crooked. I did not realize this
until after I had put primer on the missile and attached the two together.
instructions
and built both stages separately.
The booster stage was straight forward except that the four engine tubes
required a lot of sanding and filling due to the gaps.
Some of the gaps that needed to be dealt with included the edges of the
fins and the mating collar. I discovered that the missile’s engine nozzle did
not line up exactly with the booster mating collar causing the missile to be
crooked. I did not realize this
until after I had put primer on the missile and attached the two together.
I tore off the
missile engine nozzle and spent a lot of time adding shims to the nozzle.
Added a shim between the missile body and the missile engine nozzle,
glue, attach to booster, check to see if it was straight and repeat many many
many times. It took about 9 shims
in various locations to get the Nike Hercules relatively straight.
Unfortunately, the shims meant I had some gaps and steps to deal with.
This required a lot of filling and sanding with CA glue.
I tried a few times to protect the detail, but after enduring various
headaches because of it and the tight spaces due to the two sets of fins, I
opted to sand the detail away. It
took about 5 tedious filling and sanding sessions to eliminate the gaps and
steps. In a fit of sanity, I
decided not to redo the missing details.
The rest of the construction was uneventful.
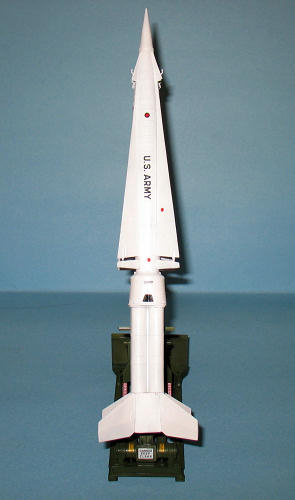
| COLORS AND MARKINGS |
 Painting
Thanks to the dark
green plastic and the white paint job required, I had to prime the missile.
I used XF-19 Sky Grey in three light coats to get it right.
I lightly buffed the missile with a 3200 grit sanding cloth to smooth out
the surface. As I mentioned
earlier, it was at this step when I realized that the missile would have an
unnatural curve to it. Once I fixed
that problem, I reapplied the XF-19 primer and then sprayed down three light
coats of flat white and two coats of gloss white to get a paint job I could be
happy with.
The launcher did
not need priming. The color
callouts were in Revell AG paint, but I opted to use two coats of XF-58 Olive
green instead of NATO Green because I had the Olive Green paint and did not have
any NATO green available. Some
details were hand painted or dry brushed (the walkway grills) using Citadel
Mithral Silver and Chainmail paints.
Once dry, the
launcher received a light coat of Future gloss in preparation for the decals.
Decals
I used most of the
kit decals and stencils except the AA badges and red lighting markings which I
thought were way too garish. The
decals did not have any issues and settled in among the detail with some
MicroSet solution.
Final Coat
No wash was used as these missiles were kept spotless. The final coat was different for the launcher (flat) and missile (semi-gloss.)
| FINAL BITS |
I did not glue the
missile to the booster when I mounted entire Nike Hercules on the launch rail.
| CONCLUSIONS |
 This is
pretty much the only game in town if you like the Nike Hercules
This is
pretty much the only game in town if you like the Nike Hercules
I added a photo
comparing the kit to a 1/48 scale Bf-109 just to give you an idea of the actual
size of the
The kit courtesy of
my thinner wallet.
Thanks to those who pointed out my mistakes in the preview's intro.
August 2009
If you would like your product reviewed fairly and quickly, please contact me or see other details in the Note to Contributors.