
Fine Molds 1/72 Slave One
| KIT #: | SW-7 |
| PRICE: | $80.00 MSRP |
| DECALS: | One option |
| REVIEWER: | Dan Lee |
| NOTES: | Based on the Lucas Films Studio model |
| HISTORY |
Boba Fett’s Ride
 Slave One was first seen in the
Empire Strikes Back hidden among a lot of Imperial garbage. It seemed to be a
fitting beginning as this ugly elephant head shaped spaceship chased the
luckless (at least in this movie) Millennium Falcon to the Cloud City of Bespin
where Han Solo would be captured by Darth Vader, who then handed him over to
Boba Fett who would then take the former spice smuggler to Jabba the Hutt. In
an inspired evil move, Darth Vader decided that Han Solo would be better used as
a live test “volunteer” for Carbonite Freezing; this was to be used on Darth’s
wayward son, Luke Skywalker. Slave One’s last scene in the Empire Strikes Back
was one of the saddest moments of the entire Star Wars series as it left Cloud
City carrying the frozen Han Solo while Princess Leia and Chewbacca watched
unable to do anything to stop it.
Slave One was first seen in the
Empire Strikes Back hidden among a lot of Imperial garbage. It seemed to be a
fitting beginning as this ugly elephant head shaped spaceship chased the
luckless (at least in this movie) Millennium Falcon to the Cloud City of Bespin
where Han Solo would be captured by Darth Vader, who then handed him over to
Boba Fett who would then take the former spice smuggler to Jabba the Hutt. In
an inspired evil move, Darth Vader decided that Han Solo would be better used as
a live test “volunteer” for Carbonite Freezing; this was to be used on Darth’s
wayward son, Luke Skywalker. Slave One’s last scene in the Empire Strikes Back
was one of the saddest moments of the entire Star Wars series as it left Cloud
City carrying the frozen Han Solo while Princess Leia and Chewbacca watched
unable to do anything to stop it.
A “younger” Slave One was seen some two decades later in the prequel Attack of the Clones as the ship of Bounty Hunter Jango Fett, who was the “father” of the Republic’s Clone Army (which later became the Imperial StormTroopers.)
Copied From the Star Wars: DataBank
For all its deadliness and stealth, the Slave I is an antiquated craft of a type rarely seen plying the modern spacelanes. Both Jango and Boba Fett staved off its obsolescence by constantly rebuilding, customizing and updating the ship's many features.
What began life as a Kuat Systems Engineering limited edition Firespray-class ship is now a dedicated pursuit craft worthy of the galaxy's best bounty hunter. Aside from its clearly visible twin blaster cannons, the ship also has numerous weapons hidden away. Concealed in its hull are a turret-mounted tractor beam projector, a pair of proton torpedo launchers, concussion missile tubes, and a powerful ion cannon.
| THE KIT |
Fine Molds originally released their Slave One kit as Jango Fett’s from Attack of the Clones in 2001. Unfortunately, for those who wanted to make an accurate version of Boba’s Slave One from the Fine Molds Kit needed to make some major modifications as apparently there were significant detail changes (what I don’t know as it looked the same to me.)
This kit makes those changes to build Boba’s older battered ship from Empire Strikes Back. It comes with 135 parts in grey and clear styrene plus an additional bonus for those who bought the first production run, a white metal Han Solo frozen in Carbonite.
In the photos, I am only showing sprues of the interior parts, the exterior pieces, the clear parts and the white metal Han Solo. The missing sprues contain the exterior detail parts.
The parts are almost free of flash with the ejection pin marks on the inside of the parts.
| CONSTRUCTION |
Fine Molds does an excellent job designing these kits that I didn’t need to do much clean up of the parts with the exception of the small bits.
I did something different with this kit than what I normally do, which is I actually took the time to plan out how I wanted to build it especially due to the complicated paint scheme. If I did things my usual way (ie: stupid) then I could have found myself making 3M and Tamiya rich through bulk purchases of tape, but I didn’t. The order of construction is also unusual so please bear with me.
I decided to build Slave One thru four sub sections based on the paint scheme rather than follow the instructions to the letter:
1) Top Half of the Hull
2) Bottom Half of the Hull
3) “Wings.”
4) Laser Cannon
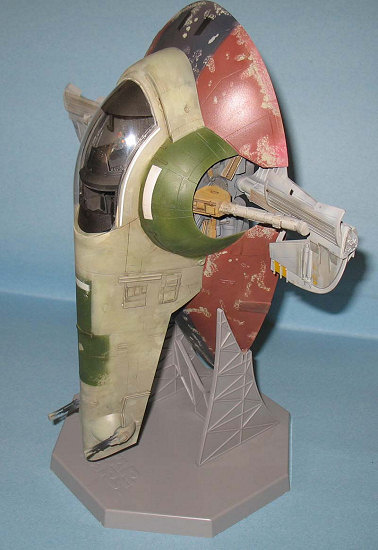
 The top half of the hull was fairly
easy to assemble. Both halves glued together and then the parts of the “trunk”
were added. I was careful not to glue the rotating spar where the ship’s laser
cannons are mounted. There were some tiny gaps along the underside of the
“trunk” which I filled with Mr Surfacer (the excess removed with lacquer thinner
rather than sanding.) The cockpit was painted with the “bright” colors of Field
Grau and Flat Black and dry brushed with a bit of sliver to bring out some
detail while the interior of the top hull was painted Field Grau. Installing
the “bridge”/cockpit into the hull/fuselage was much easier than writing the
sentence to describe the act.
The top half of the hull was fairly
easy to assemble. Both halves glued together and then the parts of the “trunk”
were added. I was careful not to glue the rotating spar where the ship’s laser
cannons are mounted. There were some tiny gaps along the underside of the
“trunk” which I filled with Mr Surfacer (the excess removed with lacquer thinner
rather than sanding.) The cockpit was painted with the “bright” colors of Field
Grau and Flat Black and dry brushed with a bit of sliver to bring out some
detail while the interior of the top hull was painted Field Grau. Installing
the “bridge”/cockpit into the hull/fuselage was much easier than writing the
sentence to describe the act.
The only part where I ran into some difficulty was filling and sanding the seam between the two top hull halves. In the process of sanding and filling, I removed some of the surface detail which was replaced with cut strips of 20 thou plastic card and any panel lines were rescored with a #15 blade.
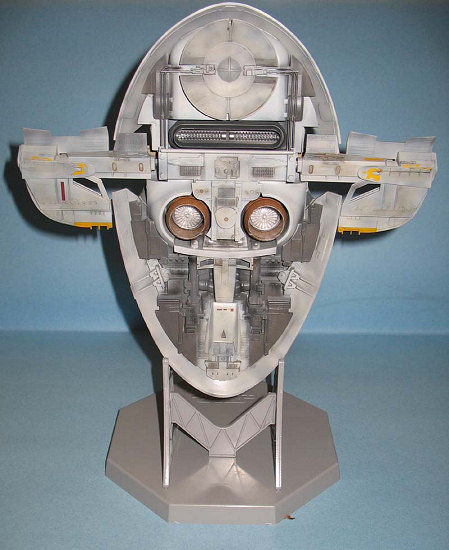
The bottom half of the hull was more involved due to the detail. I assembled all the little sub assemblies first. The fit of most of these parts was so good that I didn’t have to use any filler (a rarity for me.) The hardest part of assembly was the two engine nozzles which I took a bit of work to remove the ejection pin marks and fill the gaps. It turns out I didn’t do a good job sanding the exterior of the nozzles, but I didn’t care. The reason why is that the nozzles are recessed into the hull so that you can’t see my awful fill and sand job unless you’re really really anal and have a really small dental mirror.
Before the external portion of the bottom hull was glued to the skirt, I sprayed the engine mounts flat black and the area where the engine nozzles go, silver as per the instructions.
The wings were as easy as the bottom half of the hull. Just follow the kit instructions and you will be fine. One word of caution though. I found that one of the wing pivot arm’s internal diameter was a little smaller than it should be so I ended up inserting a shim of 10 thou plastic card (trimmed to fit of course) to increase the diameter to prevent the pivot from breaking when I rotate the wings.
The laser cannons needed a touch of filler, but no real hassles in construction.
| COLORS & MARKINGS |
This is where this kit gets fun. All the parts were pre shaded with flat black.
I started with the underside of the bottom half of the hull by doing things differently than the norm. Usually, one airbrushes lighter colors to darker ones, but I did things ass backwards. This meant more time cleaning my airbrush which slowed things down. Why would I do this? Well, the way Slave One’s paint scheme was organized, that it was easier to do the darker colors first (lower potential for mistakes and less tape used.)
 German Grey, Field Grau, Neutral
Grey and then Gloss Lt Gull Grey were sprayed on in light coats so the flat
black panel lines could show thru. I used the Gloss Gull Grey on Slave One’s
wings as well. I set the kit aside for a couple of days and then returned to
spray Tamiya IJN Grey (XF-14) all over the top hull half and the top side of the
bottom hull half as this was the base coat that I needed to work on top of.
German Grey, Field Grau, Neutral
Grey and then Gloss Lt Gull Grey were sprayed on in light coats so the flat
black panel lines could show thru. I used the Gloss Gull Grey on Slave One’s
wings as well. I set the kit aside for a couple of days and then returned to
spray Tamiya IJN Grey (XF-14) all over the top hull half and the top side of the
bottom hull half as this was the base coat that I needed to work on top of.
The laser cannons were painted RLM02 and flat black.
The base of the wing arms and some of the detail on the wing mounts was supposed to be painted Earth Green (whatever the hell that is—allegedly a combination of Khaki and Red Brown), but I decided to forgo buying Earth Green paint or mixing my own (as my container of Khaki dried up) and opted to use an “equivalent” from my paint box. I decided on Tam Desert Yellow which was “close” enough for me. The Star Wars Color police can torture me with the “Force” later.
I set this aside again till the weekend when I had the time to salt it. The chipped paint method I use most often is using tape to rip off paint, but this only works if your base coat is made of tougher stuff than the top coat. Unfortunately, I know that Tamiya acrylic paint can be rather fragile at times and I wasn’t going to buy a spray can of Tamiya light green paint for just one model (hey I can be cheap, er, frugal too.) I opted to try something that I never tried before, using salt to create the chipping effect. I read thru Greg Ewalt’s excellent build of a Float Zero in the forum and Swanny’s Models hints and tips section to get a better idea of what I needed to do.
It took a couple of hours to “salt’ my model the way I wanted (it was not an exact match to the paint guide but I’m not that exacting) following the salting process. The next day, I sprayed the bottom half of the hull with pink (actually a 50/50 mix of MM Acryl red and flat white) in certain places of the hull, then I carefully sprayed MM Acryl German Hull Red over the rest of the hull and set aside to dry.
The top half was sprayed with RLM 02. At this point I discovered that Tamiya and Gunze acrylics react to salt which causes the color to “fade.” Looking back, I should perhaps use MM Acryl which has a different formulation and does not react to salt as much. There wasn’t a lot I could do so I left it as is.
Now I had to do the secondary colors and masked off various sections with 3M Blue, trying to be careful to not knock the salt off the model. The portions of the bottom half of the hull was sprayed with Engine Grey and Gloss Black while the upper hull got sprayed with an “equivalent” mix of Tamiya greens to approximate FS34092 (didn’t turn out as well as I hoped as it looked more like FS34102.)
 After an hour, I gently
knocked off the salt and washed the parts with soap and water. The net
result was a hodgepodge mess of paint that was would have been shameful had it
not been deliberately done.
After an hour, I gently
knocked off the salt and washed the parts with soap and water. The net
result was a hodgepodge mess of paint that was would have been shameful had it
not been deliberately done.
Finally, the wings were masked off and sections were sprayed with Gunze Orange Yellow.
Finally, I sprayed the two of the three engine nozzles wood brown and the third engine nozzle flat black with dry brushed silver details.
Major Assembly Construction
It’s all too easy as you just follow the instructions. One thing to watch is mating the top hull to the bottom hull. Gently push the two sections together till you hear the click of plastic. It is scary at how mindlessly easy the kit is to assemble.
The engine nozzles required a little manual dexterity. There are raised circular attachment guides for the wood brown engine nozzles. One should be very careful to put your regular styrene glue on the outside of the guides because the engines also have a clear styrene face which mounts on the inside. I used Elmer’s white glue to attach the clear engine faces on.
Decals
There are still some decals to do for this model. I was fortunate that most of the decals were placed where I used gloss paint which meant the decals went on as soon as the paint was dry. I did add a light coat of Gunze Gloss around the cockpit so I could apply three white bands.
Wash and Final Coat
At this point I did my usual watercolor wash of black and burnt sienna mixed with a couple of drops of dish soap. The excess was wiped off with a lot of Q-Tips and then I sprayed the model with Gunze Flat Coat.
| FINAL CONSTRUCTION |
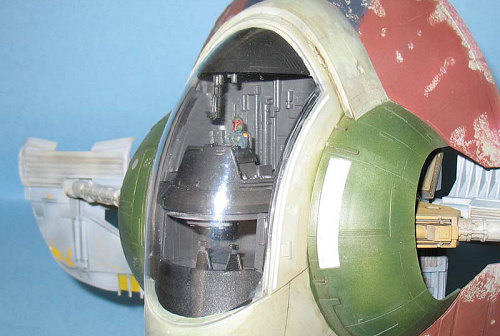 I don’t like figure painting (no
interest in it) and usually don’t put figures in my airplane models but as with
all things there are exceptions—I paint and install figures in all my Fine Molds
Star Wars Models. I painted Boba the best I could, but I only needed to paint
his upper half as anything below the waist is hidden by his console (made
painting so much easier.) A little dab of Tamiya glue stuck Boba’s rear end to
his chair.
I don’t like figure painting (no
interest in it) and usually don’t put figures in my airplane models but as with
all things there are exceptions—I paint and install figures in all my Fine Molds
Star Wars Models. I painted Boba the best I could, but I only needed to paint
his upper half as anything below the waist is hidden by his console (made
painting so much easier.) A little dab of Tamiya glue stuck Boba’s rear end to
his chair.
The canopy is a one piece of very clear clear styrene and was glued on with Elmer’s white glue.
The stand was cleaned, decaled and assembled and my Slave One was done.
| CONCLUSIONS |
I really really enjoyed this kit as Fine Molds really knows their stuff. The actual assembly is so easy which allows one to spend all the time you need on painting (which is my favorite part of model building.)
I’d recommend that one get a bit of experience painting with an airbrush before building a kit like this (only if you want to do Boba’s paint scheme and assuming you really like Star Wars.) Otherwise the assembly is perfect for a young kid or beginner (for something easier paint wise and on the wallet, I’d recommend Fine Mold’s X-wing or Tie Fighters having built both.)
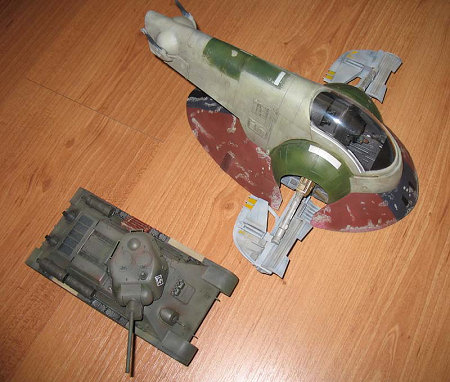 As noted above in the header, the
$80 bucks (usually more) is rather steep for a 1/72 kit but I have to point out
that it has more volume than three 1/35 WW2 tanks, has the same foot print as my
1/48 A-20G Havoc and you get an amazing slammer of a kit that does not require a
lot of “modeling skill” to assemble. Plus I figure that the money I spent saved
me a lot of sandpaper, filler dust inhalation, time and headaches (which is the
norm for SF kits as any SF modeler can attest.) From what I understand, the
much cheaper AMT’s version is not so easy to assemble and to approach the
“accuracy” of this kit would just pile on the grief, hours and effort to scratch
build parts and assemble (which is fine if you like that sort of thing.)
As noted above in the header, the
$80 bucks (usually more) is rather steep for a 1/72 kit but I have to point out
that it has more volume than three 1/35 WW2 tanks, has the same foot print as my
1/48 A-20G Havoc and you get an amazing slammer of a kit that does not require a
lot of “modeling skill” to assemble. Plus I figure that the money I spent saved
me a lot of sandpaper, filler dust inhalation, time and headaches (which is the
norm for SF kits as any SF modeler can attest.) From what I understand, the
much cheaper AMT’s version is not so easy to assemble and to approach the
“accuracy” of this kit would just pile on the grief, hours and effort to scratch
build parts and assemble (which is fine if you like that sort of thing.)
As has been discussed on the forums and in Lee’s editorials, there are kits that appeal to pride, habit, interests, idiosyncrasies and sense of fun or a combination there of. We all have our reasons why we build what we the build. I will say that for me (first generation Star Wars Geek and all), Fine Mold’s Slave One definitely falls into the fun category. In many ways this build brought back the days when I was a kid and every model built was a joy—I do suspect that the euphoric feeling I got as a kid at finishing a model was more than likely due to model glue fumes in a not so well ventilated basement.
Now when is Fine Molds shipping that 1/72 Y-Wing?
June 2007
Copyright ModelingMadness.com
If you would like your product reviewed fairly and fairly quickly, please contact the editor or see other details in the Note to Contributors.