| KIT #: | 85-4166 |
| PRICE: | $ |
| DECALS: | Two options |
| REVIEWER: | Dan Lee |
| NOTES: | Two kits in one. Inaccurate, but the only game in town for 1/48 scale |
| HISTORY |
Commander Virgil
“Gus” Grissom
Virgil “Gus”
Grissom was the commander of Gemini 3.
He was born in 1926, joined the USAAF as a clerk in 1944, demobilized in
1945 and graduated from
He flew
 Pilot John Young
John Young followed
the same route as many other astronauts.
He got a degree in engineering (aerospace) and then joined the
Gemini 3
Gus Grissom had a
lot to prove thanks to the Liberty Bell 7 landing where the escape hatch’s
explosive bolts accidently exploded, nearly killing him when water unexpectedly
flooded the Mercury capsule as he barely managed to escape the sinking Liberty
Bell. Some in NASA blamed him for
the mistake whereas Gus insisted that he had nothing to do with it.
In 1999,
Despite this
incident Gus was named commander of Gemini 3, the first man rated flight of the
two man Gemini capsule. He and his
pilot, John Young, had a very wry black sense of humor and they decided to name
their capsule “The Unsinkable Molly Brown” after the Broadway play.
This name was not well received by the PR conscious NASA (the alternative
name forwarded by the crew was Titanic) and was not so named in the official
press releases. Thanks to CAPCOM
Astronaut Gordon Cooper, the name stuck and ended NASA’s naming of each space
capsule until the Apollo missions.
Gemini 3 was
launched on
After Gemini 3, Gus
was named commander of Apollo 1. He
died in the first fatal spacecraft accident in NASA’s history on
John Young went on
to fly on Gemini 10, two Apollo Missions (10 and 16), walk on the moon (Apollo
16) and fly the 1st Space Shuttle
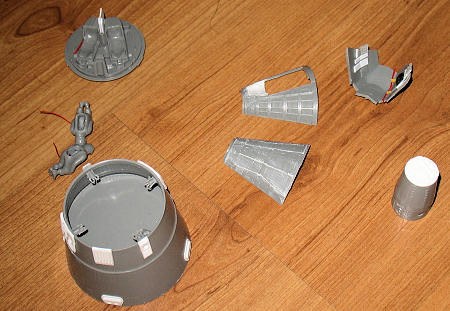
| THE KIT |
 See my preview of
the dual Mercury/Gemini Kit.
See my preview of
the dual Mercury/Gemini Kit.
I originally
purchased this kit off the MM forums almost two years ago as part of a hobby
store clearance sale and intended to build the kit OOB.
An examination of the parts showed that it sort of looked like a Gemini
Capsule, but not really as it was based on an early prototype.
I realized that I would not be happy with building OOB and put the kit
away till I could do something about it.
Fortunately, Real Space Models sells a correction set for the Gemini
capsule that replaces a lot of the parts, but it involves a lot of mods and
careful cutting. I’ve found that
when it comes to real space model kits, I’m a Joyless Model Nazi who wants the
greatest possible accuracy. Much of
this comes from me being a kid who devoured every book on space exploration I
could get my hands on and was almost obsessed with space travel.
Being a Joyless Model Nazi means one needs a lot of expensive correction
sets and dealing with the headaches that go with it.
One of the biggest
problems was that I would need a lot of Mr Surfacer type filler and Lacquer
thinner--I shudder at the thought of building this kit with CA glue as a filler.
There is probably someone who can replace all those lost rivets and
surface corrugation but I am not that guy.
| CONSTRUCTION |
If there had to be
a theme song for this kit, it would have to be Ringo Starr’s “It Don’t Come
Easy.” Sometimes, accuracy can be
it’s own punishment as the amount of work to make it accurate doesn’t seem worth
it.
This kit was
released in 1964 and it shows (this is from the 2000 re-release.)
There was a lot of clean up of the parts due to flash and they didn’t fit
together. Fortunately, the parts
weren’t warped so I consider myself fortunate.
One of the biggest
inaccuracies of the kit is that the back of the equipment module was not open to
space and was covered by a shield covered in gold foil.
The Real Space kit comes with a vaccuform insert that is supposed to fit
exactly into the rear of the Gemini Equipment Module (EM.)
When I cut it out in the manner you’re supposed to prep vaccuform parts,
I discovered that there was a gap of about 1/2 mm between the vaccuform part and
the inner portion of the equipment module.
At this point I put everything back in the box and it sat there for a few
months.
When I returned to
the kit in early April, I realized what I would should have done.
I measured the depth of the EM and the internal depth of the vaccuform
part, calculated the length required for a support.
I took some plastic tubing, cut a 1 3/4” length and glued it dead center
of the EM and then glued the Vaccuform part dead center.
I let the glue dry and then inserted 20 thou plastic card strips into the
gap, glued it and waited for the glue to cure before I cut the strips to shape.
Unfortunately I still had gaps, but I could deal with them by filling and
sanding. I carefully put CA glue
into the gaps and made sure I did not get any on the vaccuform part.
This was a lot of tricky work and took several sessions to realize I
screwed up the alignment, fix it, remove any gaps without knocking the vaccuform
part off the support, but eventually I got it done to my satisfaction.
After that mess, I
removed the various resin replacement parts from the pour stubs.
All the parts needed cleanup, but they didn’t have pinholes which was
fine with me. Once washed, certain
parts were glued on the EM with CA glue.
I put the EM aside to tackle the bigger headache of the Gemini Capsule
itself.
 The capsule
interior is inaccurate, spartan and lacking in interior detail.
There is no easy resin replacement for this so I did what I could do.
I went to the modeler’s friend, Google, to hunt down interior shots of
the capsule especially sidewall details including consoles.
To replicate that, I carefully cut rectangles from scrap 20 thou plastic
card, rummaged through my spares box for anything that could remotely looked
like a Gemini instrument panel.
These were then glued to the cockpit sidewalls to give a rough approximation of
the detail. I then twisted up some
30 gauge wire to look like exposed cable bundles and glued them into a couple of
places.
The capsule
interior is inaccurate, spartan and lacking in interior detail.
There is no easy resin replacement for this so I did what I could do.
I went to the modeler’s friend, Google, to hunt down interior shots of
the capsule especially sidewall details including consoles.
To replicate that, I carefully cut rectangles from scrap 20 thou plastic
card, rummaged through my spares box for anything that could remotely looked
like a Gemini instrument panel.
These were then glued to the cockpit sidewalls to give a rough approximation of
the detail. I then twisted up some
30 gauge wire to look like exposed cable bundles and glued them into a couple of
places.
Next I tackled the
inaccurate cockpit window sills.
This involved a lot of swearing and planning.
Mostly swearing as there was a lot of work required to use the Real Space
window sills. I went by the
engineer’s motto of “measure twice, cut once” as if I screwed this up I pretty
much ruined the model. No pressure,
eh? I put the resin replacements on
the plastic it was to replace and marked it off with a marker.
I next used wood carving tools with a metal ruler to score the plastic
and then carefully cutting along the score lines with sprue cutters to remove
the old parts. The resin parts fit
in barely. Success!!!
Well sort of.
The resin sills
were secured with CA glue and then the edges were filled with
I turned to the
landing skid doors (the Gemini originally was supposed to land on skids via a
hang glider contraption, but that was scrapped for the much simpler parachute
system) glued them in and then smeared in putty to fill in all the ugly gaps.
It took several applications to remove the gaps to my satisfaction.
The actual Gemini capsule did not have these doors, but unless someone
has a resin replacement or found a miraculous way to reproduce the surface
corrugation there is nothing I could do to fix it.
Besides the Capsule is black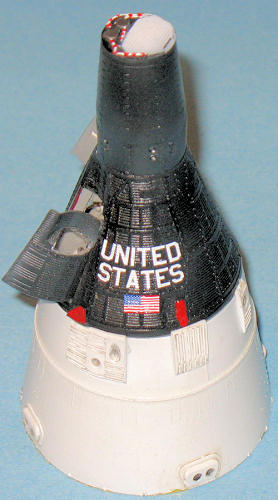 so it isn’t all that easy to notice.
Next I tackled the
nose. The model’s nose lacks the
radar details or any detail for that matter of the actual capsule.
The Real Space Kit has all the various noses for the various Gemini
Missions, but I only needed the Gemini 3/4 nose.
The resin nose plug needed a lot of careful clean up as the surface was
rougher than it should have been.
I sanded the nose
down carefully with 220 grit, removing the bare nose.
The resin nose plug was aligned and then glued in place with CA glue.
The nose mating ring was probably the worst fitting part of the kit as it
needed both shims and CA glue to fill in all the gaps.
One noticeable
detail skipped over by Monogram was the centerline divider between the two
crewmen. I cut some 40 thou plastic
card into shape, trimmed to fit and glued it in.
Next step involved
painting the interior parts. I used
Tamiya XF-19 Sky Grey for the interior (the interior looked too light to use
Dark Gull Grey.) The instrument
dials and switches were done with a combination of careful brush painting with a
00 brush and dry brushing. The
exterior of the EM was painted Sky Grey at the same time to prime it and ensure
that the white resin parts would not look different than the grey plastic under
a coat of white.
Finally, I
assembled the capsule interior and exterior.
It did not fit very well and I was stuck with gaps between the three
exterior pieces as well as the heat shield.
I broke out the putty and Q-Tips to deal with it.
Once the putty was cured, I lightly sanded the seams down so that they
would not be so obvious (even under a flat black coat of paint.)
I glued the nose on
and discovered that I had over sanded the mounting ring as there was a very
obvious step between the capsule and nose.
I masked off the area and added CA glue, layer by layer.
Once it was dried, I sanded it down till the step disappeared.
It was at this
point that I discovered that my window sills did not line up with the capsule
doors. I decided that I would leave
the capsule doors open so as to hide my mistake.
Shhhhhhh!!!!
Trust me, it was easier to type this out than to actually actually assemble the entire Gemini capsule.
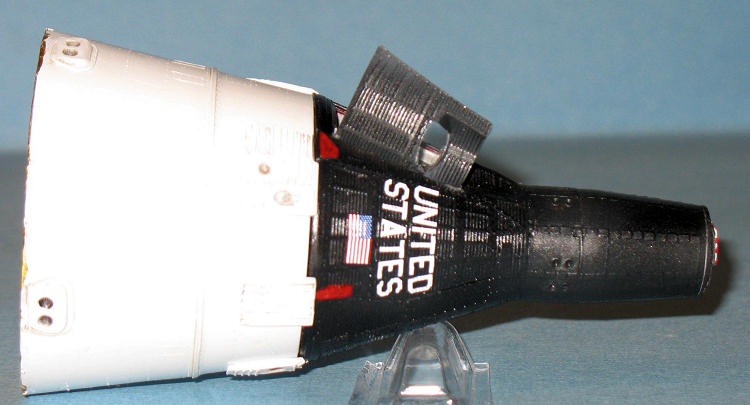
| COLORS & MARKINGS |
Painting
 Gemini Capsules are
remarkably easy to paint. The
capsule is black and the EM is white.
To break up the monochrome black, I sprayed on a thinned coat of gunmetal
(beats dry brushing.) I masked off
the nose and sprayed a portion of it flat white while I had painted the other
details using Citadel paints. The
last area of brush painting was the red attachment points and the red door
seals.
Gemini Capsules are
remarkably easy to paint. The
capsule is black and the EM is white.
To break up the monochrome black, I sprayed on a thinned coat of gunmetal
(beats dry brushing.) I masked off
the nose and sprayed a portion of it flat white while I had painted the other
details using Citadel paints. The
last area of brush painting was the red attachment points and the red door
seals.
Once it was dried,
I sprayed on a thin coat of Future for the decals.
Decals
The Gemini Capsule
has two decals. I used the newer
Real Space Decals instead of the Monogram ones, but they still required Microset
and Solvaset because of the corrugated surface.
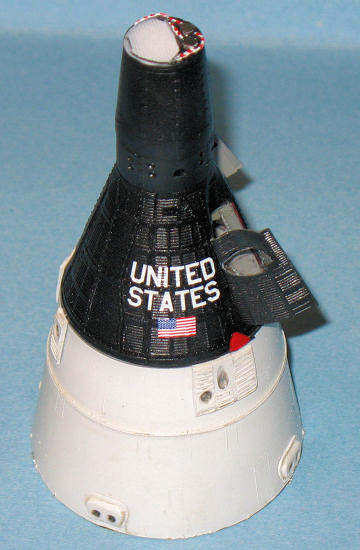
Weathering
I decided to use a black water color wash in only a few places to show off the detail as the thing left the pad spotless. The excess wash was removed and the model was sealed in a semigloss final coat of 75% Future and 25% Tamiya Flat Base.
| FINAL CONSTRUCTION |
A sheet of gold
foil is provided with the Real Space set that is to be used with the back of the
EM. I took a Q-Tip and swabbed the
vaccuform piece with Micro Metal Foil adhesive.
Once it was sticky, I gently secured the foil onto the part using a Q-Tip
to smooth it out. I didn’t care
about wrinkles as photos show the imperfections which are duplicated on the
surface of the part. It was a rare
moment that being sloppy meant being accurate.
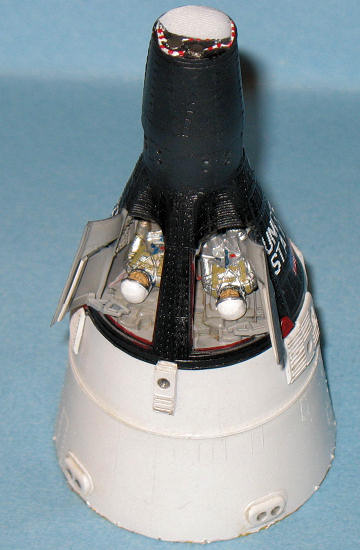
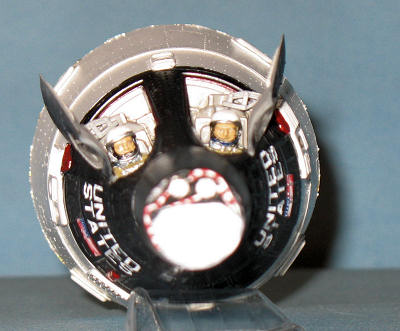
The kit comes with
a pair of astronauts. Normally, I
wouldn’t add them, but as I mentioned the cockpit is pretty weak so I needed
something to add and/or obscure detail.
The suits Grissom and Young wore were cop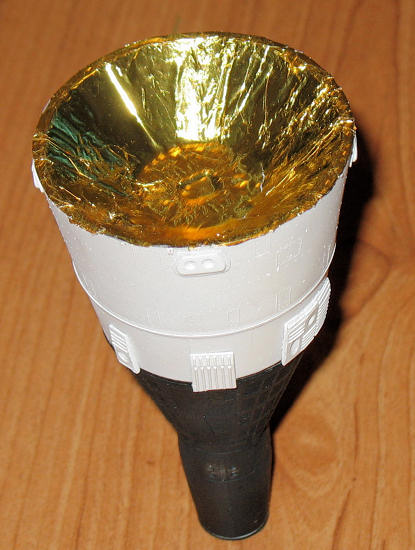 ies of the Mercury suit, silver
with white helmets and metallic red/blue fittings.
To add some detail, I drilled holes in the left abdomens and inserted 30
gauge wire to represent the air/water/communications hoses.
The figures were sprayed with Tamiya Aluminum and then the details were
hand painted. I’m not a decent
figure face painter, but I did the best I could and glued each astronaut to his
seat with a dab of CA glue.
ies of the Mercury suit, silver
with white helmets and metallic red/blue fittings.
To add some detail, I drilled holes in the left abdomens and inserted 30
gauge wire to represent the air/water/communications hoses.
The figures were sprayed with Tamiya Aluminum and then the details were
hand painted. I’m not a decent
figure face painter, but I did the best I could and glued each astronaut to his
seat with a dab of CA glue.
I added some details to the doors using 10 and 40 thou plastic card and rummaged through my spares box to find parts that looked like the Gemini hatch actuators (the closest were some Tamiya P-47 Flap actuators.) The interiors of the hatches were painted XF-19 and once the paint was dry, clear acetate cut to shape and glued in with white glue. The hatch assemblies were then glued to the Gemini and I was done.
| CONCLUSIONS |
This kit isn’t
really for the faint of heart especially if you want a somewhat accurate model.
If you do then I strongly
recommend the Real Space Models Gemini set.
It might not sound like it, but I actually had a lot of fun assembling this kit and brought me back to the days when I daydreamed about being part of NASA’s manned space program.
July 2009
If you would like your product reviewed fairly and quickly, please contact me or see other details in the Note to Contributors.