| KIT #: | 8230 |
| PRICE: | $15.99 |
| DECALS: | Two options |
| REVIEWER: | Greg Ewald |
| NOTES: | Straight forward build with lots of painting options |
| HISTORY |
 about space, but also become airworthy in suitable atmospheres.
It seems like the Romulans and the
Klingons got into bed with each other early (maybe that’s when the head knobs
started to appear?) as this ship has the ability to “cloak” itself.
about space, but also become airworthy in suitable atmospheres.
It seems like the Romulans and the
Klingons got into bed with each other early (maybe that’s when the head knobs
started to appear?) as this ship has the ability to “cloak” itself.
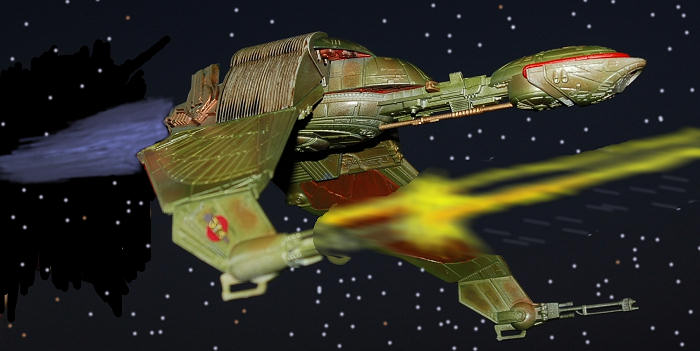
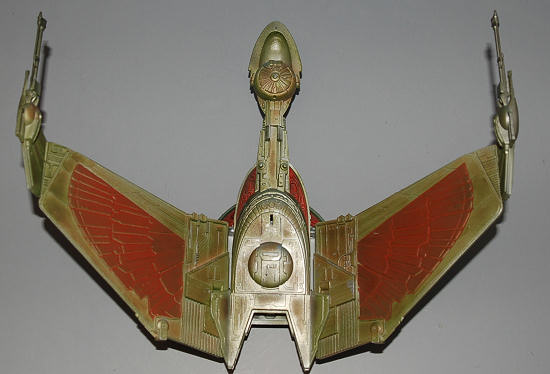
The most notable structure on the ship are the immense baffles, unlike the portable razor configuration seen on the earlier and larger vessels.
Two wings extend forward from the main hull in an aggressive posture, tipped with phasers (hey, didn’t the Klingons use disruptors? Hmmm.) and some sort of cannon. It also has a single Photon torpedo launcher in the beak, just in case you need to really blow some stuff up. Yeeha.
| THE KIT |
 One of the things that constantly amazes me is the
quality of sci-fi kits as opposed to real-world kits. This thing is absolutely
beautiful in molding, detail, and ease of assembly, they put a lot of thought
into it, for sure. I wish they would do the same for some of the more standard
models !
One of the things that constantly amazes me is the
quality of sci-fi kits as opposed to real-world kits. This thing is absolutely
beautiful in molding, detail, and ease of assembly, they put a lot of thought
into it, for sure. I wish they would do the same for some of the more standard
models !
The manufacturer obviously has a sense of humour, as there is a bit in the fold out instructions for a “cloaked” ship, that is nothing but the stand. Ha ha. Ok, the instructions themselves are quite good, very easy to understand, and with an absolutely fantastic painting guide that obviously took a lot of research.
Fit is impeccable, the plastic is of perfect quality.
| CONSTRUCTION |
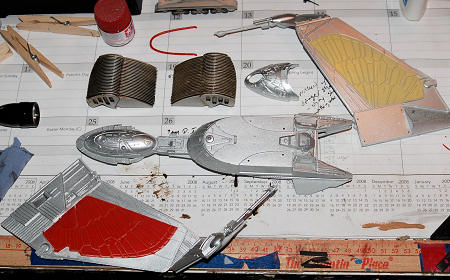
I built this for a friend’s sci-fi party (ooh, you should have been there) and was meant to be hung from the ceiling along with some other ships. I used heavy duty Zap glue for the construction, just in case it fell. Hey, these trekkies can get pretty wild. No really.
 The weapons assembly goes together well in step one,
though you will need some Mr. Surfacer for the outer edges, and a little bit of
PSR.
The weapons assembly goes together well in step one,
though you will need some Mr. Surfacer for the outer edges, and a little bit of
PSR.
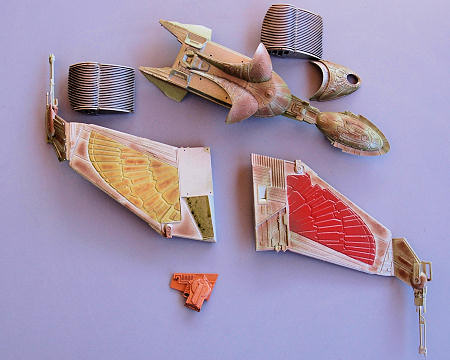
You do have to decide which way you want the wings to appear, in cruise mode or attack mode, before you assemble the baffles. I like the cruise mode better, but they wanted the attack mode, with the wings drooping down like a mantling hawk. I have to admit, the designers of the ship did a good job, it does look aggressive.
The wings themselves fit together will, and will need some PSR attention to fix the large molding injection ports, but nothing major.
The hull, however, is a little bit trickier. Make sure to test fit the fuselage panels several times before you glue them in place, mine were slightly warped. The same situation applies to radiator shields, sand, fit, sand, fit, sand, etc.
The mating of the wings to the ship will require a gap filling super glue or the like, so it is nice and sturdy in case someone throws a shot glass of Romulan ale up in the air, but they fit on quite nicely.
| COLORS & MARKINGS |
With so few parts, you know what’s coming. Yep, another wildly complex paint scheme. During the construction, you are going to have to keep up with the painting, this isn’t a model you can build completely and then paint, unless you are one of those flagellant nutcases.
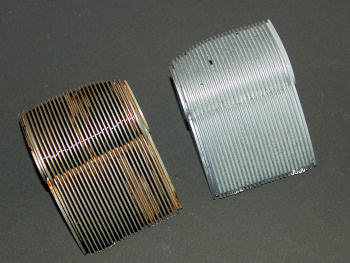
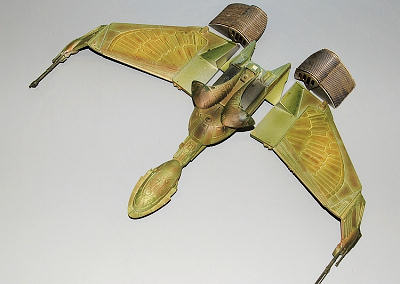 The baffles were painted chrome, and after drying for
an hour or so, a light wash of minwax wood stain was applied with a brush, then
wiped off. It gives off that “dirty used” look perfectly.
The baffles were painted chrome, and after drying for
an hour or so, a light wash of minwax wood stain was applied with a brush, then
wiped off. It gives off that “dirty used” look perfectly.
I
modified the standard paint scheme, due to a time constraint, and the fact that
I have always loved the Romulan early BOP with the big red eagle. I started by
painting the whole ship silver, letting it dry in the
The whole craft was then lightly sprayed with a very thin mixture of NATO green and a bit of yellow, to lighten it up somewhat. The salted metal look came through perfectly.
The “feathers” were painted red, a bit of darker rust was sprayed on using my trusty Badger Hybrid, and then it was time for the little bits.
I used a series of small brushes to pick out the details with a number of vibrant colours, and then applied a heavy sludge was of India ink.
Within an hour, it was dry, and a satin clear overcoat was sprayed on. Done!
| CONCLUSIONS |
 I am going to pick up some more
of these kits, as they are most impressive for the dollar, and just plain fun to
build ! Highly, highly, highly recommended.
I am going to pick up some more
of these kits, as they are most impressive for the dollar, and just plain fun to
build ! Highly, highly, highly recommended.
In six hours, it went from box to done, though I would like to really spend some time and detail one out.
| REFERENCES |
May 2008
If you would like your product reviewed fairly and fairly quickly, please contact the editor or see other details in the Note to Contributors.