
Games Workshop Warhammer Dwarf Gyrocopter
|
KIT # |
8577D |
|
PRICE: |
$20 |
|
DECALS: |
none |
|
REVIEWER: |
|
|
NOTES: |
Metal gaming miniature |
|
BACKGROUND |
Warhammer is a fantasy war game that involves armies of
dwarves, elves, orcs, trolls, goblins, vampires, etc. That’s about all I know a
lot about it, as it has sprung up since my own fantasy-gaming days back in the
early 80’s when Dungeons and Dragons was just starting to take off. Cast-metal
figures seem to be central to the action, as there are bazillions of cast-metal
figures available. There are also books, websites, discussion boards, chat
rooms, etc., all devoted to mass pitched
 battles between little metal figures of
creatures that you’d never want to meet in real life. Take heart, fellow
modelers. Some people have obsessions even odder than ours.
battles between little metal figures of
creatures that you’d never want to meet in real life. Take heart, fellow
modelers. Some people have obsessions even odder than ours.
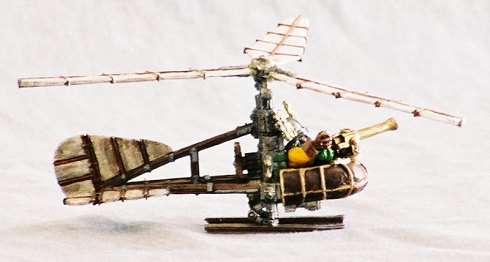
Strolling through the local shop, looking for something a little different, the “wood-and-fabric” rotor blades of the Dwarf Gyrocopter caught my eye. (A lot of those little metal figures are more than just a little “different,” but with a wife and small children, some things I’m just not going to bring home.) But this was different. Remember the Ewok hang-glider in Star Wars? The contraptions the Professor on Gilligan’s Island cobbled together out of coconuts and bamboo? The brass-and-iron Victorian machinery of Journey to the Center of the Earth and 20,000 Leagues Under the Sea? Same technology here. At $20, it was definitely Not Cheap, but I’ll shell out for something sufficiently unique. And this is a seriously retro-techno flying machine. In addition, the rotund, bearded pilot looked familiar – I think I’ve seen him in a mirror recently.
|
THE KIT |
The blister pack on the card contains thirteen pieces of finely detailed, dense, “white metal” (pictures at http://ussearch.games-workshop.com/search/search.asp?Restriction=gyrocopter&SearchButton=1&DisplayImages=1) I assume it has a high lead content, though it’s not quite as soft as pure lead. It cuts easily with a #11 blade, and bends with finger pressure. Like most casting metal, it fatigues easily, so don’t bend it too much or it may break.
 The finished rotor diameter is 2 5/8”, the nose-to-tail
length is about 3 ¾” (counting the cannon), and the top of the rotor mast is
about 2 ½” inches above the skids. There’s no scale, of course, but the pilot’s
head is about the same size as a 1/48 figure.
The finished rotor diameter is 2 5/8”, the nose-to-tail
length is about 3 ¾” (counting the cannon), and the top of the rotor mast is
about 2 ½” inches above the skids. There’s no scale, of course, but the pilot’s
head is about the same size as a 1/48 figure.
There are no instructions, but it’s pretty clear how everything goes together, with one exception. There’s a half-cylinder with a hole in it that mystified me until I got the rest of the machine assembled. It goes underneath the boiler; the hole is for the stand. Most pieces have mold lines, some in pretty unfortunate locations. The one on the cockpit tub is particularly prominent. Take care in filing them off.
|
CONSTRUCTION |
I used CA for most of the construction, though when I reattached the rotors after they broke I used Testors Cement for Metal and Wood Models (in the green squeeze tube). I washed all the parts to remove mold release oil, and primed them with flat white. I didn’t prime the mating surfaces. Most parts were painted before assembly. The rotor was painted as a subassembly.
The engine and the cockpit tub went together first. Both
are fairly heavy, so I was generous with the CA. After painting and detailing I
added the pilot (turned at a slight angle), then the two-piece tail unit. There
are three square locating holes on the back of the engine for the beams of the
empennage, but they didn’t quite fit. If the beams were in the holes, the
 rudder didn’t line up right with the elevators. If the empennage was aligned,
the beams didn’t match the locating holes. I finally realized that the rudder
beam had a very slight bend, right at the vertical support in the center. Once
that was straightened out, everything lined up fine. Then I realized that I’d
forgotten to attach the pusher propeller to the rear of the engine. The tail
beams made it a little tricky, but it went on okay using tweezers.
rudder didn’t line up right with the elevators. If the empennage was aligned,
the beams didn’t match the locating holes. I finally realized that the rudder
beam had a very slight bend, right at the vertical support in the center. Once
that was straightened out, everything lined up fine. Then I realized that I’d
forgotten to attach the pusher propeller to the rear of the engine. The tail
beams made it a little tricky, but it went on okay using tweezers.
The rotor is a three-piece unit, with the hub attached to one of the blades. The ends of the blades have pins that fit into the hub, but there’s a fair amount of flash in the way. Take care to set the blades at the same angle. I attached the rotor to the mast at an angle, as though the aircraft were maneuvering. After the model was completed, the skis and the two separate rotor blades broke off in an accident. CA reattached the skis, but would no longer hold the blades. I drilled holes in the ends of the blades and in the hub and glued in short pieces of brass-wrapped steel wire clipped from a D guitar string with generous amounts of (non-plastic) model cement.
The last pieces to go on were the cannon and landing gear. The gear is kind of delicate – it has to support a fair amount of weight on a small glue surface. The gear legs are VERY well-located, however - right at the CG. It’s not “tippy” at all.
|
CAMOUFLAGE & MARKINGS |
I used a bunch of different paints, mostly Model Master
enamels, acrylics and Metalizers. The cockpit interior is Zinc Chromate (though
thinking of it now, one might assume that Dwarf’s native magic would probably
ward off metal corrosion). The pilot’s legs were Insignia Blue, while his tunic
was Japanese Yellow. Boots and gloves were leather with highlights and shadows
in lighter and darker shades. Helmet is Steel Metalizer, with Brass wings. A
VERY thin wash of 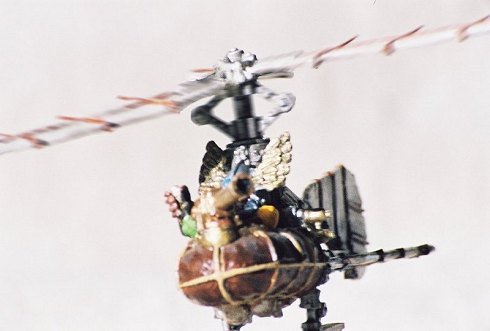 black popped out the details of the feathers and rivets. I
used various Metalizer shades on the engine unit, then gave it a thin dark brown
wash to bring out the details and make it look oily.
black popped out the details of the feathers and rivets. I
used various Metalizer shades on the engine unit, then gave it a thin dark brown
wash to bring out the details and make it look oily.
The cockpit tub got a coat of Leather, then several over-washes with lightened and darkened tones to add depth. For the ropes I used a mix of yellow and white with a little brown. For the rotors and control surfaces I had planned to mix up a yellowish weathered-linen / parchment color. But I first wanted to experiment with a highlighting wash to bring out the wrinkles and shade the recesses. So I applied a thin dark brown (leather and black) over the flat white primer. I was so pleased with the results that I left it as is.
The wooden parts are a sandy color mixed from Flesh (whose? I always wonder) and a little yellow. A dark wash pops out the grain. The metal reinforcing plates are a dark shade of Metalizer. To get the bronze for the cannon, I added red to Brass Metalizer.
|
CONCLUSIONS |
This was challenging to build and to finish, and a lot of fun besides. The skids and rotors require careful handling, because there’s not a lot of glueable surface to take the fair amount of stress placed on them. You’ll need to do a good bit of cleanup and straightening of the parts. But there is so much detail that you can really have a lot of fun with the paint brush. It’s a great change of pace, and a whimsical addition to your collection.
March 2003
If you would like your product reviewed fairly and fairly quickly, please contact the editor or see other details in the Note to Contributors.