White Ensign Models 1/72 5"/25 Deck Gun
| KIT: | White Ensign Models 1/72 5"/25 Deck Gun |
| KIT #: | PE 7237 |
| PRICE: | See Text |
| DECALS: | None |
| REVIEWER: | Bruno Schielzeth |
| NOTES: | Photo etch and resin |
| HISTORY |
The 5”/25 Mk. 40 deck gun was the most powerful gun mounted on U.S. submarines in WWII. The 5” gun was capable of throwing a 54 pound shell 18,000 yards against land or sea targets, or 6 miles into the air against aerial targets. It was semi-automatic and capable of firing 10-15 rounds per minute. [i]
 The sub’s
deck gun could be used against shore, ship, or aerial targets with equal
effectiveness. Most subs would use the deck guns to sink barges and smaller
patrol boats that weren’t worth the expenditure of their limited number of
expensive, and still largely unreliable, torpedoes. Many cargo vessels were
dispatched with just the deck guns as long as armed escort vessels weren’t
around. The 5” gun alone was capable of sinking even a large freighter with only
a few well-placed shots. As the war against Japan entered its last year more and
more subs ran on the surface and used their deck guns against anything afloat
The sub’s
deck gun could be used against shore, ship, or aerial targets with equal
effectiveness. Most subs would use the deck guns to sink barges and smaller
patrol boats that weren’t worth the expenditure of their limited number of
expensive, and still largely unreliable, torpedoes. Many cargo vessels were
dispatched with just the deck guns as long as armed escort vessels weren’t
around. The 5” gun alone was capable of sinking even a large freighter with only
a few well-placed shots. As the war against Japan entered its last year more and
more subs ran on the surface and used their deck guns against anything afloat
For those not into naval or artillery terms let me explain those ‘5”/25’ numbers. 5” is the caliber of the bore, and therefore the size of the round being fired. In this case it is 5 inches in diameter. The ‘/25’ describes the length of the barrel in front of the breach of the gun in terms of multiples of the bore size. Thus 5”/25 becomes a 5 inch bore with a barrel length of 25 times 5 inches. 5 X 25 = 125 inches, or 10 feet, 5 inches.
Sorry about the math lessons, but a lot of modelers see these numbers and have no clue as to what they mean.
| THE KIT |
The 4”/50 gun included in RoG’s Gato kit was used early in the war, but it wasn’t as accurate or powerful as the later gun. All the early 3” and 4” guns were quickly replaced by the 5”/25 deck gun. Although Revell’s gun is a well-detailed gun for a kit piece, it just wasn’t good enough for some of us. Those of us, myself included, that wanted to model a later war Gato had to rely on the efforts of the aftermarket suppliers for the newer, larger gun.
White Ensign Models dove into the process of producing the proper gun the moment the RoG sub was even hinted at in the modeling press. Revell didn’t give anyone a lot of warning on this release!
 The process
of designing, modeling, casting, and finally offering a resin gun for sale isn’t
quick. I think I ordered my guns from WEM in May of 2007, but only the 40mm
naval mounts were available at that time. I received, built, and mounted the
metal 40mm guns within two weeks. I was willing to wait for the proper deck gun.
The process
of designing, modeling, casting, and finally offering a resin gun for sale isn’t
quick. I think I ordered my guns from WEM in May of 2007, but only the 40mm
naval mounts were available at that time. I received, built, and mounted the
metal 40mm guns within two weeks. I was willing to wait for the proper deck gun.
My U.S.S. Cod was completed by the end of July. Since then it’s been moved and damaged but it’s basically complete and waiting for the proper deck gun.
Today my mail included a package from England! Inside the sturdy cardboard box was my 5”/25 deck gun for the Cod!
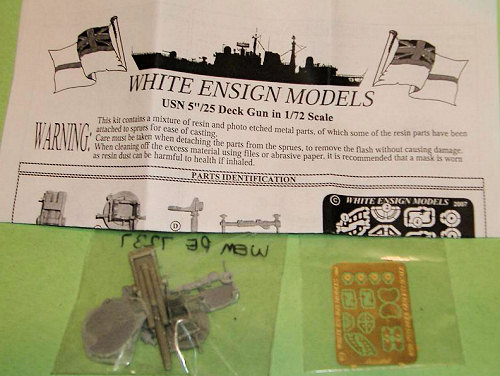
The approximately 3” X 5” plastic zip bag contained a bag of resin parts, a bag with the PE sheet, and the A-4 sized folded instruction sheet.
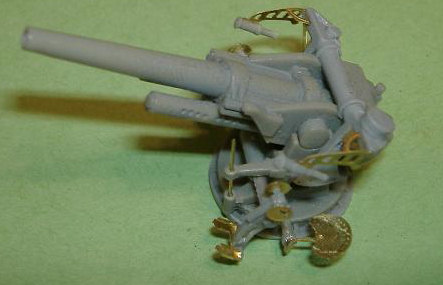
I opened the bag of resin pieces and inside were eight beautifully cast hard gray resin parts. There is some very minor clean up needed on a couple of the parts to remove flash or a thin resin web, but only the gun and the gun mount have any mounting blocks to cut off.
I found a couple of tiny air bubbles in the castings. Only a few will require filling. The rest will disappear under a coat of paint or are in areas that don’t show. The sight yoke had one bubble about 1/16 inch in diameter on the backside. It is easily filled with CA and cleaned up. Total clean up time was only about 15 minutes, most of that trying to remove the webbing between the delicate parts. The resin is easy to work with, but I’m sure it could be broken. I was able to prep the parts with no damage at all.
The detail in exquisite! You can actually see the rifling in the end of the gun barrel and the vents on the recoil compensators! However there were supposed to be nine parts in the bag. One of the sight telescopes was MIA! I can make another one easily enough but I will be contacting John at WEM to let him know there is a minor problem with their quality control.
An update: I’ve been contacted by John at WEM and they shipped the initial orders of the 5”/25 and 4”/50 guns with only one telescope, new scopes are being cast at the moment and will be shipped to purchasers of the guns at no cost. I told him not to bother with mine as a replacement only took me about 2 minutes to make.
The small but substantial PE sheet holds the azimuth and elevation hand wheels, the perforated seats for both gun layers, foot pedals, brackets, and seat supports. Also included are four replacement support brackets for the sight yoke for those that want to carve off the resin parts and replace them with the more detailed PE parts.
| CONSTRUCTION |
 Remember to wear a mask when sanding resin. The resin
dust is dangerous to inhale. Luckily little sanding is really necessary on this
kit.
Remember to wear a mask when sanding resin. The resin
dust is dangerous to inhale. Luckily little sanding is really necessary on this
kit.
All resin parts must be washed to remove the mold release agents! It’s not a suggestion; it’s a requirement! The mold release agents used in resin casting will defeat all paints and glues. What you use to wash your resin parts varies with each person. I find that a good acid brush from the hardware store, or my wife’s toothbrush, and a little paint thinner works for me. Be careful however! Acetone and lacquer thinner can melt most resins! I stick with odorless turpentine, but I have to allow the parts to dry for at least two days after cleaning or the thinner that soaked into the resin will eat off the paint in time.
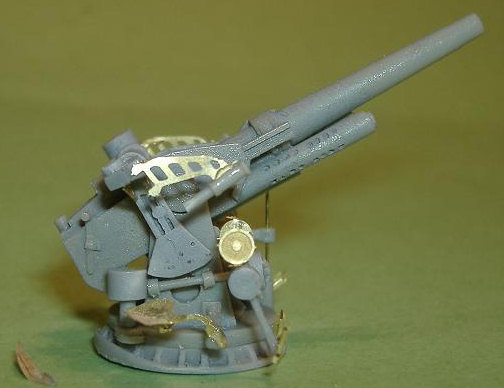
I decided to cut the resin supports off the sight yoke and use the PE supports. They do look better. The task took all of 5 minutes as the resin is easy to carve. On the yoke support make sure to clean out the two grooves on the bottom, they fit over the side supports of the gun breach and proper assembly will be impossible if the grooves have resin in them. Also, when mounting the sight yoke, be sure the telescopes line up with the centerline of the gun barrel! The gun would look decidedly strange with the scopes pointing up with the barrel level!
 When mounting the gun
layer’s hand wheels be sure to get the handles opposite each other.
When mounting the gun
layer’s hand wheels be sure to get the handles opposite each other.
I gently bent the seats into the correct dish shape and added the PE foot pedals. I managed to fake a new scope using a gear retraction strut from my junk box. I heated the large end with a match and then sliced it flat. It comes very close to looking like the original scope, so I doubt that anyone will notice or care.
The final task was to add a length of brass rod to the gun cradle for the ‘stupid rod’. OK, that’s my name not the real name, but the purpose of the rod is to prevent the gun from depressing far enough at certain points of its travel to blow holes in the conning tower or blow off the antenna mounts at the stern of the sub. The WEM base actually models this as a small ramp on opposite sides of the base. These ramps should be located on the centerline of the sub facing fore and aft.
| COLORS & MARKINGS |
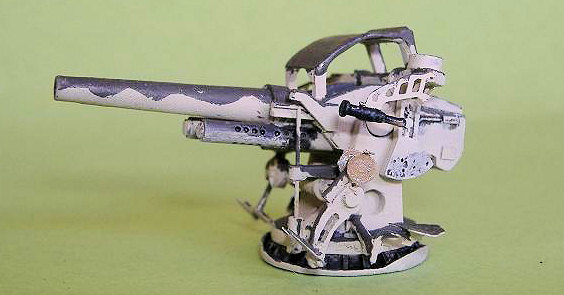
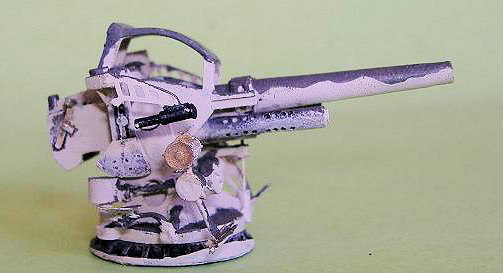
No decals are supplied or needed. Painting consisted of spraying the entire gun
and mount with MM Camouflage Gray and then hand painting the upper surfaces of
the gun with MM Gunship Gray with a wavy demarcation line. The foot pedals and
seats 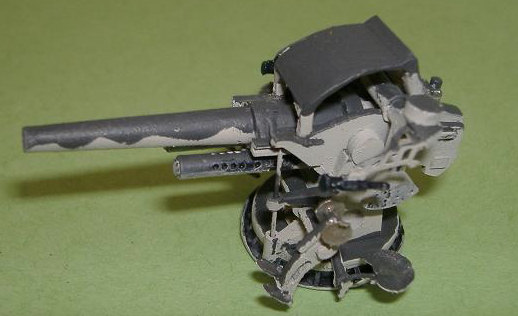 were dry brushed
with steel and rust colors and the breach block insides were painted steel.
That’s about all that is needed. A light wash of my dark sludge mix added some
shadows and picked out the extra details.
were dry brushed
with steel and rust colors and the breach block insides were painted steel.
That’s about all that is needed. A light wash of my dark sludge mix added some
shadows and picked out the extra details.
| CONCLUSIONS |
At the moment the price of the 5”/25 gun is a little vague. I paid 12 pound 72 pence for mine. What is that in American money? Well it’s hard to say. The exchange rate is changing almost daily and WEM has just announced an increase in their prices to cover their ever-rising cost of manufacturing these parts. My cost was about $24 USD I think. Your price may be different.
Is the cost worth it? Well, if you want the right gun, beautifully detailed, then the answer is yes. The Gato kit costs anywhere from $70 to $100. The inclusion of WEM’s cast metal 40mm guns and the 5”/25 deck gun added another $60 to that. To me it was worth the cost to have an accurate model of the U.S.S Cod.
| REFERENCES |
If you would like your product reviewed fairly and quickly, please contact me or see other details in the Note to Contributors.