Eastern Express/Airfix Zil fire truck
|
KIT # |
? |
|
PRICE: |
£ |
|
DECALS: |
None |
|
REVIEWER: |
|
|
NOTES: |
Kit bashed. |
|
BACKGROUND |
 The idea
for this conversion was started well over two years ago when I obtained
the History of Russian Fire Engines, ISBN no.0-55555-333-1 published by
Russian Motor Books in 2000 the author is Dmitry Gladky
The idea
for this conversion was started well over two years ago when I obtained
the History of Russian Fire Engines, ISBN no.0-55555-333-1 published by
Russian Motor Books in 2000 the author is Dmitry Gladky
This was obtained from Army book. Com at $19-00 plus P&P. I then started to carry out the research and at the same time looking for two suitable donor kits.
The final part was when the Russian small scale kit of the Zil 5V fire Engine came out by PST. I sent off to NKR Models of Australia for it and other kits at the same time. It duly arrived and I built it in half a day, to say I was disappointed is an understatement, it is very poorly researched and the kit is basic and has many faults. I used as an illustration for how not to build mine.
I now needed the donor kits and recently at a model show sure enough I was able to obtain the Eastern Express Fuel tanker kit no 35154 and the Airfix Dennis Fire Engine. The idea behind using Airfix kit was to use as many of the pump parts and ladders as I could, in the end it was only the ladders that I used as the rest was so badly misaligned as to be useless.
|
CONSTRUCTION |
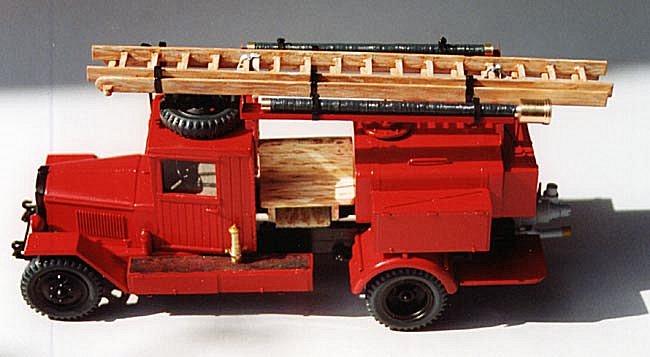
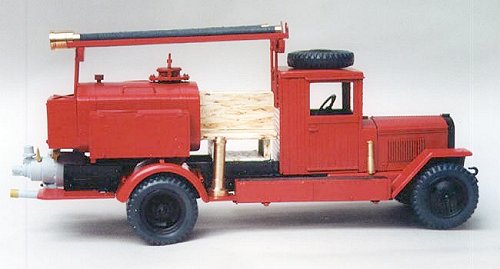
For the Zil 5V Fire Engine I used the cab, chassis, and part of the fuel tank, all the rest was scratch built using plastic card, aluminium foil, and brass stock bar.
All the work was carried out by the good old fashioned method of eyeballing the kit and photographs and plans in the book, I used the kit as the basis for all the measurements. So I started by cutting the fuel tank down to a suitable length and blanked off the newly cut end with 40 thou plastic card, all the strap detail was filed off at this stage , later to be replaced with more in scale aluminium foil. The final length of the tank is 45mm long. I then repositioned the tank loading hatch closer to the edge and relocated the relief valve to the other end.
At the same time the cab
and chassis was completed and set aside; till all the work on the tank
was completed. After a test fit of the tank and cab on the chassis I
noticed that the tank was too low and needed rising. So I added two new
beams the same height as the kit chassis and made new tie bars and
clamping plates. The chassis then had to have new cross
 members fitted
from the same material. After it was all glued and set square and rock
solid I tried the tank and cab again this time they eyeballed to the
photos in the book. I then worked out that the mid seating area was just
slightly below the top of the tank and half way up the rear cab window
bars, this gave me the total height to work to, I knew from close study
of the photographs the seats were no wider than the chassis, this was all
I needed to scratch build them from 40 thou plastic card. The seats are
30 mm long and 25mm high and made to simulate the real ones with planks
over a wooden frame.
members fitted
from the same material. After it was all glued and set square and rock
solid I tried the tank and cab again this time they eyeballed to the
photos in the book. I then worked out that the mid seating area was just
slightly below the top of the tank and half way up the rear cab window
bars, this gave me the total height to work to, I knew from close study
of the photographs the seats were no wider than the chassis, this was all
I needed to scratch build them from 40 thou plastic card. The seats are
30 mm long and 25mm high and made to simulate the real ones with planks
over a wooden frame.
A final test fit and I was satisfied with the result; it looked as per the photos.
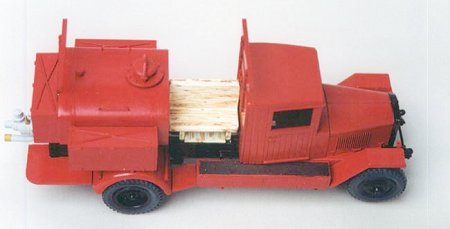
I then was able to fit the lower stowage boxes along the side of the cab, new doors were made and clips, the matting on the top was from a nylon net used in a air conditioning filter, cut to size and supper glued on. Again stowage box I built is one of many styles the full length from rear edge of the front wings to the front edge of the rear mudguards. These lower lockers along side the cab are 58 mm long by 10 mm deep and 8 mm high.
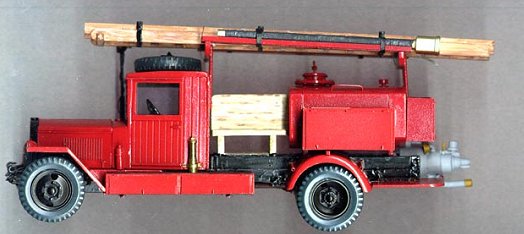
 The rear mudguards came
from an old scrap Italeri Opel Blitz kit; these were increased in width
to suit the wheel spacing and cut to profile as per the photos. Again it
was test time and I found I had one slight problem with the mudguards how
was I to fix them to the chassis. The plans and photos were not clear
enough for me to work from. Lucky not far from me there is a preserved
1930 Morris Commercial 2 ton truck , a quick walk down the road , and I
had the solution, a metal tube either side bolted to a flange on the
chassis. Plastic tube and card solved it for me.
The rear mudguards came
from an old scrap Italeri Opel Blitz kit; these were increased in width
to suit the wheel spacing and cut to profile as per the photos. Again it
was test time and I found I had one slight problem with the mudguards how
was I to fix them to the chassis. The plans and photos were not clear
enough for me to work from. Lucky not far from me there is a preserved
1930 Morris Commercial 2 ton truck , a quick walk down the road , and I
had the solution, a metal tube either side bolted to a flange on the
chassis. Plastic tube and card solved it for me.
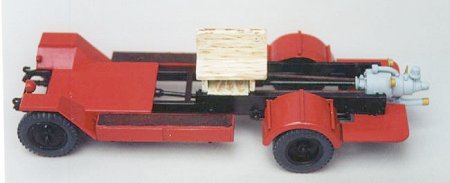
The hardest part was going to be making the centrifugal pump on the rear of the Fire Engine , but a request on the forums on the net came up with a 1/9 scale plans of the pump and its mountings , gauges , etc.
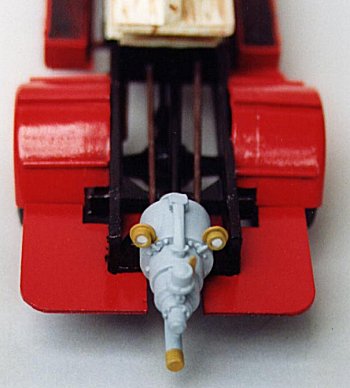 I was able to scratch
build it from various dia of plastic tube and rod, bolts came from the
grant line. Test fitted after it was safe to hold showed a small problem
and a little use of the file and I was happy. The step at the side and
rear of the pump was a simple matter of measuring up the total width of
the mudguards and eyeballing the length to fit inline with the pump. I
made it from 30 thou plastic card. It came out at 56mm width by 28 mm
long.
I was able to scratch
build it from various dia of plastic tube and rod, bolts came from the
grant line. Test fitted after it was safe to hold showed a small problem
and a little use of the file and I was happy. The step at the side and
rear of the pump was a simple matter of measuring up the total width of
the mudguards and eyeballing the length to fit inline with the pump. I
made it from 30 thou plastic card. It came out at 56mm width by 28 mm
long.
The ladder supports on the tank and rear of the cab were made again from plastic rod and stock plastic beam. 42mm wide by 8 mm high with the rods set at 20mm centres.
To make the hoses I used an aluminium rod as a former and wound round fuse wire in a tight coil, supper gluing every 5 turns. The brass ends and large end used to drop on rivers were turned up on my lathe from brass stock rod. The length of the hose support frames is 84mm by 6mm wide and the overall length of each hose is 80mm.
While I had the lathe set up I also turned the fire hose nozzle, fire hydrant, bell and the tundish for filling the fuel tank and radiator, all are based on contemporary photographs.
The lockers on the side of the water tank are one of several styles. The side lockers are 38mm long, by 15mm high, by 10 mm deep, and the rear one is 32 mm long by 18mm high, by 10 mm deep. All were made from 30 thou and the internal corners fitted with 60 thou angle fillets to stop warping, the doors were made from 5 thou plastic card.
Sorry I do not have any more measurements but at the time I never intended to write this model up as an article.
|
PAINTING |
Now it was time to bring all the separate parts together and check the final result before priming them. It was now time to start spraying, a light grey primer was applied all over and left to harden for several days, the chassis and wheels were then sprayed semi gloss black and again left to harden off. I masked off the chassis from the seating area and sprayed the seats matt white. Lastly I masked off the seating area and the chassis and sprayed the cab, tank and the wings gloss red. After all was really hard I removed the masking and carried out a few touch ups in some areas.
 It was then time to
bring all the parts together after I had hand painted the pump, it was
primed in light grey , then using a mixture of matt white and silver ,
this gives you a true matt aluminium colour depending on the amount of
silver added , I use about 5% silver to matt white.
It was then time to
bring all the parts together after I had hand painted the pump, it was
primed in light grey , then using a mixture of matt white and silver ,
this gives you a true matt aluminium colour depending on the amount of
silver added , I use about 5% silver to matt white.
As you can see in some of the photos were taken at the test assembly stage to see how everything lined up.
The ladders were primed in matt white and I had a problem the red plastic bled into the white turning it very slightly pink. I left this several days and then gave it an other light over spray of matt white again it bled into the top coat. I then painted all the wooden seats and ladders in acrylics using several different pale yellows and browns to simulate wood. The pink still bled through but it has added a depth of colour I could not have painted myself, I am satisfied so that’s all that matters. To seal I used an acrylic floor polish which gives a semi gloss finish.
The hoses I painted a dark grey I made up myself, this is to simulate the cloth over wire strengtheners used on the original hoses.
|
FINAL CONSTRUCTION |
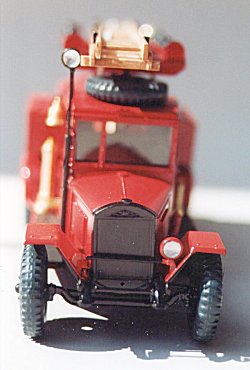
It was only after a final check that I noticed I had not made the spot light on the pole alongside the cab, a spare headlight and plastic tube solved this minor problem, a wire was added from fuse wire and it was painted gloss black.
The next part was to add the ladders and the strapping for them and the hoses, these were made from paper with fuse wire for the clips and the clips and bolts for the hydrant, nozzle and tune dish came from brass coloured aluminium foil. To the headlight and searchlight I punch out a disc of aluminium foil then after I had domed it over an old pen top, I popped it into the headlight and a lenses was punched out of clear acrylic sheet, and glued in place.
|
CONCLUSIONS |
A few historical notes. You can (if you buy the book and I recommend it very highly) build over 20 different body styles on two main chassis, the Zil 5 and 5V and also on the Gaz A, AA, or AAA chassis.
 They were used by the
civilian fire services well into the 1980’s and also by the military on
training bases and under combat conditions following up the troops to put
out fires in civilian areas.
They were used by the
civilian fire services well into the 1980’s and also by the military on
training bases and under combat conditions following up the troops to put
out fires in civilian areas.
They also served on active airfields and in naval bases as well.
I hope that when the second volume comes out more information will be available about their service with the armed forces.
In all it took over 150 hours spread over several months to complete this model mainly due to drying time both of the sub assembles and the fact that I spray out doors so I am dependant on the English climate. I hope you have enjoyed this write up as much as I have compiling it, first one for a few years.
July 2003
If you would like your product reviewed fairly and fairly quickly, please contact the editor or see other details in the Note to Contributors.