
Tamiya 1/350 IJN Yamato
|
KIT # |
78002 |
|
PRICE: |
$45.00 |
|
DECALS: |
|
|
REVIEW : |
Len Roberto |
|
NOTES: |
Gold Model P.E. Set used |
|
HISTORY |
HISTORY:
In the realm of battleships, the Japanese sister ships Yamato and Musashi are at the top of the list in terms of tonnage, main gun battery caliber, and sheer massiveness. The Yamato, named after the ancient collective term for the Japanese land and its people, met a fiery fate from swarms of American naval aircraft before the Okinawa operation. In the ultimate irony, the most massive dreadnought ever constructed was destroyed by the new main weapon of naval warfare: the aircraft.
See below for a starting point to learn more about Yamato’s history. I would like to point out one very captivating book I read long ago. It is not a reference for building the ship but it will prove a great read. It was written by a young sailor who sailed on Yamato during her last sortie. It’s called “Requiem For Battleship Yamato” by Yoshida Mitsuru- a short book well worth reading.
|
THE KIT |
 Tamiya’s 1/350 Yamato is much like the other
battleships in this series. You get a great platform on which to add further
details, a kit with very good fit even on the larger pieces, and the option to
motorize. I used Gold Medal Models photo-etched detail set specifically for
this kit. It is excellent as always and adds immensely to the overall look of
the model. In the construction photos that follow- you will see the GMM
replacement part alongside the kit plastic for reference.
Tamiya’s 1/350 Yamato is much like the other
battleships in this series. You get a great platform on which to add further
details, a kit with very good fit even on the larger pieces, and the option to
motorize. I used Gold Medal Models photo-etched detail set specifically for
this kit. It is excellent as always and adds immensely to the overall look of
the model. In the construction photos that follow- you will see the GMM
replacement part alongside the kit plastic for reference.
The hull is one piece and the deck is split into a bow section, amidships section with most of the deck levels already molded on, and a stern insert where aircraft were stowed and launched. I had no fit problems during construction and only used filler where the 2 deck pieces joined.
|
CONSTRUCTION |
As usual on a large ship project, I build in sub-assemblies purely based on what I feel like building at the time! Here is the sequence I followed with notes about what transpired during assembly:
MAIN BATTERY: The three main gun battery turrets went together well and the 18.1-inch barrels were molded nicely with some sanding required to remove the mold lines. I added PE railings around the tops of the turrets.
 BRIDGE ASSEMBLY: The Bridge was a smooth assembly with
many platforms and sponsons needing to be added. There was a large amount of PE
replacement parts here including the rectangular radars, director walkways with
railing, vertical ladders, and searchlight platform railings.
BRIDGE ASSEMBLY: The Bridge was a smooth assembly with
many platforms and sponsons needing to be added. There was a large amount of PE
replacement parts here including the rectangular radars, director walkways with
railing, vertical ladders, and searchlight platform railings.
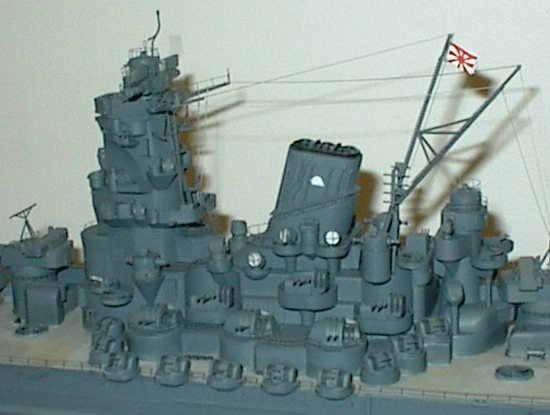
STACK: Yamato’s raked stack provides one of the main visual clues to the profile of the ship. I added PE wraparound walkway along with the railing, as well as railing around the 4 searchlights. I chose not to hollow out the funnel and replace with the PE grilles and baffles. The last time I tried this extra step, I mangled the stack a little too much for my taste!
MAST: The mast was a delicate assembly but went together much sturdier than I imagined. The only PE added here was 4-ladder section on each mast extension and down the leg of one mast support.
SECONDARY ARMAMENT: This was the most tedious portion of assembly. You need to make 24 sets of 25mm three-barreled AAA guns, 6 sets of 12.7cm high angle AAA guns, and 6 sets of rounded 12.7cm guns with PE railing added to each turret. There are an additional 24 single mount machine guns to be added to the deck.
CATAPULTS & CRANE: these pieces are chunks of plastic in the kit but the GMM replacement brass are superb and make the stern of the model look amazing.
Once all of the sub-assemblies were completed and the deck fixtures were added- it was off to the garage for painting.
|
PAINTING |
I was not convinced that the painting instructions were accurate so I did a bit of research online to find what some other builders had used for colors. The Yamato was never painted in a complicated camo scheme. Basic color was a dark grey with a blue tint evident. I decided to use Tamiya paint in the following way:
 HULL: Hull Red XF-9. There was no waterline boot on
Yamato so it was an easy mask using the light etched line that Tamiya molds onto
the hull.
HULL: Hull Red XF-9. There was no waterline boot on
Yamato so it was an easy mask using the light etched line that Tamiya molds onto
the hull.
MAIN HULL & SUPERSTRUCTURE: I used 2 parts Neutral Grey XF-53 with 1 part German Grey XF-63 and I added in a little bit of Medium Blue XF-18 to give the color a slight blue tint.
DECKS: Unlike US battleships, Yamato’s decks were covered in cypress and not teak. Over time, this wood takes on a grayish hue. To replicate this, I used a base color of Deck Tan XF-55 with some light see grey added. When dry, I smudged in some pastel chalk dust to vary the monotone.
SECONDARY GUN BARRELS: Metallic Grey.
|
CONSTRUCTION CONTINUES |
After the main paint session and the masking tape was removed, I touched up where necessary. Then the various pieces were added to the model. I chose to add the 2 main deck sections and stern insert right off the bat. The directions tell you to add all the pieces to each deck section and then at the final step add the completed deck sections into the hull. I feel better with the main hull and deck assembled and then building up as I go onto the main model.
 After painting the main gun
blast bags a light grey, the main turrets were added. This was followed by the
bridge section, stack, Rear Bridge, and the mast. I then added the various
directors, winches, deck fixtures, PE ladders, searchlights, and AAA guns. Then
the high angle guns and three-barrel 25mm guns were added around the ship. The
crane and catapults were glued onto the stern.
After painting the main gun
blast bags a light grey, the main turrets were added. This was followed by the
bridge section, stack, Rear Bridge, and the mast. I then added the various
directors, winches, deck fixtures, PE ladders, searchlights, and AAA guns. Then
the high angle guns and three-barrel 25mm guns were added around the ship. The
crane and catapults were glued onto the stern.
Once all of the pieces were added, it was onto the PE railing. The bow railings are precurved and fit around the ship was excellent. A considerable amount of time was taken in adding the smaller railing sections around the superstructure. I touched up the railing by brushing on the main color where light revealed the shiny brass was apparent.
I used stretched sprue for basic rigging and added the stern flag and mast ensign with CA glue. After this I sit down and look over the model in the brightest light of the day. I look for brass PE needing a touch-up and any other areas that might need a paint touch-up or a swipe of the Exacto blade. Instead of using the kit supplied stand, I used the larger stand from the Enterprise kit and glued on the nameplates from the Yamato kit.
|
CONCLUSIONS |
 Unlike most of my ship projects, I decided
to make the Yamato full hull and to not weather the ship in any way. I wanted
to show the massiveness of the ship to full effect and to show off the lines of
the ship as cleanly as possible. Like every other Tamiya 1/350 project, the
Yamato was a great build and it was interesting to compare the design and girth
of the model to the New Jersey and Prince of Wales. These models are not
difficult to build. Adding the PE details does require some dexterity and a
light touch but the added visual appeal is worth the effort. I can recommend
this kit to anyone with basic modeling experience who does not mind repetitive
assemblies!
Unlike most of my ship projects, I decided
to make the Yamato full hull and to not weather the ship in any way. I wanted
to show the massiveness of the ship to full effect and to show off the lines of
the ship as cleanly as possible. Like every other Tamiya 1/350 project, the
Yamato was a great build and it was interesting to compare the design and girth
of the model to the New Jersey and Prince of Wales. These models are not
difficult to build. Adding the PE details does require some dexterity and a
light touch but the added visual appeal is worth the effort. I can recommend
this kit to anyone with basic modeling experience who does not mind repetitive
assemblies!
|
REFERENCES |
http://www.warships1.com/JAPbb08_Yamato.htm
Copyright ModelingMadness.com
If you would like your product reviewed fairly and quickly, please contact the editor or see other details in the Note to Contributors.
Back to Reviews Page 2018