|
KIT: |
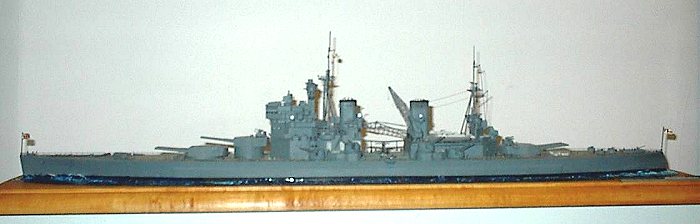
Tamiya 1/350 HMS Prince of Wales |
|
KIT # |
78011 |
|
PRICE: |
$64.00 |
|
DECALS: |
flags and aircraft markings |
|
REVIEW & |
|
|
NOTES: |
Gold Medal Models set used/ crew figures also |
|
HISTORY |
Rushed into the fray before being fully completed, the King George V-class battleship HMS Prince of Wales sortied with the doomed HMS Hood to chase the German Battleship Bismarck. With much of her machinery not ready and workers still aboard, the Prince of Wales watched the Hood explode under the Bismarck’s fire while gallantly fighting back with some of her main guns inoperable. She escaped the same fate as Hood and despite her handicaps, managed to score hits on Bismarck; one of which we can safely say was critical to the final outcome. A shell penetrated a forward fuel bunker causing Bismarck to stream fuel, curtail her range, and eventually force her to head home prematurely. After this battle, the ship went on to ferry Winston Churchill across the Atlantic for an early strategy meeting with FDR.
Unfortunately, the Prince of Wales met her fate on December 10,1941 at the hands of the Japanese Air Forces. Sent to "defend" Singapore with HMS Repulse (and no air cover) by Sir Winston Churchill, the ships were caught and sunk by torpedoes and dive-bombers in open water. It was a humiliating defeat for the Royal Navy and was a portent for all battleships in WWII that the airplane was to become the dominant weapon of sea warfare.
|
THE KIT |
I built my first Tamiya 1/350 scale ship many years ago as an inexperienced and naïve modeler. When I opened the box of my Missouri, my jaw dropped open at the detail, the instruction booklet, and the number of small parts. But still, I was fascinated and excited to build it. During a huge snowstorm, I proceeded to slap together the USS Missouri. I have built a bunch more since then and still remember that initial feeling of awe, fear, and excitement.
The Tamiya 1/350 HMS Prince of Wales is a great kit. Parts fit was excellent, molding detail is superb, and instructions are clear. It may seem daunting at first but a project of this size should be approached as a series of smaller models. Instructions are my guide but I jump around in order to construct and complete the various sub-assemblies. The sequence takes me to a point where I can paint the majority of parts in one session, and then move on to major construction, details, and additional add-ons.
|
CONSTRUCTION |
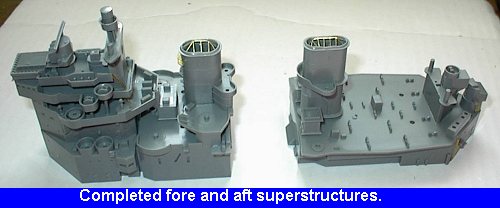
Along this line of thinking, I broke down the kit into various sub-assemblies:
 Once these subassemblies were completed and dry, it was on to the main
painting. I did not want to use the 5-color camo scheme the ship was wearing at
the time of her sinking for a couple of reasons. First, I chose to model the
ship as she appeared after her engagement with Bismarck. Second, I honestly did
feel that my airbrushing skills are adequate enough to do a proper job. My
choice allowed me to do the lion’s share of airbrushing in one marathon
session.
Once these subassemblies were completed and dry, it was on to the main
painting. I did not want to use the 5-color camo scheme the ship was wearing at
the time of her sinking for a couple of reasons. First, I chose to model the
ship as she appeared after her engagement with Bismarck. Second, I honestly did
feel that my airbrushing skills are adequate enough to do a proper job. My
choice allowed me to do the lion’s share of airbrushing in one marathon
session.
|
PAINT & DECALS |
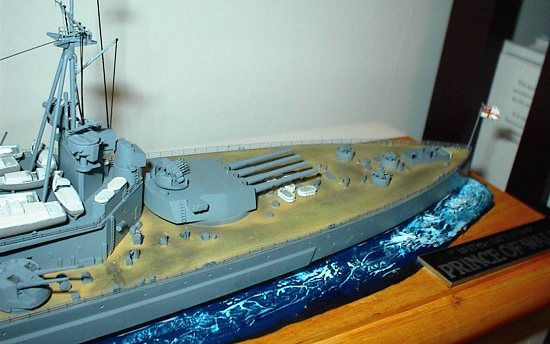
I used Tamiya Light Grey to approximate the Royal Navy’s grey as worn by the Prince of Wales in her initial scheme. It seemed to offer me a good enough match when I compared it to the color references I could find online. All assemblies listed above were airbrushed with Light Grey. When the hull and decks were dry, my next step was to paint the wood deck. I used a mixture of Testor’s Wood, Flat yellow, and white. The color turned out a bit too dark and later I tried to "yellow" it by using pastel chalk with limited success. I then tried to make the deck look well tread by using black and brown chalk to scuff up the planking. This took about a week of slow progress because there are hundreds of deck fixtures, which you need to paint around. Perhaps there is a better method for doing this but for now- I struggle on in my limited scope of knowledge!
Other detail painting included flat black for the tops of the funnels (accented by black chalk to illustrate smoke stains), Camouflage Grey for all life rafts, and thinned black droplets inserted to represent the bridge windows.
|
CONSTRUCTION CONTINUES |
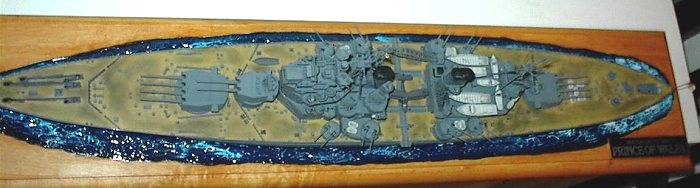
Once the paint had completely dried and the decks were finalized, it was a matter of attaching the subassemblies to the deck. This process went smoothly—dry fitting was a must to ensure an even and flush fit of the superstructure assemblies to the deck. After this major construction- it was on to adding the PE railings throughout the ship.
SHORT PRIMER FOR USING PHOTO-ETCHED BRASS DETAILS…
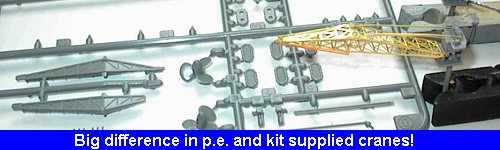 Photo-etched brass detail sets will add an immense amount of realism to your
ship model. The two best producers of this type of product are Gold Medal Models
and Tom’s Modelworks. You can usually find a set specific to the ship (or
class of ship) and scale you are building.
Photo-etched brass detail sets will add an immense amount of realism to your
ship model. The two best producers of this type of product are Gold Medal Models
and Tom’s Modelworks. You can usually find a set specific to the ship (or
class of ship) and scale you are building.
Working with these parts is a very delicate procedure. I use 2 pairs of tweezers, a sharp #11 Exacto blade, a pane of glass (for cutting off parts), and Zap CA glue (in the green bottle.) You also need a fine applicator- I usually use an end of a bent paper clip. I have seen a fancier applicator at my local hobby shop for around $6.00 but have not tried it yet.
 The brass parts come on a flat "sprue" and must be cut off and then
the edges sanded down to remove attachment points. Instructions will often tell
you which kit parts to replace with their brass part.
The brass parts come on a flat "sprue" and must be cut off and then
the edges sanded down to remove attachment points. Instructions will often tell
you which kit parts to replace with their brass part.
The trickiness comes in the preparation of the part. Most of the time, you need to bend or shape parts to their proper configuration. For example, radars must be curved or bent, railings must be shaped around bends, curves, and right angles, inclined ladders must be formed, etc. Usually, you only get a couple of bends to get it right. The brass is sometimes so thin that they will snap or become so disfigured- they will look worse than the kit parts! The key is to use a good pair of tweezers and to enlist the help of materials already on your workbench. For instance, use various paintbrush handles for forming round bends. Or use a ruler to make crisp right angles. Be as delicate as you can be!
When attaching these parts to your model, you need a fast acting
"super-glue"- I use Zap brand in the green bottle. Drop a blob of glue
onto your pane of glass- then dip the paper clip end into the blob. Capillary
action will draw a drop onto the clip end. Touch this to the plastic and then
using a tweezers- attached your PE part. This glue works very quickly and in
most cases will grab the part and hold it in the first 3-4 seconds. If you botch
the first attempt- the glue seems to lose it’s initial strength. It’s best
to move on and let that glue dry completely before trying it again.
 Trust me-
the results of being stubborn ruin that section! Using the paper clip, add a
little more glue where you see fit for strength. Try as hard as you can to not
get this stuff on your fingers or on the model where you don’t want it. The
glue bonds everything and messes up a good paint job if used too liberally.
Also- the fumes will irritate your eyes and nose- keep your distance and stop
working if your eyes start to burn. Safety glasses might be a good idea. (Editor's
note. The non-fogging type of superglue is also 'fumeless' if this is a
problem.)
Trust me-
the results of being stubborn ruin that section! Using the paper clip, add a
little more glue where you see fit for strength. Try as hard as you can to not
get this stuff on your fingers or on the model where you don’t want it. The
glue bonds everything and messes up a good paint job if used too liberally.
Also- the fumes will irritate your eyes and nose- keep your distance and stop
working if your eyes start to burn. Safety glasses might be a good idea. (Editor's
note. The non-fogging type of superglue is also 'fumeless' if this is a
problem.)
Loren Perry, creator and owner of Gold Medal Models, offers an excellent manual explaining PE details. I highly recommend checking it out.
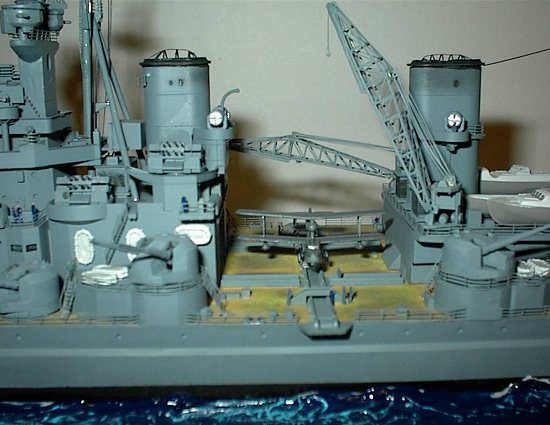
RAILINGS
In 1/350 scale, the addition of brass railings around the ship make the model much more realistic. This is a time-consuming and tedious process of bending, shaping, dry fitting, re-shaping, attaching, and touching up. Sometimes, there are 2-3 different railing styles indicated on the instructions. Take care and measure each area you are fitting. I count off sections and cut a bit extra. File down or cut off the excess. The best method is to start at the highest point of the model (masts, radars, bridge, etc. down to the lower decks.) Finish off by using the long sections around the outer edges of the main deck. When the railings are all on, inspect them for chipped off paint (it’s best to spray or airbrush - brush painting onto these thin parts looks sloppy) and touch-up the areas needed.
 RIGGING
This ship carried extensive rigging. I used black stretched sprue attached with Zap glue for the halyards. The main rigging stretched from the fore topmast to the aft mast. Try as I might with various thicknesses of sprue, I could not get the sprue to hold at the distances required. They sagged and would not hold with any amount of glue. After filling my room with all the Italian vulgarities I know, I decided to leave the long rigging alone and search for an alternative to sprue.
BASE
The length of the model barely cleared my main display base but I need to find a nice base. My usual pine sign board method did not reveal any of this length. I went to my local lumberyard and ordered the correct dimension in ¾ inch choice maple. It came out great but cost $30.00! Oh well- I love the look after a coat of antique maple stain. Water was created with the usual gel medium and acrylic paints covered with Future. The kit contains nicely molded nameplates. I sprayed one silver and used a heavy thinned black mixture to bring out the lettering.
|
CONCLUSIONS |
Whew! After tackling one of these kits, I’m ready to throw together a 1/72 scale plane or something with about 40 parts! Honestly, these kits are great experiences. You learn a lot about your subject and the sense of accomplishment is very satisfying. No special skills are required if you do not use photo-etched brass. The kit is easy to build and offers a unique building experience even if you are not a "ship guy" Tamiya 1/350 battleships can be had on ebay for $40.00- get yourself one and have fun!
If you would like your product reviewed fairly and quickly by a site that averages over 2,000 visits a day, please contact me or see other details in the Note to Contributors.