|
KIT # |
78005 |
|
PRICE: |
$64.00 |
|
DECALS: |
Yes |
|
REVIEW & |
|
|
NOTES: |
Gold Models photo etch set used |
|
HISTORY |
The USS New Jersey (BB-62) was one of the four Iowa-class battleships launched by the US during the last few years of WWII. These were the most powerful battleships built by the US and the New Jersey was chosen by Bull Halsey to be his flagship. She was brought back into service in 1968 to provide fire support in Vietnam and was extensively modernized in 1982 at the beginning of Reagan’s explosive 600-ship Navy program. She then served in the Middle East through the mid-Eighties.
For a fantastic read on the storied history and current status of the "Big J" click here to visit the Battleship New Jersey Historical Museum Society:
The USS New Jersey is currently docked in Camden, New Jersey and is undergoing refurbishment by volunteers to prepare the ship as a floating museum. The expected opening is planned for September 2001.
|
CONSTRUCTION |
As usual, with a large ship project what I like to do is break down construction into smaller sub-assemblies. Here is the basic order of construction with building notes:
 DECKS- These are split into 3
sections. The first is a nicely upswept bow section ending just under Turret #2.
The second is the main deck which has an additional deck molded above it along
with many details molded in. The last section is the stern deck which begins
just under the aft Tomahawk launchers. Construction of the bow and stern decks
consists of adding various winches, chocks, bits, and mushroom vents. GMM
photo-etched hatches and Stokes litters for battle casualties were added as
well.
DECKS- These are split into 3
sections. The first is a nicely upswept bow section ending just under Turret #2.
The second is the main deck which has an additional deck molded above it along
with many details molded in. The last section is the stern deck which begins
just under the aft Tomahawk launchers. Construction of the bow and stern decks
consists of adding various winches, chocks, bits, and mushroom vents. GMM
photo-etched hatches and Stokes litters for battle casualties were added as
well.
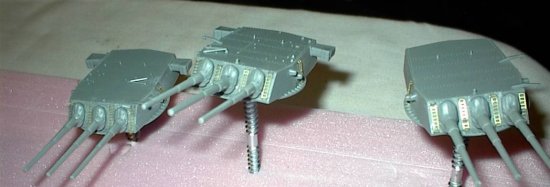 TURRETS- The three 16-inch gun
turrets were assembled straight from the box with the only modification being to
sand off the side and front ladders and replacing them with the delicate but
realistic PE ladders. I also spent a fair amount of time sanding each gun barrel
to smooth out the mold lines. The 5-inch secondary armament was built straight
OOB with no additions.
TURRETS- The three 16-inch gun
turrets were assembled straight from the box with the only modification being to
sand off the side and front ladders and replacing them with the delicate but
realistic PE ladders. I also spent a fair amount of time sanding each gun barrel
to smooth out the mold lines. The 5-inch secondary armament was built straight
OOB with no additions.
STACKS- these assembled nicely with a bit of sanding needed. I also used PE railings around the top ring and on the small observation platforms.
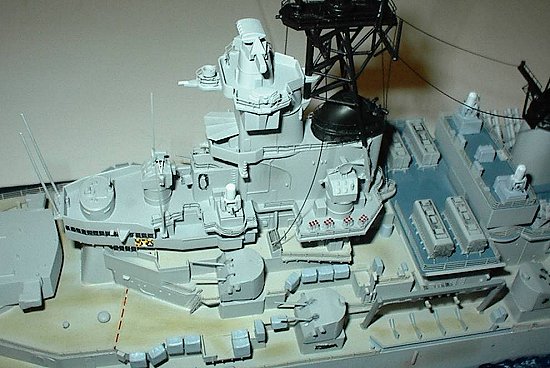
 MAIN DECK CONSTRUCTION- The
majority of building focuses on the main deck area, bridge structure, and
missile decks. This is a slow process of painting and adding to the deck. I try
to build up as much as I can and head downstairs for a paint session. Then when
dry- I add the bits to the deck. Assembly was hassle free in all areas. The CIWS
(Close-In Weapon Systems), Tomahawk launchers, etc. fall together easily. I keep
a sharp eye on the GMM Photoetch instruction sheet to alert me to the many areas
where I can replace the kit parts with brass. The GMM set is spectacular. I
replaced the Gun director supports with brass, life raft back plates, and added
many different railing styles to enhance the realism of the model.
MAIN DECK CONSTRUCTION- The
majority of building focuses on the main deck area, bridge structure, and
missile decks. This is a slow process of painting and adding to the deck. I try
to build up as much as I can and head downstairs for a paint session. Then when
dry- I add the bits to the deck. Assembly was hassle free in all areas. The CIWS
(Close-In Weapon Systems), Tomahawk launchers, etc. fall together easily. I keep
a sharp eye on the GMM Photoetch instruction sheet to alert me to the many areas
where I can replace the kit parts with brass. The GMM set is spectacular. I
replaced the Gun director supports with brass, life raft back plates, and added
many different railing styles to enhance the realism of the model.
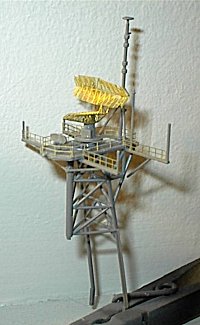
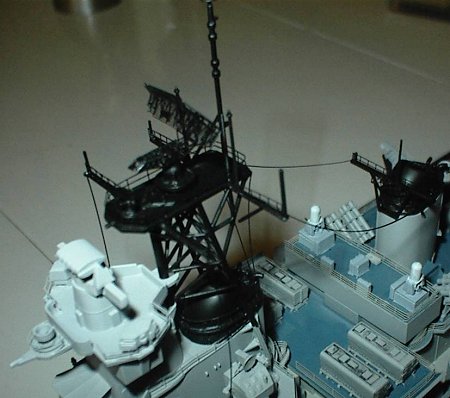
MASTS- There is a lot of brass to be added on these assemblies and they really add significantly to the look of the kit. The radar is so finely detailed and the railings around the platforms fit perfectly- it looks infinitely better than the plastic parts.
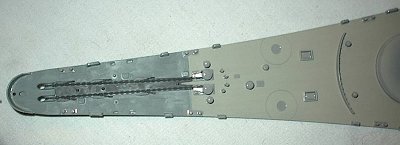
HULL- Following my normal lunacy, I charged up the Dremel and went to work cutting the bottom of the hull off. There is a clearly marked waterline boot engraved on the hull and I follow along smack in the middle of the boot. Care must be taken here to save your fingers and to hold the tool steady as it is cutting. It has a tendency to jump out of the groove your are cutting and will mar the hull above the waterline. After the cursing is done- you will need to spend some time sanding out these errors. I added the gorgeous PE helicopter safety netting around the helo pad, the kit anchors, and brass helo refueling stations with hose reel in the aft portion of the deck.
|
PAINT |
 Once I had the major
subassemblies to the paint stage- I proceeded to the paint "basement".
Primary color used for the US Navy Haze Grey was Tamiya Sky Grey which is a
close match.
Once I had the major
subassemblies to the paint stage- I proceeded to the paint "basement".
Primary color used for the US Navy Haze Grey was Tamiya Sky Grey which is a
close match.
TURRETS: Airbrushed Sky Grey overall. Hand-painted the blast bags flat black and the barrel sleeves gunmetal. I also used a black pointy marker for the barrel tips to simulate the muzzle opening. I thought about drilling them out but I was not confident I could pull that off with these thin barrels.
HULL, SUPERSTRUCTURE: Airbrushed all Sky Grey. Steel decks were painted using Tamiya Medium Blue.
MASTS: Sky Grey lower portions and Krylon Flat Black from a spray can for the entire mast above the top of the stacks.
DECKS: Tamiya Deck Tan used for the teak deck, Testor’s Gunship Grey for the non-skid areas, and Medium Blue just forward of the helo deck.
|
CONSTRUCTION CONTINUES |
After the hull was cut down and sanded, the 3 decks were added easily to the now quite flexible upper hull. A bit of filler was needed because there was a 1/16 inch gap between the main deck and the aft deck. The turrets were added along with there retainer allowing them to turn. 5-inch turrets were added to the main deck as well as the main superstructure subassemblies. I had a bit of a problem attaching the main mast requiring me to massage and bend outward the legs to get a proper fit around the stack.
 Prior to the addition of the
brass railings, I moved on to extensive weathering. For the teak decks, I
concocted a chalk pastel dust mixture of yellows, browns, and earth colors.
Using an old stiff brush, I rubbed this dust into all the teak sections. This
gives the monotone tan color depth and realism by almost fooling the eye- teak
is various shades of color and I think this is an OK method to get that look.
Prior to the addition of the
brass railings, I moved on to extensive weathering. For the teak decks, I
concocted a chalk pastel dust mixture of yellows, browns, and earth colors.
Using an old stiff brush, I rubbed this dust into all the teak sections. This
gives the monotone tan color depth and realism by almost fooling the eye- teak
is various shades of color and I think this is an OK method to get that look.
I used black pastel dust to smudge up the helo non-skid deck. This was done over the white landing stripe decals to simulate tire, oil, and boot marks/ stains. I use a maroon/ ochre/ rusty colored mixture of dust to simulate rust stains along the hull. I am still learning to use washes appropriately and tried a dark grey/ black wash over various areas to bring out detail and simulate wear. The tops of the Tomahawk launchers received this treatment as well as the other missile launchers.
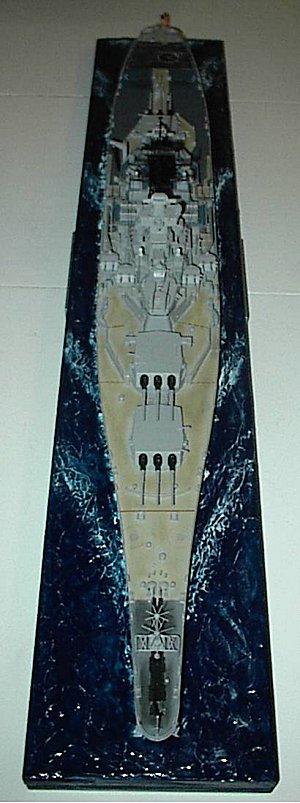
Hull decals and other warning stripe decals were added. I used black stretched sprue for some simple rigging. The model was floated using my usual Acrylic Gel Medium sea with watercolors. Two coats of Future make the water shine nicely. I am still thinking about adding crew figures but my eyes hurt just thinking about that task! A final spray of dullcote completed the model- at least until I feel like adding other stuff like a Seahawk helo and a crew!
|
CONCLUSIONS |
The Tamiya 1/350 battleship kits can be had for around $40 online if you look around a bit. The GMM set costs $36.00 but is worth every penny. This was a great build and the kit caused no headaches. It sure looks nice alongside my WWII Missouri. If you want to see an incredible display by Tamiya 2000 Master Modeler Kelly Quirk of the USS New Jersey along with the USS Enterprise- poke around the www.modelwarships.com site and check it out- it is stunning!
|
REFERENCES |
Battleship New Jersey Historical Museum Society: http://www.bb62museum.org/
http://www.warships1.com/index_ships.htm
If you would like your product reviewed fairly and fairly quickly, please contact the editor or see other details in the Note to Contributors.