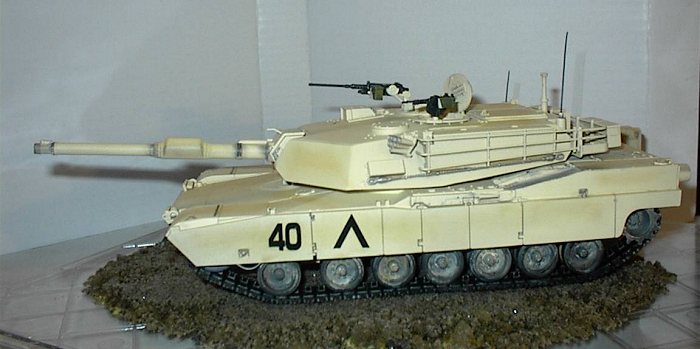
Tamiya 1/35 M1A1 Abrams
|
KIT # |
? |
|
PRICE: |
$27.00 |
|
DECALS: |
See Review |
|
REVIEW : |
|
|
NOTES: |
Desert Camo |
|
HISTORY |
The M1A1/2 Abrams main battle tank is manufactured by General Dynamics Land Systems (GDLS). The first M1 tank was produced in 1978, the M1A1 in 1985 and the M1A2 in 1986. 3,273 M1 tanks were produced for the US Army. 4,796 M1A1 tanks were built for the US Army, 221 for the US Marines and 555 co-produced with Egypt. 77 M1A2 tanks have been built for the US Army, 315 for Saudi Arabia and 218 for Kuwait. For the M1A2 Upgrade Program, 1079 M1 Abrams tanks are being upgraded to M1A2 configuration. (see below for references)
|
THE KIT |
 Believe it or
not- this was my first tank kit. I wanted to try something different and picked
this kit up on ebay for a good price. I know that any Tamiya kit offers a good
building experience and also wanted to "practice" some new weathering
techniques that I had read about from other builders on M2 and in FSM magazine.
Believe it or
not- this was my first tank kit. I wanted to try something different and picked
this kit up on ebay for a good price. I know that any Tamiya kit offers a good
building experience and also wanted to "practice" some new weathering
techniques that I had read about from other builders on M2 and in FSM magazine.
The kit is molded in tan plastic and as you would expect, offers great detail. It is a good size model too- the main body of the tank is about 8 inches long and about 4 inches wide. Tamiya supplies realistic, hard rubber tracks that fit into the wheels snugly.
I started building on a rainy Connecticut weekend (lots of those recently) and finished up rather quickly. Along the way, I got to try out some new techniques and to practice some others I need to perfect.
|
CONSTRUCTION |
Actual building time of the kit was only about 3 hours. All parts fit well and there was no need of filler. Some sanding was needed but that’s about it. There are 14 road wheels to assemble using Tamiya’s familiar polycap set up to attach to the chassis. The only tricky step is attaching the tracks. The instructions call for a hot screwdriver to melt the 4 attachment pegs for a secure bond of the soft vinyl/ rubber. I used CA glue and it worked fine. You do need to stretch the track about an inch to fit it over the wheels. I decided to glue the tracks, let the CA set-up fully, and then stretch them over the wheels. Luckily, the CA held firm and it was accomplished without breaking anything.
The completed turret assembly takes the most building time-- with the addition of the ammo cans, hatches, grab handles, etc. You also get a mesh cut out to fit into the rear crew cage. The kit also includes clear plastic cutouts for the driver’s observation post.
|
PAINT & MARKINGS |
 I decided to do the Desert Camo
scheme mostly because I had a can of Testor’s Modern Desert Sand lying around
that never be used otherwise! I skipped the Primer because there were no seams
to clean and thought the Sand color would cover the tan without a problem.
I decided to do the Desert Camo
scheme mostly because I had a can of Testor’s Modern Desert Sand lying around
that never be used otherwise! I skipped the Primer because there were no seams
to clean and thought the Sand color would cover the tan without a problem.
After the paint had dried, the assembly was finished by slotting the turret in place, which allows it to rotate freely. Two pieces of stretched black sprue were used as antennas. The few decals were applied and it was on to the experimentation phase of weathering…
A tank kit is a great subject for practicing wear and tear on a model. It is one of the skills I need to improve—I think I can build a decent kit but I want to take the next step and learn to simulate a real world vehicle, aircraft or ship.
The first thing I did was to grind up on sandpaper various "earthy" chalk pastels from yellow to tan to a darker brown. This dust was mixed up on a piece of cardboard. I then used one of my many old hardened brushes to mix around the dust. My goal was to simulate sun fading and paint wear on the tank’s main sand color. The dust is used by smudging it into the flat paint surface. It is a subtle procedure that is built up slowly. After a few seconds of rubbing the brush over the surface, you begin to see the pastels take effect. I dipped the brush back into the dust for more and kept going over the major panels of the tank. Later on I used what was left to brush on this "dirty sand" mixture on the tracks and road wheels.
The next step was to highlight
certain areas with a "wash." I have read so much about using a wash
but very seldom is it exactly clear on how to do this without making a mess.
Here’s what I did: I have this bottle of grey and black paint that I have
built up over the years to which I added a healthy dose of
 thinner. This water
thin concoction is my standard wash. I used a thin brush, dipped it in the wash,
and tried to touch the tip to a panel line. Capillary action will draw the
mixture along the crack or panel. I also did this for the numerous screens and
exhaust covers to simulate a screen. Any overflow was cleaned up with a q-tip.
thinner. This water
thin concoction is my standard wash. I used a thin brush, dipped it in the wash,
and tried to touch the tip to a panel line. Capillary action will draw the
mixture along the crack or panel. I also did this for the numerous screens and
exhaust covers to simulate a screen. Any overflow was cleaned up with a q-tip.
Further weathering was done with dry-brushing. I wanted to simulate wear by using a steel color to show chipped paint in high wear areas like hatches, exhausts, tank tracks, etc. I dipped a wide brush in steel paint, brushed most of it off, then ran this lightly over the tracks and other areas to show scuffing and chipping of the sand paint.
The final touch is a black pastel dust. This is used to show exhaust and gun stains and to shade other areas that need more depth.
I was happy with my results and with what I learned.
|
CONCLUSIONS |
This kit was a fun weekend build. It went together very easily and looks great on the real sand base I made. It offered me a great opportunity to try a full range of weathering techniques. In short, it’s a kit with typical Tamiya quality, detail, and fun factor.
|
REFERENCES |
http://www.army-technology.com/projects/abrams/
http://www.tacom.army.mil/gcss/pmabrams/vehicles/m1a1char.htm
Copyright ModelingMadness.com
If you would like your product reviewed fairly and quickly, please contact the editor or see other details in the Note to Contributors.
Back to Reviews Page 2018