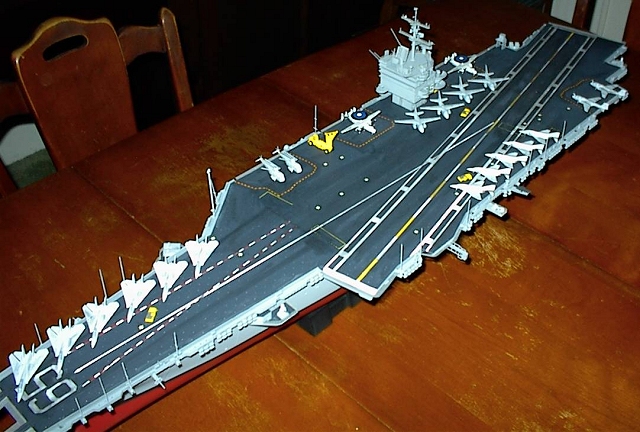
FLIGHT DECK PAINTING and WEATHERING:
The kit does not provide any decals for the flight deck except for a handful of what I think are observation “bumps” for the catapult operators. The modeler is faced with painting the deck but a little help can be found in the Gold Medal Models 1/350 Ship Decals set which offers some of the safety striping that would be a nightmare to mask.
Over the course of a week, I masked off the “runway” using plain Scotch clear tape taking extra care to keep the lines straight! I brushed on flat white in two coats foregoing the airbrush because I thought the result would look too “clean.” The same methods were applied to paint the “65” on the bow and the other deck stripes.
 The tie-down pad
eyes were another challenge. The first time I built this kit, I used a pointed
toothpick dipped in white paint-- it worked OK but there were many mistakes
made with too much paint flowing off the toothpick. This time, I tried one of
my wife’s paint pens. These are just like a roller point pen only they use real
paint. Luckily, she had a light grey! Holding the pen straight up, just a
touch to the raised line tie down worked perfectly. I cut the goofs to a
handful and finished in half the time.
The tie-down pad
eyes were another challenge. The first time I built this kit, I used a pointed
toothpick dipped in white paint-- it worked OK but there were many mistakes
made with too much paint flowing off the toothpick. This time, I tried one of
my wife’s paint pens. These are just like a roller point pen only they use real
paint. Luckily, she had a light grey! Holding the pen straight up, just a
touch to the raised line tie down worked perfectly. I cut the goofs to a
handful and finished in half the time.
I cut the red and yellow safety decals from the GMM sheet and applied them around the elevators. The deck has these molded in raised lines so I used Solvaset to help the decals snuggle down.
Once all the painting was done, it was time to weather the deck. I had a bunch of pictures for reference and went to work. First a light sanding to deaden the paint. Then it was a healthy dusting of chalk pastels using mostly black but with a touch of greys and even some browns and reds to simulate stains and rust. Focusing on the landing area, I really tried to scuff up this heavily worn patch. I went a little more than satisfactory because when the dull coat is laid on top of this- it lightens some of the effect.
AIR WING:
I had high hopes for making a detailed air wing using PE details, decals and drilling out exhausts, etc. I succeeded in some areas and failed in others.
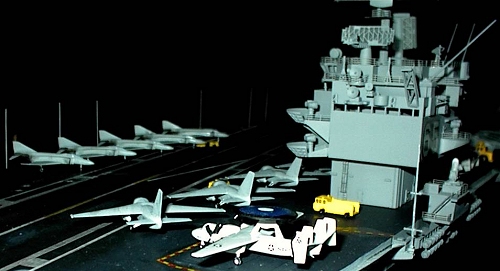
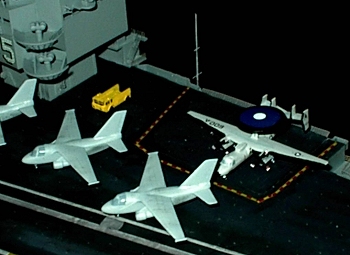 The first task was
two E-2C Hawkeye AWACS planes. These are little kits in themselves. I was able
to substitute brass replacement propellers and these look much better than the
over-thick and incorrect plastic ones. I also used the tailhook from the Tom’s
Modelworks set. This set also provides tiny brass gear doors and wheels but I
had a heap of trouble with these. Cutting them off their fret left tiny points
which had to be sanded off or they would stick out and look silly. Well after
trying various methods to hold the part while sanding failed. After the first 5
were launched into the netherworld of my carpet- I decided to skip the gear
door operation. Ditto for the wheels. The GMM decals do add a lot however-
the kit only provides insignia and the “NAVY” decals. The GMM set provides
canopies, tail, nose, and specific aircraft decals. In high-viz gull grey over
white- I think these look great.
The first task was
two E-2C Hawkeye AWACS planes. These are little kits in themselves. I was able
to substitute brass replacement propellers and these look much better than the
over-thick and incorrect plastic ones. I also used the tailhook from the Tom’s
Modelworks set. This set also provides tiny brass gear doors and wheels but I
had a heap of trouble with these. Cutting them off their fret left tiny points
which had to be sanded off or they would stick out and look silly. Well after
trying various methods to hold the part while sanding failed. After the first 5
were launched into the netherworld of my carpet- I decided to skip the gear
door operation. Ditto for the wheels. The GMM decals do add a lot however-
the kit only provides insignia and the “NAVY” decals. The GMM set provides
canopies, tail, nose, and specific aircraft decals. In high-viz gull grey over
white- I think these look great.
Next up were five F-4S Phantom II’s. I drilled out the exhausts and
 managed to keep my fingers
whole. Here is a tip for anyone using a mini-Dremel for this: use the low
setting and don’t push. Too fast and the plastic melts leaving you a deformed
exhaust. Tailhook brass was added and the GMM canopies look super. Light Ghost
Grey lightened with white allows the decals to be visible.
managed to keep my fingers
whole. Here is a tip for anyone using a mini-Dremel for this: use the low
setting and don’t push. Too fast and the plastic melts leaving you a deformed
exhaust. Tailhook brass was added and the GMM canopies look super. Light Ghost
Grey lightened with white allows the decals to be visible.
Four S-3 Vikings followed. Drilling out the intakes on the big engines make these jets look very polished.
Two S-3H Sea King choppers next with the folded rotors. I tried using the brass blades but I made a shambles of these delicate pieces as well as managing to invent a few new vulgarities. Again, the GMM decal sets add a lot to these choppers.
Two EA-6B Prowlers and I was determined to use the brass refueling probes…I got these on with no problems along with the tailhooks.
Finally, I turned to six F-14 Tomcats- canopy decals went on fine with
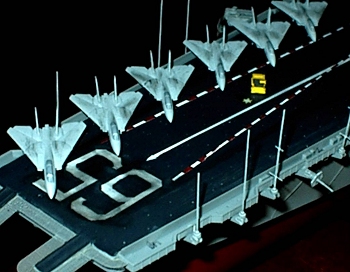 Solvaset. Tail and nose decals
helped. I drilled out the exhausts on these planes and went very slow here as
well to avoid melting the plastic. Only had to scrap 1 F-14!
Solvaset. Tail and nose decals
helped. I drilled out the exhausts on these planes and went very slow here as
well to avoid melting the plastic. Only had to scrap 1 F-14!
I then used some black and grey pastel chalk to lightly weather up the planes especially the Tomcats and Prowlers. I couldn’t have them look too clean…Then I closed up the aircraft shop for now. At some later date, I’ll go back and build a few more aircraft but for now this complement will do!
FINAL DETAILS:
The last of the decals were applied to the island and stern. I used the wife’s
silver paint pen to simulate the light bulbs that illuminate the “65” on the
port side of the island. PE railing was installed around the ship. Props were
painted gold and the non-skid portions of the sponsons were touched up. The
CIWS and Sea Sparrow launchers were painted and installed. As of
 yet, the hose reels are still
absent- I need to get away from this model for a while before I can start that
tedious task!
yet, the hose reels are still
absent- I need to get away from this model for a while before I can start that
tedious task!
The kit supplied stand was assembled and a drybrushing of gold brought out the lettering. The Big “E” is resting on top of my two display cases in a custom built acrylic display case. I love showing it off to guests but can’t seem to convince the wife to display it downstairs…go figure.
Anybody who has questions on building this kit- drop me a line…I’d be happy to chat with you.
REFERENCES:
http://www.fas.org/man/dod-101/sys/ship/cvn-65.htm
http://www02.clf.navy.mil/enterprise/
http://www.steelnavy.com/CVN65.htm
for a pretty good list of the kit’s shortcomings, click here:
http://www.quuxuum.org/rajens_list/shiprevs.html#TamiyaCVN65